Panasonic Lumix DMC-TZ20 / ZS10
-
-
Written by Gordon Laing
Intro
 |
Like its predecessor, the TZ20 / ZS10 features a built-in GPS receiver which records location and local time details for each image and stores them in the standard EXIF header. Again like the TZ10 / ZS7 before it, the GPS information is also exploited by an internal database which can match-up co-ordinates to display the name of the Country, State and City, along with nearby landmarks like museums, churches, stations, airports, temples, sports grounds and tourist locations. The earlier TZ10 / ZS7 featured over half a million landmark entries, which the new TZ20 / ZS10 extends to over one million.
The next major upgrade regards the screen. It’s still a 3in panel with 460k resolution for nice, detailed images, but like many of Panasonic’s new cameras, it’s now touch-sensitive.
Unsurprisingly the resolution of the camera has increased from the 12.1 effective Megapixels of its predecessor to 14.1 Megapixels. More important than a boost in resolution though is a change in sensor technology. Up until this point, the TZ / ZS series employed CCD sensors, but now the TZ20 / ZS10 features a MOS sensor, which allows it to support 1080i movie recording and much faster continuous shooting.
The earlier TZ10 / ZS7 could shoot a paltry three frames in its best quality mode at a leisurely 2.3fps. Now the TZ20 / ZS10 can shoot up to 15 full resolution frames at no less than 10fps, or at 5fps with continuous AF; you can alternatively drop to 2.5 Megapixels and shoot at 60fps; there’s even a 220fps option at a much reduced QVGA resolution for slow motion playback. A less-mentioned, but very welcome additional benefit of a MOS sensor is the elimination of annoying vertical streaks in very bright areas on video. This is something which plagues CCD-based models like the TZ10 / ZS7.
Completing the picture are a selection of new modes, including 3D image capture and Handheld Night Shot, which stacks a burst of images to reduce noise.
In the face of tough increasingly competition from Sony and Canon in the compact super-zoom market, Panasonic has clearly pulled out all the stops for its latest travel zoom. The specification sounds great on paper, but of course the big question is whether it can live up to its promise in practice. Read on to find out in our full review!
Panasonic Lumix DMC-TZ20 / ZS10 design and build quality
At first glance, the new Lumix TZ20 / ZS10 looks very similar to its predecessor. It shares essentially the same styling, albeit with a curved reshaping of the front grip. It’s 2mm wider and 2mm shorter, but shares the same thickness, and with just one gram between them (219g with battery), it’s fair to say the weight is much the same too.
Viewed from above, you’ll find the same small bulge in line with the lens for the GPS receiver, with stereo microphones to its right. The mode dial is in the same position, but with minor adjustments we’ll mention later in the review, while the shutter release button and power switch also share the same space as before. The only major change on the top surface is a new dedicated video record button, relocated from the rear of its predecessor.
 |
Round the back, the TZ20 / ZS10’s controls mostly mirror the earlier TZ10 / ZS7, with the only major change again being the relocation of the video record button to the top surface. The four cross keys of the TZ10 / ZS7 have been replaced by a circular rocker, but the function remains the same: push up to set exposure compensation, push right for flash options, push down to set the Macro mode and left to adjust the self-timer. Below this remain the same two buttons which cycle through the Display options and fire-up the super-imposed Q.Menu. Above and to the right you’ll find the Exposure button, now by itself, but still offering the same control of aperture and shutter speed in the relevant modes.
 |
In the top right corner Panasonic has chosen to stick with a switch to set the camera between record and play – and our opinion of it remains unchanged. We’d prefer to have a play button instead as a prolonged press and hold could power the camera straight into playback, while a half-press of the shutter release could exit into record mode. Unfortunately as it stands, it’s easy to leave the switch set to play, then miss a spontaneous photo opportunity as a result – we found ourselves regularly powering-up the camera only to wonder for a few seconds why the screen showed a previous photo rather than a live image even with a press of the shutter. This approach feels less intuitive to us, although becomes more familiar over time. It is however revealing to see Panasonic gradually adopting the Play button approach of its rivals in this regard with models like the Lumix LX5.
|

In your hands, the TZ20 / ZS10 remains a relatively chunky compact that’s better suited to trouser and coat pockets rather than the one on the front of a shirt. It’s important to put this in perspective though, as there’s plenty of compacts which share similar dimensions yet have zoom ranges three to four times lower; indeed passers-by will still give the camera a double-take when you tell them it has a 16x optical zoom.
The build quality, like previous Lumix compacts, is excellent. The metal body feels confidently solid with no creaks or poor joins. As before, the camera bulges on the right side to provide a grip. This has been subtly reshaped on the TZ20 / ZS10, but still forces the tips of your right fingers to press up against a relatively slippery surface, although the bulge of the grip itself and the raised dots on the rear for your thumb still allow you to hold the camera pretty securely; just be careful with any thumbs or fingers straying onto the screen as they could unintentionally operate the touch controls. The TZ20 / ZS10 is available in black, silver, blue or red, and the optional DMW-MCTZ20 underwater casing can protect the camera to depths of up to 40m.
With essentially the same body, it’s not surprising to find the Lumix TZ20 / ZS10 also powered by the same battery as its predecessor: the DMW-BCG10E. The quoted number of pictures under CIPA conditions has however decreased from the 300 of the TZ10 / ZS7 to 260 shots here, and neither take GPS into account. We’ll discuss the impact of GPS operation on battery life later in the review. As always Panasonic warns of using third-party batteries from non-certified companies, but doesn’t explicitly say whether the TZ20 / ZS10 will automatically block them or not. We didn’t have access to any third-party batteries so can’t comment on their compatibility.
The battery compartment also houses an SD memory card slot, and alongside the door, gratifyingly near the centre of the body, is a metal tripod thread. The TZ20 / ZS10 is compatible with the SDXC format to support cards bigger than 32GB. You’ll need a card rated at Class 4 or higher to successfully record video in the AVCHD mode, or at Class 6 or higher to support video in the Motion JPEG mode. We used a Lexar Professional 16GB SDHC 133x model in our tests which is rated as Class 10 and worked fine with all the movie modes. SanDisk’s Ultra III and Extreme cards are also rated as Class 6, so should be a great match for the TZ20 / ZS10; note the cheaper Ultra II cards are only Class 4, so while fine for still photography and AVCHD movies on this camera, will be too slow to support the Motion JPEG mode. See the movie section below for further details.
Behind a small flap on the right side of the body are a combined AV / USB socket and a mini HDMI port; the former works with the supplied TV and USB cables. Enabling the Viera Link option allows the camera to be operated across HDMI by compatible Panasonic HDTVs and their remote controls; there’s no comment on support for CEC for other brands of TVs though. Note the HDMI port isn’t active during composition, and neither it or the composite output are active while filming a video – so it’s not possible to monitor the output on a bigger screen while actually recording video, although to be fair, this won’t be an issue for many people.
Panasonic Lumix DMC-TZ20 / ZS10 lens and stabilisation
The headline feature of the Lumix TZ20 / ZS10 remains its broad optical zoom range, and after two earlier generations sharing the same 12x range, Panasonic has chosen to upgrade the new model with a broader 16x range. Yes, broader, not just longer: the new lens features a 24-384mm equivalent range, making it fractionally wider and noticeably longer than the 25-300mm of its predecessor. This is a very welcome extension to the range, and allows you to easily capture expansive views at one moment, before zooming-in to grab distant detail in the next. It’s a powerful and compelling range to have at your disposal in a pocketable camera.
The closest focusing distance remains 3cm. You can see an example of the coverage below, and further examples of how you can use it in our Sample Images Gallery.
Panasonic Lumix DMC-TZ20 / ZS10 coverage wide | Panasonic Lumix DMC-TZ20 / ZS10 coverage tele | |
 |  | |
| 4.3-68.8mm at 4.3mm (24mm equivalent) | 4.3-68.8mm at 68.8mm (384mm equivalent) |
The TZ20 / ZS10’s 16x range sits jointly at the top of the current crop of compact super-zooms. Sony’s latest Cyber-shot DSC-HX9 shares exactly the same 16x / 24-384mm range, although the cheaper Cyber-shot HX7 has stuck with the same 10x / 25-250mm range of the earlier HX5. Meanwhile Canon also felt the 14x / 28-392mm range of its earlier SX210 IS was perfectly sufficient for its latest SX220 HS / SX230 HS models.
So Panasonic and Sony have taken a joint lead in compact super-zoom ranges, sharing a massive and very useful 24-384mm zoom. Technically Canon’s lens zooms 8mm longer at the telephoto end, but this is barely noticeable in practice. However at the wide end, the 4mm advantage of the Panasonic and Sony ranges makes a significant difference in coverage, capturing a significantly wider area.
The lens extends upon power-up with the camera showing an image in just under two seconds, and responding to controls a fraction later – it’s not the quickest by any means, but rarely holds you back. A rocker around the shutter release operates the dual-speed zoom with 40 steps between wide and telephoto, and little if any lurching between them. Push the rocker gently and the TZ20 / ZS10 will take about six seconds to zoom from full wide to tele, while a full push will do it in around three. Note to minimise the sound of the zoom motor while filming, there’s only one speed offered once you start recording and it takes a leisurely nine seconds or so to complete the full range; see more details in our movie mode section below. You can alternatively zoom the lens at either speed using touch-screen controls, or immediately go to the wide or telephoto extremes of the range.
Panasonic Lumix DMC-TZ20 / ZS10 Image Stabilisation off / on | ||
 |  | |
100% crop, 4.3-68.8mm at 68.8mm, 1/20, 100 ISO, IS off | 100% crop, 4.3-68.8mm at 68.8mm, 1/20, 100 ISO, IS on | |
Like all Panasonic cameras, the Lumix TZ20 / ZS10 employs optical image stabilisation – that’s pretty essential on a compact with a minimal grip and a 384mm equivalent telephoto. Like its predecessor, the TZ20 / ZS10 employs Panasonic’s latest Power OIS system, claiming up to four stops of compensation. Unlike its predecessor though, you no longer have the choice of stabilisation modes: on the TZ20 / ZS10 it’s either on or off.
Above are examples taken with and without stabilisation using the Lumix TZ20 / ZS10 fully zoomed-into its maximum equivalent of 384mm, and at a shutter speed of 1/20. Traditional photographic advice would recommend a shutter speed of at least 1/384 to eliminate camera shake, but the stabilised TZ20 / ZS10 allowed us to capture sharp handheld shots at 1/20 or even slightly below. In contrast under the same conditions we required 1/160 without stabilisation to achieve the same degree of sharpness; this corresponds to at least three stops of compensation. It’s a pretty impressive capability, and makes the long telephoto reach of the camera perfectly usable, although remember like all stabilisation systems it’ll only iron-out wobbles, not freeze a subject in motion.
Panasonic Lumix DMC-TZ20 / ZS10 screen and menus
 |
The rear surface of the Lumix TZ20 / ZS10 is dominated by a 3in / 460k pixel screen – this is the same size and resolution as its predecessor, but the big change on the new model is that it’s now touch-sensitive.
Panasonic has arguably embraced touch-sensitive screens more than any other camera manufacturer. The idea of tapping the screen to confirm settings or swiping through images during playback is something you’ll either enjoy or fail to see the point of; some may even find it less usable than traditional controls, but thankfully the TZ20 / ZS10 can be fully operated by buttons if you prefer.
Novelty aside, there are a number of genuine benefits to having a touch-screen on a camera. The most useful is without a doubt being able to tap on the subject you’d like the camera to focus on. If Face Detection is enabled you can tap on the person you’d like to have priority in a group shot, and if AF Tracking is enabled, you can tap on the subject you’d like the camera to track.
The TZ20 / ZS10 extends this concept further with a Touch Shutter option which not only focuses on what you tap at, but takes a photo of it immediately afterwards. You have to be careful not to jab so hard that the camera is shaken, but it can be a fun and quick way of grabbing a shot, especially with the camera on a tripod.
There’s also a touch-zoom option which allows you to adjust the lens focal length via the screen. Several touch-buttons are provided, allowing you to zoom slowly, quickly or straight to the widest or longest setting with a single tap.
 |  |  |
Press the Menu button and you’re presented with large icons to tap-into the various sub-menus. Meanwhile during playback you can swipe the screen to scroll through photos, along with tapping buttons to zoom-in or out. Once zoomed-in, you can also drag the image around with your finger, and perhaps in an attempt to encourage the touch-interface, it does so much more quickly than scrolling with the traditional buttons.
So far so good, but it’s not a 100% consistent experience. If you decide tapping and dragging is for you, you’ll be disappointed to find it not extending to all areas of the TZ20 / ZS10’s operation. For example, the super-imposed Q.Menu is entirely operated by buttons, and once you’ve tapped into the main menu system, you’ll also need to use the buttons to scroll through and select the options.
Similarly while you can tap an image during playback to zoom-in and back out again to the full view, you’ll need to twist the zoom ring to see the thumbnail view. Arguably worst of all, the text entry for Face Recognition and Landmark editing isn’t touch-sensitive despite the on-screen keypad being redesigned with chunky fingertip-sized ‘buttons’. Throughout the TZ20 / ZS10’s operation there’s a continued reliance on traditional buttons and levers which had us gradually forget about the touch options altogether. Indeed after a while of non-use, it can come as some surprise when the AF area changes due to an inadvertent touch of the screen – and watch out for that too, as it’s easy for your right thumb to stray onto the screen and reset the focusing area to the side without you knowing.
At this point it’s also worth mentioning the screens of the competition. The Sony Cyber-shots HX7 and HX9, along with Canon’s PowerShot SX220 HS and SX230 HS all sport 3in screens, none of which are touch-sensitive, but there are important differences to weigh-up. Sony’s opted to equip its latest pair of compact super-zooms with higher resolution 921k panels for a more detailed view, while Canon has matched the 460k resolution of the Panasonic, but with a wider 16:9 aspect ratio that’s ideal for filming HD video, but significantly cropped when shooting or playing 4:3 shaped images.
 |
Like previous Panasonic models, the TZ20 / ZS10 offers quick access to common shooting options via a drop-down menu that’s super-imposed along the top of the screen when you press the Q.Menu button. Pressing the left and right buttons highlight particular headings, after which you use the up and down buttons to select the desired option from a drop-down list. Depending on the shooting mode, this allows you to quickly and easily adjust aspects like the GPS, burst and AF modes, White Balance, Sensitivity, Quality and LCD mode. With no separate movie mode on the mode dial, you can also set the video quality here. Note as mentioned above, this interface is entirely operated by buttons rather than the touch-screen.
The direction buttons double-up outside of the Q.Menu to offer direct adjustments over the exposure compensation (and bracketing), flash, self-timer and macro modes.
While shooting, the Display button switches between three modes: a clean view of the image, one with alignment guides (switchable between a grid and a cross), and shooting information with either the remaining shots or remaining video recording time; both of the latter views also show the GPS location details, see section below. A live histogram can also be enabled in the Setup menus if desired.
 |  |  |
 |  |
During playback, the DISP button cycles between a clean view and ones with GPS landmark details (but not actual co-ordinates) or shooting information, the latter including a brightness histogram if it’s been enabled in the menus. Sadly unlike Canon’s compacts, the TZ20 / ZS10 still doesn’t employ its orientation sensors to automatically rotate portrait images to fill the screen when the camera’s turned to the side during playback. You can however make slideshows based on content or location (thanks to the GPS-tagging), or perform tweaks in playback including fine rotation.
Panasonic Lumix DMC-TZ20 / ZS10 exposure modes
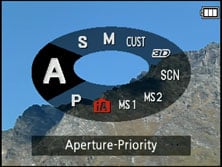
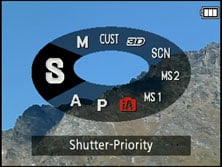
Like its predecessor, the Lumix TZ20 / ZS10 offers a wealth of shooting options via the main mode dial and a selection of on-screen sub-menus. Impressively, these include full manual control over exposures. While manual exposure control on a compact lacks the impact of a DSLR (at least when it comes to depth-of-field anyway), it can be useful in other areas which we’ll discuss in a moment.
 |  |  |
 |
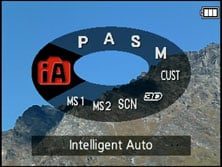
The TZ20 / ZS10 inherits most of its predecessor’s mode dial options, including Program, Manual, Aperture and Shutter Priority, along with a newly enhanced Intelligent Auto, but the earlier Clipboard position has now been switched for a new 3D capture mode which we’ll describe later.
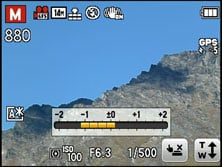
The lens may have changed, but like its predecessor the TZ20 / ZS10 still offers seven aperture settings (when zoomed-out) and the ability to adjust them in Aperture Priority or Manual modes. Switch to Shutter Priority and you can choose from exposures between 1/4000 and 8 seconds, with Manual further extending the maximum to an impressive 60 seconds. To make changes to the aperture or shutter, just press the Exposure button on the back of the camera, and then use the cross-keys to adjust the setting highlighted in yellow at the bottom of the screen; there’s no touch-control over exposure. Unlike its predecessor, there doesn’t appear to be any restriction over shutter and aperture combinations, so it is possible to use the maximum aperture of f3.3 with the fastest shutter speed of 1/4000.
 |  |  |
Like most compacts though, there are caveats involving the usefulness of manual exposure control. Most notably, the inherently large depth-of-field in most compacts, including this one, means it’s hard to achieve a blurred background on portraits even with the aperture wide open. Your best bet is to zoom all the way-in, position the subject close and the background as far away as possible. Macro shots allow a shallower depth-of-field, but neither these nor portraits will come close to the blurred background effect you can enjoy with a DSLR or a mirrorless ‘EVIL’ camera.
To illustrate the depth-of-field control of the Lumix TZ20 / ZS10 in a macro environment, we photographed a still-life arrangement in a cafe and focused on the front edge of the coffee cup; this was positioned 5cm from the camera, with the lens set to its widest focal length of 4.3mm (24mm equivalent). We chose to shoot this composition with the lens zoomed-out in order to access the maximum range of apertures from f3.3 to f6.3.
As you can see below, there’s virtually no visible difference between the two images shot with the aperture wide open and fully closed when viewed at a reduced size. You really need to view both images at or close to 100% to see any difference at all in depth-of-field. We tried several other compositions at a variety of focal lengths and distances in an attempt to maximise the depth-of-field effect, but the example below remained the most effective. The bottom line is while the minor change in depth-of-field does indeed confirm the presence of a physical iris, it ultimately has minimal impact on the visible depth-of-field in practice. A handful of specialist compacts sporting f2 apertures or faster enjoy greater control over depth-of-field, but again it’s nowhere near the blurring effect that’s possible on a DSLR or EVIL camera. The bottom line is if you really want a significantly blurred background, you’ll either need to go for a DSLR / EVIL compact, or consider digital blurring.
Panasonic Lumix DMC-TZ20 / ZS10: Depth-of-field in Aperture Priority | ||
 |  | |
| Aperture Priority: f3.3, 4.3-68.8mm at 4.3mm (24mm equivalent) | Aperture Priority: f6.3, 4.3-68.8mm at 4.3mm (24mm equivalent) | |
 |  | |
| Above: 100% crop taken from f3.3 sample | Above: 100% crop taken from f6.3 sample | |
On a more positive note though, Aperture Priority does allow you to select the optimum f-number to avoid diffraction, although we’re pleased to report the TZ20 / ZS10 in Program or iA modes tends to automatically select the best setting. Shutter Priority also lets you choose deliberately slower-than-normal exposures to blur moving action, such as waterfalls or racing vehicles. You can find out how to achieve these effects in our Blurring Action and Photographing Water tutorials. Meanwhile, full Manual lets you choose combinations of aperture and shutter which go way beyond normal metering or compensation ranges, allowing you to achieve massive under or over-exposures. You can also choose very long exposures with ease. So while the presence of Aperture Priority doesn’t guarantee portraits with blurred backgrounds, the provision of manual exposure controls remains a useful feature.
The PASM modes are joined by Intelligent Auto, a pair of MyScene modes, SCN, Custom and a new 3D option on the dial, more of which in a moment. You’ll note there’s still no Movie mode on the dial, because like its predecessor you can start recording in any mode at any time by simply pressing the dedicated record button on the top.
 |  |
Intelligent Auto on the Lumix TZ20 / ZS10 combines Panasonic’s latest technologies to deliver a pretty foolproof experience. Like earlier models, these include Intelligent ISO and Scene Detection which both do a good job of figuring out what you’re trying to take and whether the subject’s in motion. In practice this works very well, with the camera automatically recognising and switching between portraits, landscapes, close-ups, night scenes (with or without people) and sunsets. If Face Recognition is enabled and spots a previously registered under-three year old, it’ll switch to Baby mode, and if a night scene is recognised without a tripod, the camera can opt for the new Handheld Night Shot mdoe, more of which in a moment. The camera’s also good at detecting motion and increasing the sensitivity if necessary to maintain a quick shutter to avoid blurring – great when photographing unpredictable children, although obviously the quality reduces quickly at higher ISOs.
 |
 |
Turning the dial to SCN lets you choose from 30 Scene Presets which include a High Dynamic option and the new Handheld Night Shot mode. The High Dynamic scene preset simulates the effect of true HDR photography with a single frame, digitally boosting shadow areas while attempting to retain bright highlights; you also have the choice of applying Standard, Art or Black and White effects.
The HDR preset employs the same technique as Intelligent Exposure but with two or three times the effect. This approach is however far from ideal, as significant brightness adjustments to a single exposure normally incurs loss of quality, such as increased noise in those shadow regions. This is further accentuated by the preset operating at a fixed sensitivity of 400 ISO. In use the High Dynamic preset can noticeably boost the shadow areas, albeit with increased noise artefacts when viewed at 100%. As such it’s best-reserved for small prints or emailed photos.
New to the TZ20 / ZS10 and arguably far too important to be hidden away in the SCN menu amongst pet and food presets is the Handheld Night Shot mode. Undoubtedly inspired by Sony’s Handheld Twilight mode, this captures a burst of images before automatically combining them into a single image in an attempt to reduce noise or camera shake. Like Sony’s system, it operates completely automatically with no control over exposure or sensitivity. Unlike Sony’s system though, it appears to capture more frames in a burst: Panasonic doesn’t supply details, but by analysing a sound recording, we heard ten frames being captured, compared to six on Sony’s Handheld Twlight, and four on Canon’s own Handheld Night Scene version.
Judging from the results, it looks like it can effectively reduce noise at high ISOs and to show it in a variety of conditions we’ve dedicated a whole results page to it. We’ve got a quick preview below, but for full details, see our Panasonic Lumix TZ20 / ZS10 Handheld Night Shot results page.
Panasonic Lumix TZ20 / ZS10 Program at 400 ISO, 100% crop | Panasonic Lumix TZ20 / ZS10 Handheld Night Shot at 400 ISO, 100% crop | |
 |  | |
| 100% crop, f3.7, 1/8, 400 ISO | 100% crop, f3.7, 1/8, 400 ISO |
New to the Lumix TZ20 / ZS10 is 3D photo capture, selected from a dedicated position on the mode dial. Traditionally this would require twin lenses, but inspired no doubt by Sony, Panasonic has developed a means by which a single lens can generate a 3D image.
 |
 |
Like Sony it achieves this by analysing a burst of images taken while moving the camera, and using parallax changes to generate depth information. Two files are subsequently recorded: a conventional 2 dimensional JPEG for normal viewing, and an MPO file which contains the depth information and typically measures around 2MB. When connected to an ‘MPO-compatible’ 3DTV over an HDMI connection, both files are interpreted into a single 3D image; all commercial 3DTVs we’ve seen are MPO compatible. Unlike commercially produced 3D content though, the images produced by Sony and Panasonic’s single lens cameras only contain depth which extends ‘behind’ the screen, rather than in front of it.
The practical approach and image options from Sony and Panasonic are also slightly different. Sony’s 3D Panorama function grabs its images in an arc, whereas Panasonic’s 3D mode requires you to simply move the camera horizontally in a straight line; it recommends a shift of around 10cm in around four seconds for the best success.
While both cameras take a burst of images during the motion, Panasonic only takes the two most appropriate to generate a 3D image. The Lumix TZ20 / ZS10 can also only generate 3D images measuring 1920×1080 pixels (Full HD 1080), whereas the Sony models additionally offer wider panoramas which slide across the screen during playback.
In use, it’s hard not to pan the TZ20 / ZS10 in an arc rather than sliding it horizontally as requested by the manual, but both approaches will generate a 3D image. We connected the Lumix TZ20 / ZS10 to a 55in Samsung LED 9000 (model UA55C9000 courtesy of Smiths City in Queenstown) and found images captured in an arc certainly generated a 3D effect, but it was generally not as refined as those captured in a straight line as recommended.
Like Sony’s single-lens 3D capture, you could peer around objects to a certain extent and there was certainly a convincing impression of depth conveyed – although again it only extended behind the screen, not in front of it. We’ve included two samples – albeit shown here in 2D – where the effect worked particularly well.
Panasonic Lumix TZ20 / ZS10 3D capture (2D JPEG file shown below) | Panasonic Lumix TZ20 / ZS10 3D capture (2D JPEG file shown below) | |
 |  | |
| Camera shifted horizontally during capture. | Camera shifted horizontally during capture |
The Lumix TZ20 / ZS10 inherits the Intelligent Resolution (IR) capabilities of its predecessor, which apply greater sharpening to images, and if i.ZOOM is also enabled, allow the camera to digitally extend its zoom from 16x to 21x. To put this to the test, we photographed the same scene fully zoomed-in first with the normal settings, followed by Intelligent Resolution, then with i.ZOOM extending the range.
Panasonic Lumix TZ20 / ZS10 Maximum zoom with IR disabled | Panasonic Lumix TZ20 / ZS10 Maximum zoom with IR and i.ZOOM enabled | |
 |  | |
| Uncropped image, 16x, 384mm equivalent | Uncropped image, 21x, 504mm equivalent. |
Above left is an image taken at the maximum zoom with IR disabled, while above right shows the image taken at the maximum zoom with IR and i.ZOOM enabled. When viewed at the reduced size above, the latter certainly delivers an effective boost to magnification, but how does it look at 100%? To find out we took three sets of crops with IR disabled, IR enabled, and both IR and i.ZOOM enabled. The cropped areas are marked with red squares in the image above left and pictured below.
TZ20 / ZS10 normal shooting | TZ20 / ZS10 with Intelligent Resolution (IR) | TZ20 / ZS10 with IR and i.ZOOM | ||
 |  |  | ||
 |  |  | ||
 |  |  | ||
100% crop, 4.3-68.8mm at 68.8mm, 100 ISO | 100% crop, 4.3-68.8mm at 68.8mm, 100 ISO | 100% crop, 4.3-68.8mm at 68.8mm, 100 ISO |
Judging from the crops above, Intelligent Resolution with i.ZOOM certainly isn’t delivering any greater detail, and if anything the scaled-up view just makes the noise and noise reduction artefacts more obvious – and lest we forget, the image here was taken at 100 ISO under bright sunny conditions. As you’ll discover in our results pages, the Lumix TZ20 / ZS10 is not the camera for you if you like to examine very clean samples at 100% on-screen. But when viewed at reduced size or on smaller prints, the output looks fine and the i.ZOOM feature certainly gives you more reach in-camera. Just don’t look closely, that’s all.
Note: i.ZOOM isn’t just for still photos. It can also be applied to movies, and since even a 1080 HD frame only measures 2 Megapixels, it works a lot better. See Movie Mode section below.
Panasonic Lumix DMC-TZ20 / ZS10 focusing and face detection
The Lumix TZ20 / ZS10 is equipped with five main AF modes which can be manually selected in the PASM modes, or left to the camera to choose from in auto. First is Face Detection, which can detect and track human faces. This now works alongside Face Recognition, which can memorise up to six people (using one to three poses) along with their names and birthdays if desired. Once registered, these faces can have focusing priority over ‘strangers’, and it’s also fun to see their name popup under the tracking frame, although unforgiveable that the phone keypad style of text entry for names isn’t touch-sensitive. If the subject’s age is less than three years old, the camera will also automatically switch to its Baby scene preset in auto modes.
 |  | 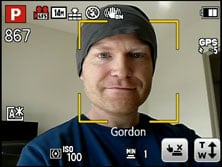 |
In practice it really works too, and is fairly tolerant of accessories like hats, although sunglasses can fool the system. The touch-screen also allows you to simply tap on the face you’d like to give priority.
The second AF mode is AF Tracking, which is essentially like face detection for non-human subjects. This allows you to place a target over a subject, after which the TZ20 / ZS10 will track it across the frame and adjust its focus as required. Again, it’s possible to tap on the desired subject using the touch-screen.
Next up comes the standard 23-area AF system, which the TZ20 / ZS10 defaults to in the absence of recognisable faces in the auto modes. The fourth AF mode is single-area, which as its name suggests, just uses one area for quicker response. Gratifyingly you can use the touch-screen to reposition this area almost anywhere on the image, although watch out for your thumb straying onto the edge of the screen and doing this by mistake. The fifth option is spot focusing, which works the same way as single-area, but unsurprisingly with a much smaller square; again this can be repositioned by tapping on the desired part of the image.
 |  |  |
The ability to set face or tracking options by touch, or simply to tap on the desired area to focus, is a killer aspect of the touch-screen. It gives the Lumix TZ20 / ZS10 a key advantage over cameras with traditional screens. The focusing speed is pretty snappy too. It may not be in the same league as the Lumix GH2, but given a subject with sufficient contrast, the TZ20 / ZS10 will lock onto it in under a second.
Panasonic Lumix DMC-TZ20 / ZS10 GPS features
 |
The Lumix TZ20 / ZS10 inherits the built-in GPS receiver of its predecessor, which allows it to record location and time details for each image and store them in the standard EXIF header. These can then be cross-referenced by a built-in database of landmarks to display location information, or simply used by mapping software on your computer later. The main GPS implementation on the TZ20 / ZS10 is essentially the same as predecessor, although the landmark database has roughly doubled and there’s now also the chance to select from a list of nearby landmarks should the camera get it wrong; sadly there’s still no elevation data recorded though.
Several 2011 super-zoom compacts now sport GPS capabilities alongside the Lumix TZ20 / ZS10, including Sony’s Cyber-shot HX9 and Canon’s PowerShot SX230 HS. What sets the Panasonic apart from the competition though is its internal location database. All of these cameras can embed GPS co-ordinates into image headers for later use, but only Panasonic additionally exploits them in-camera to actually tell you where you are, or where the picture was taken.
Once the Lumix TZ20 / ZS10 has locked onto the GPS signal, it can cross-reference the co-ordinates against its internal location database to display the name of the Country, State and City on-screen. The camera’s database also features over one million landmarks (roughly double that of the TZ10 / ZS7) spread across 73 countries, including museums, churches, stations, airports, temples, sports grounds and tourist locations, which are also displayed if desired. You can choose how much or little area information is displayed from the database, although purists may be disappointed they’ll still have to delve into the GPS menus to actually view raw co-ordinates and satellite details; they’re sadly not viewable in playback at all. For that you’ll need to read the image header either manually or with mapping software later.
 |  |  |
There’s more than one way to implement GPS on a camera, but if you’ve used a receiver before, you’ll probably have two major concerns at this point: first is the time taken to acquire a location after powering-up (after all, are you likely to wait for a couple of minutes before taking a shot just for the co-ordinates to appear), and second is the impact the receiver will have on battery life. Panasonic has given this a great deal of thought and offers three GPS modes as a solution.
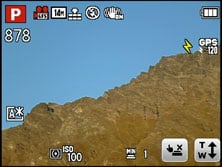
The default GPS ON mode addresses potentially slow acquisition times by actually running most of the time, even when the camera is switched off. When the camera is switched on, we believe positioning is performed every five minutes, and when it’s switched off, positioning is performed every 15 minutes; you know when this is happening because a small green light by the GPS bulge on top of the camera illuminates. This approach means the camera stands a good chance of knowing where it is when you switch it on to take a photo, and in practice we found it generally took between five and 20 seconds to confirm its new position. In the meantime, the previous confirmed position is displayed.
Of course this ‘always-on’ approach raises concerns over battery consumption, but the TZ20 / ZS10 is intelligent enough to stop the search under a number of conditions. If positioning has not been successful for two hours after power-off, it’ll give up. Likewise if the camera’s not been switched on for three hours, it’ll stop the search. And if the battery indicator falls to one bar, it’ll automatically stop searching to prevent itself from running down.
Alternatively if you’d like greater control over the GPS, there’s two other modes to choose from. Flight mode, indicated by a plane, only starts positioning when the camera’s switched on, and stops the process when powered-off. The plus-side is knowing exactly when the GPS is operating, but the downside is taking anything up to a few minutes to re-acquire your position. Finally, there’s an OFF option which deactivates the GPS altogether.
 |  |
Despite initial concerns over the default GPS option, it once again became our preferred choice when using the TZ20 / ZS10. If you’re regularly taking photos throughout the day, the TZ20 / ZS10 will typically find and display its location in no more than ten seconds (or 20 at a push), even if the camera’s been in a pocket or car – the times we measured for re-acquisition were roughly the same as its predecessor.
When you switch the camera on, you’ll see a GPS icon on the right of the screen with a yellow lightening symbol indicating the search is in progress. Below the icon you’ll see the number 5, 60, or 120, indicating the number of minutes since the last confirmed location; if the camera displays 120- it’s been over two hours since acquisition. Then when the symbol turns white, you’re locked-on. During the re-acquisition process the camera displays the last known location, which can look a little odd if you’ve significantly moved-on since then, so unless you’re going to miss a spontaneous opportunity, it’s worth waiting for the symbol to turn white.
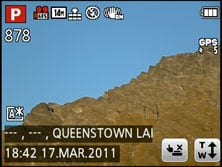
In addition, while rivals only display co-ordinates from their GPS, the Panasonic cross-references them with its internal database to display a place name. This region and landmark information on the TZ20 / ZS10 may sound like a novelty, but it’s great fun to see places named on-screen, not to mention being useful. Even in familiar places the camera can teach you a thing or two about local landmarks, such as the official names of churches or a sports club you weren’t aware of – and the larger database of the TZ20 / ZS10 was certainly reflected by many more place-names displayed around our home region of Queenstown New Zealand than its predecessor. Of course a system which displays landmark names by location can be tripped-up by overlap or simply covering a large area. As such, you may need to move around a park, zoo or golf course before its name is revealed, while anything close to a known landmark will often display its name instead.
For example, before revealing the name of a local golf course we had to drive through the greens to the actual clubhouse, while photos taken in a bar near to a church displayed the church’s name. In another example, a church we confirmed was in the database from earlier photos was later mis-identified as a tennis club. The TZ20 / ZS10 does however offer several options to edit the landmark information in playback.
In a welcome upgrade over its predecessor, the TZ20 / ZS10 now offers a ‘Candidate’ option during playback which presents a list of alternative landmarks located nearby; if the right one is on the list simply select it and the camera will associate that name with the image instead. In the case of the church mis-identified as a tennis club, we found the correct name in the Candidate list and replaced it on the image – see screen shots below.
 |  |  |
In other cases where the landmark doesn’t exist in the database at all, you can create a new name for it using manual text entry. We did this for the bar which was mistakenly displaying the name of a nearby church instead – see below. This process is the same as the TZ10 / ZS7 before it, although Panasonic has swpaped the on-screen Qwerty keyboard for a mobile phone keypad arrangement with nice large ‘buttons’ – see below. At this point you’d understandably be forgiven for trying to tap-in the characters using the touch-screen, but in a bizarre decision, you can only do it using the rocker control. This is the same as the text entry for names in Face Recognition mode.
 |  |  |
Surely the change to a chunkier mobile phone style keypad was in preparation for a touch-interface, so we can only assume it was somehow forgotten and left out in this firmware (1.0) version. It’s a terrible shame as every time you press the rocker to select a new character, you can’t help but get increasingly annoyed at Panasonic for not implementing a touch interface for text-entry instead. Still at least there’s the new Candidate list for alternative landmarks and that’s a welcome update over its predecessor.
Ultimately it’s important not to worry too much about the displayed place names though as they’re not actually recorded in the image files. The TZ20 / ZS10 is simply matching the reported GPS co-ordinates with a database of names during capture or playback, and while the result may not always match-up or show what you were expecting, you still have the raw GPS time and location details to work with later.
Note, the database is not upgradable, so any landmarks built after December 2010 won’t be named on your screen. Again though (aside from geographic border changes) you will always have the correct country, state and city details automatically displayed, and you can manually enter your own landmark name on the photo if desired for internal cataloguing. And remember you’ll always have the raw GPS co-ordinates in the image data. So consider the place names as a fun bonus.
As for battery life, GPS has an inevitable impact, although perhaps not as much as you fear. In our tests a full charge was good for a couple of days of regular stills and movie shooting with positioning enabled, although once the battery indicator reached one bar, it wasn’t long before it expired altogether. The moral is to recharge every night or two if you’re regularly taking photos, or switch off the GPS if you’re away from mains electricity and don’t have a spare. And like all GPS receivers, coverage may be limited or unavailable in densely wooded areas or when surrounded by tall buildings; Panasonic also warns it may not be available in and around China.
Ultimately if all you want are co-ordinates embedded in your images, you could achieve the same results by using a separate handheld GPS with geo-tagging software later (see our forum tutorial), but the TZ20 / ZS10 has the benefit of doing it all in-camera, with the bonus of displaying place-names. It’s convenient and great fun.
Panasonic Lumix DMC-TZ20 / ZS10 Movie mode
|

 |
 |
After several generations of compacts which offered a maximum of 720p, Panasonic has finally upgraded the latest TZ20 / ZS10 with Full HD 1080i capabilities. Like its predecessor, you have the option of encoding movies in the AVCHD or Motion JPEG formats (although 1080i is only available in AVCHD), along with providing a dedicated record button, stereo microphones and the chance to adjust the optical zoom while filming; the TZ20 / ZS10 also now lets you take still photos while filming, albeit in a 16:9 shape and resolution of 3.5 Megapixels, and thanks to its MOS sensor, the vertical streaking of highlight areas which plagued its predecessors is mercifully absent. Note to support AVCHD, you’ll need to use an SD memory card rated as Class 4 or quicker, while to support Motion JPEG, you’ll need Class 6 or faster; we confirmed the 1080i AVCHD option worked fine on Class 4 SanDisk Ultra II cards.
Set the TZ20 / ZS10 to AVCHD and you have the choice of GFS, FSH, GS and SH quality options. GFS and FSH both record in 1080i, while GS and SH record in 720p; the difference is the GFS and GS modes additionally include GPS location details which are absent on the FSH and SH versions. You may prefer to record AVCHD movies without GPS data to maximise their compatibility.
All four AVCHD modes encode their video at the same rate of 17Mbps. GFS and FSH take a 50 or 60fps output from the sensor (depending on region) and encode 1920×1080 video in a 1080i interlaced format at 50i or 60i respectively. GD and SH take a 50 or 60fps output from the sensor and encode 1820×720 video in a 720p progressive format at 50p or 60p respectively. There’s no way to change the frame rate on the camera. Note the earlier TZ10 / ZS7 sensor output 25 or 30fps and scaled it up to 50p or 60p for its AVCHD 720p mode. To illustrate the difference between the resolving power of the 720p and 1080i AVCHD modes we filmed the same scene at each quality setting and took screen grabs before then taking 100% crops below. There may or may not be some scaling involved in generating the 1080i image, but there’s definitely finer detail recorded in the lower right crop.
Panasonic Lumix TZ20 / ZS10 720p AVCHD crop | Panasonic Lumix TZ20 / ZS10 1080i AVCHD crop | |
 |  | |
| 100% crop from 720p image | 100% crop from 1080i image |
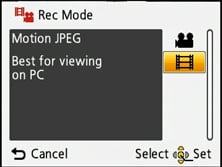
Set the TZ20 / ZS10 to Motion JPEG mode and you can choose from three resolutions: HD (1280×720 / 16:9), VGA (640×480 / 4:3) and QVGA (320×240 / 4:3), all recorded at a fixed quality setting and at a frame rate of 30fps regardless of geographic region.
Like its predecessor, the choice of encoding formats for HD video seems a little odd at first, but there’s compelling reasons for having both. As before, Motion JPEG has the advantage of easier editing, while AVCHD allows smaller files (roughly half the size at the same 720p resolution), longer recording times, stereo sound and the possibility of playback on compatible Panasonic TV sets, although again beware of the GPS option reducing compatibility.
Smaller file sizes are always handy, but the major benefit of choosing AVCHD is the potentially longer recording times. Motion JPEG files on the TZ20 / ZS10 are restricted to 2GB in size, which limits the HD mode to clips lasting about 7 minutes and 40 seconds each. In contrast, switching to the AVCHD mode allows you to keep recording uninterrupted until you run out of memory or battery life in 720p, or to one second shy of half an hour in 1080i. Fit an 8GB card and you could record 720p for an hour. We confirmed this on our model, by recording uninterrupted for just over 38 minutes before the two-thirds-full battery gave up the ghost.
Note we tested a Lumix TZ20 from New Zealand so can’t comment on whether European TZ20’s suffer from a half hour restriction in all AVCHD modes (due to tax reasons), and conversely whether a North American ZS10 can record 1080i beyond half an hour. But even where half hour restrictions are in place, it’s still a lot longer than the eight minute maximum of HD in Motion JPEG mode.
Another difference worth noting between the two formats is their location on the card itself. Motion JPEG ‘MOV’ files may be found alongside your still photos in the DCIM folder, but the AVCHD ‘MTS’ files are buried away in various nested folders which start with one unhelpfully labelled PRIVATE on your card. This is to ensure compatibility with Panasonic’s TVs and Blu Ray playback software on computers. That said, it’s also easy to play the MTS files in standard programs – we had no issues watching them with Windows Media Player 12. Either way, just remember to copy the MTS files out of this nested PRIVATE folder before reformatting your card. Note the manual warns Mac owners won’t be able to copy AVCHD MTS files from the camera over a direct USB connection, so will need to use a card reader instead.
Here are a selection of sample videos filmed with the Panasonic Lumix DMC-TZ20 / ZS10 using its best-quality 1080i AVCHD mode; our sample came from a PAL region, so the videos are encoded at 50i. Registered members of Vimeo can download the original files by clicking the links below each window; these take you to the Vimeo page where the video is hosted and the link to download the actual file can be found under the ‘About this video’ section in the lower right.
| |
|---|---|
|
Our first clip, above, was a handheld pan and zoom with the Lumix TZ20 / ZS10, and as always we started by filming bright reflections on the rippling water. On the previous TZ10 / ZS7, saturated highlight areas like these would cause undesirable vertical streaking – a problem which faces all cameras sporting CCD sensors. With the new TZ20 / ZS10 though, it’s no longer a problem thanks to its MOS sensor. Before even looking at the image quality, this will be considered by many to be a major upgrade, as the earlier TZ10 / ZS7 was frequently plagued by vertical streaks, spoiling many clips.
Moving onto the rest of the video, the jump to 1080i resolution delivers a large and detailed image, and the camera’s stabilisation does a good job of ironing-out most wobbles. Towards the end of the clip we zoomed all the way in and panned around the scene. During this section, you’ll see the image jump back and forth a little – while some of this is due to panning with optical stabilisation, most is down to the operator’s own camera-shake. Note, we found the TZ20 / ZS10’s Active stabilisation mode actually delivered worse results in this respect, but your mileage may vary depending on your type of shake. If you have a steadier hand, the results can look great.
We had Continuous AF enabled for this and the other clips, and the TZ20 / ZS10 does a good job at keeping the image sharp during pans and zooms. It drifts a little from time to time, but not significantly. We also filmed a similar sequence moments later using the 720p Motion JPEG mode – you can view it and download the original version at Lumix TZ20 / ZS10 Motion JPEG sample.
| |
|---|---|
|
For our second clip, above, we mounted the TZ20 / ZS10 to a tripod to test its full zoom range, and this time we enabled i.ZOOM in the Intelligent Resolution section of the main recording menu. This extends the 16x optical zoom to a digitally-enhanced 21x range.
The camera does a great job of transitioning between the optical and digital zoom, maintaining the speed and minimising any gap between them; indeed if you’re not really paying attention you may not even notice the join, but the clue is a very brief pause almost at the end of the zoom. The quality with i.ZOOM at the maximum magnification also looks much better in video than with stills – indeed unlike our still photo comparison earlier on the page, the scaling is barely noticeable here. This is because even at 1080i, you’re looking at working on a much more forgiving 2 Megapixel frame with plenty of spare pixels in and around it on the sensor, compared to using the full 14 Megapixel resolution for stills. As such, i.ZOOM delivers a useful boost to the range when filming with barely if any loss in quality.
During the zoom, the camera has to refocus and the TZ20 / ZS10 again does a good job. There’s a little visible drifting, but it’s better than many cameras we’ve seen. The bottom line is any drifting is quickly corrected for a sharp image.
Arguably the biggest problem with this clip is the image shifting a little while the camera zooms in and out. It becomes more obvious when mounted on a tripod and can be distracting. Clearly it’s a compromise of packing a big zoom range into a small body. As such, it’s more forgiving to film zooms with the camera handheld where any wobbles can hide the shifting effect.
| |
|---|---|
|
For our final clip, above, we tried the Lumix TZ20 / ZS10 in the dim environment of a bar. Interestingly, when set to any of the PASM modes, this clip was consistently underexposed, even with the ISO set to a high value or automatic; it was as if the camera had a safety ceiling for video sensitivity beyond which it couldn’t increase the gain any further. The solution here was to set the camera to Intelligent Auto, after which any clips were filmed at the desired brightness.
Unfortunately, the clip itself suffers from a high degree of noise and processing artefacts which mar it for full-screen playback. On the upside though, the TZ20 / ZS10 keeps the focus in check, with little if any drifting to worry about. And towards the end where the brightly backlit window comes into view, there’s none of the vertical streaking which plagued its predecessor.
Returning to the subject of zooming while filming, the TZ20 / ZS10 slows its motor right down to minimise operational noise, taking a leisurely 11 seconds to go from one end of the range to the other. If you’re filming in absolute silent conditions, you’ll still hear the motor whirring very faintly, but in our outdoor footage it was generally masked by ambient noise levels, with a much bigger issue being the sharp sound if you quickly let go of the spring-loaded zoom rocker. Comparing footage shot with the TZ10 / ZS7, the new model made a similar amount of operational noise. Slowing down the zoom also gives the TZ20 / ZS10 a decent shot at maintaining sharp focus, and as illustrated in the examples above, it does a fairly good job even when zooming all the way in and back out again repeatedly.
The stabilisation also does a good job at ironing out the wobbles while filmimg, although sometimes the image would jump a little sideways when handholding at the longest focal lengths; this is more to do with our own shake though than the TZ20 / ZS10’s ability to counteract it. There’s also an Active Mode option, designed to deal with more significant shake when walking while filming. In our tests though it proved more susceptible to the sideways jumping mentioned earlier, so we rarely used it. Note it is not possible to disable stabilisation while filming, but in our tripod-based tests it didn’t prevent smooth pans.
| ||||||
Like many compacts with (C)MOS sensors, the Lumix TZ20 / ZS10 also sports a slow motion video mode which drops the resolution to greatly increase the frame rate – here to 320×240 pixels at 220fps. These recordings are then played back at 30fps, revealing the action taking place over seven times slower than normal.
Files are encoded in Motion JPEG, and again the limit is a file size of 2GB, which should give you just over seven minutes worth of recording. No audio is recorded in this mode, and the optical zoom is also locked once you start filming; stabilisation is also disabled.
The reduction in resolution to QVGA is disappointing, but the High Speed Movie mode is still capable of capturing some neat action clips. We’ve shown one left of the Shotover Jetboats zipping past. The clip is pictured at 100%, so is shown here at its maximum size without any scaling.
 |
So far so good, but the movie mode on the TZ20 / ZS10 isn’t without a few issues. First of all, the dedicated record button may allow you to quickly start filming without turning a dial, but it also means the screen may not be set up to show the 16:9 frame (for the wide recording options), forcing you to quickly readjust the composition once recording begins. You can choose to superimpose 16:9 guidelines in advance, but these are distracting for normal 4:3 composition. To be fair though this is a compromise which faces all cameras which record stills and video of different shapes.
As mentioned earlier, choosing the GPS tagging for AVCHD files can render them less compatible with other devices, and we found the Active stabilisation option could occasionally jerk the image when fully zoomed-in, depending on the degree of shake. But overall the video experience with the TZ20 / ZS10 remains very satisfying, especially with 1080i video and the elimination of vertical streaking thanks to a CMOS sensor – the latter alone will be enough to tempt many existing TZ / ZS owners into upgrading.
Panasonic Lumix DMC-TZ20 / ZS10 drive modes
The Lumix TZ20 / ZS10 offers a wide variety of continuous shooting options, and thanks to its MOS sensor, some of them are very fast. The earlier TZ10 / ZS7 could only shoot three full-sized Fine JPEGs at 2.3fps. In stark contrast, the new TZ20 / ZS10 can capture 15 full-sized Fine JPEGs at 10fps.
The 10fps mode locks the focus, white balance and exposure with the first shot, but reduce the speed to 5fps (or 2fps if you prefer), and you can enjoy continuous autofocus with adjustable white balance and exposure, not to mention up to 100 pictures in a sequence.
If however you feel the need for speed and 10fps isn’t quick enough, you can drop the resolution to 5 Megapixels and shoot at 40fps for up to 60 frames, or down to 2.5 Megapixels for a 60 shot burst in just one second. Understandably the focus, exposure and white balance are all locked in these modes.
 |  |  |
To put the various modes to the test we fitted the Lumix TZ20 / ZS10 with a freshly-formatted Lexar Professional 16GB SDHC 133x Class 10 card and started timing various modes. With the camera set to 10fps mode, we fired-off 12 JPEGs in the 14M Fine setting in just under 1.3 seconds, corresponding to a rate of just over 9.3fps. Reducing the speed to 5fps with AF, we managed 16 frames in 4.5 seconds before the camera briefly stalled, corresponding to a rate of around 3.5fps; it would then continue in sporadic bursts.
Switching to the 40 and 60fps modes turns to a silent electronic shutter; the former delivered (no more than) 50 shots in 1.6 seconds (31 fps), while the latter captured 60 shots in much the same time (37fps). After each burst, the camera displayed the card-writing icon for up to ten seconds. During this time you could still fire-off more images, but in smaller bursts until the buffer was completely cleared.
In each case our TZ20 / ZS10 may have delivered speeds which were slower than quoted, but it remained very swift, especially compared to its predecessor. The main 10fps mode managed over 9fps at the best quality setting for 12 frames, which is pretty impressive. The fastest modes may have only recorded just over a second and a half worth of action, but covered it with 50 or 60 frames for incredibly detailed slow motion analysis. If you’re happy to drop to 320×240 pixel resolution, remember there’s also the High Speed Movie option which shoots at 220fps.
These all add up to an impressive array of options at your disposal and we couldn’t wait to try them out in the field – or rather, by the river with a trip to see Queenstown’s famous Shotover Jet boats in action. We tried each of the continuous shooting modes with the speeding boats and found the 5fps option most practical for following longer periods of action. For short bursts, the 10, 40 and 60fps modes all grabbed their shots in a period of between one and two seconds, forcing you to wait until exactly the right moment before shooting, lest you miss some of the later action. You can see a sequence below at 10fps, and check out our Sample Images Gallery for some downloadable shots using this and the quicker modes.
Panasonic Lumix DMC-TZ20 / ZS10 Continuous shooting at 10fps | ||||||||
 |  |  |  |  | ||||
 |  |  |  |  | ||||
But the bottom line is while its predecessors would plod away in slow and tiny bursts under the same conditions, the new TZ20 / ZS10 really can be used to capture fast action events. It’s a significant upgrade, although one which was necessary in the face of Sony’s CMOS-equipped compact super-zooms.
Finally in terms of self-timer, the TZ20 / ZS10 offers the usual 2 or 10 second modes without any frills. Canon’s recent compacts out-gadget these facilities with customisable self-timer and face timer modes, the latter cleverly exploiting face detection to wait for a new person to enter the frame, smile or wink before starting the countdown.
Panasonic Lumix DMC-TZ20 / ZS10 sensor
The Lumix TZ20 / ZS10 is equipped with a 14.1 Megapixel MOS sensor measuring 1/2.33in. This gives the TZ20 / ZS10 two extra Megapixels over its predecessor and actually matches the specification of the sensor in the Lumix FZ100; we confirmed with Panasonic they are the same part.
The use of a MOS sensor represents a significant change in the TZ / ZS series which previously used CCD sensors. The major benefit of a MOS sensor is faster data readout, which in the TZ20 / ZS10 allows higher resolution video and faster continuous shooting than its predecessor; the technology also avoids vertical streaking in highlight areas which often plagued video on earlier CCD-based models. All of these benefits have been proven above.
It’s not all good news though as the adoption of a MOS sensor in the earlier Lumix FZ100 resulted in soft and fuzzy output with the default settings. By tweaking the noise reduction of in-camera JPEGs or processing RAW files on that model we discovered the softness could be reduced, but at the cost of greater visible noise. Unfortunately while the TZ20 / ZS10 shares the same sensor as the FZ100, it’s lacking any adjustment over noise reduction or the ability to record RAW files. Basically you’re stuck with the default image processing parameters for in-camera JPEGs. Check our results pages to see if Panasonic has managed to wrangle better quality from the TZ20 / ZS10’s default settings than the FZ100.
 |
 |
 |
|

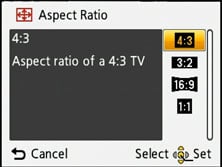
Another point to note is the multi-aspect ratio capability of its predecessor is also missing here. The earlier TZ10 / ZS7 actually featured a 14.5 Megapixel sensor, but only captured images with a maximum effective resolution of 12.1 Megapixels. The extra pixels around the edges of the frame were used to maintain the angle of view and avoid cropping at different aspect ratios. So with the camera zoomed-out, you could enjoy 25mm coverage whether you were shooting in 4:3, 3:2 or 16:9 aspect ratios. Shoot the same scene with each aspect ratio and you’d see the wider modes may capture less vertically, but more horizontally.
In contrast, the new TZ20 / ZS10 abandons this innovative approach for a more traditional way of implementing different aspect ratios: it simply crops horizontal strips from full sized images, thereby gradually losing vertical resolution and field of view as the aspect ratio widens. To be fair, this is no different from rival cameras, but it’s a shame to lose the capability with the switch to MOS technology.
So the maximum quality is when shooting in the native 4:3 aspect ratio of the sensor, whereupon the TZ20 / ZS10 delivers images with 4320×3240 pixels. Switch to 3:2 or 16:9 aspect ratios and the image height shrinks to 2880 or 2432 pixels respectively, while an additional 1:1 mode records at 3232×3232 pixels.
In each aspect ratio, four lower resolutions are available, and JPEGs can be recorded with Fine or Normal compression; no RAW mode is available. Set to 14M Fine mode, images typically measure around 5.5MB each, and Panasonic includes 18MB of internal memory to get you started. The TZ20 / ZS10 actually starts with more memory, but much of it is already consumed by the internal database for the GPS system. You can delete the landmark database, but considering this is a non-reversible choice which only frees up a few Megabytes, we’d recommend leaving the camera as it stands and simply fit a decent card sooner rather than later. Once again the camera is compatible with SD, SDHC and the latest SDXC cards, although for a smooth HD movie recording experience go for at least Class 4 (for AVCHD files) or at least Class 6 (for Motion JPEG files).
A new sensor means a new sensitivity range, with the TZ20 / ZS10 offering 100 to 1600 ISO at the full resolution, and a High Sensitivity Scene Preset automatically working between 1600 and 6400 ISO depending on conditions – albeit at a greatly reduced resolution of 3.5 Megapixels (in 4:3 mode).
To see how the quality of the Lumix TZ20 / ZS10 measures-up in practice, take a look at our real-life resolution and high ISO noise results pages, browse the sample images gallery, or skip to the chase and head straight for our verdict.


