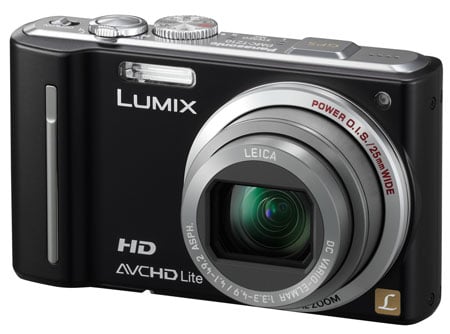
Panasonic Lumix DMC-TZ10 / ZS7
-
-
Written by Gordon Laing
Intro
Panasonic’s Lumix DMC-TZ10 (or ZS7 as it’s known in North America) is the latest model in the company’s enormously popular travel zoom series. Announced in January 2010, one year after the best-selling Lumix TZ7 / ZS3, the new model inherits the same 12x optical zoom, compact body and detailed 3in screen of its predecessor, along with its 720p HD movie modes with the choice of AVCHD Lite or Motion JPEG encoding formats.
New to the Lumix TZ10 / ZS7 are manual control over exposures, improved image stabilisation and, the ultimate travel companion, a built-in GPS receiver to pinpoint the locations of your shots and ensure the clock is always telling the right time; the camera even includes a database of over half a million landmarks allowing you to identify many of your photos. There’s also an inevitable boost in resolution, this time to 12.1 Megapixels (effective). The core premise of its predecessors remains the same though: packing a flexible super-zoom lens range into a pocketable compact camera.
The headline feature of the Lumix TZ10 / ZS7 remains its broad optical zoom range, and despite sharing the same lens as its predecessor, its impact remains undiminished. The TZ10 / ZS7 boasts a 12x zoom range taking you from an ultra-wide equivalent of 25mm to a serious telephoto equivalent of 300mm, allowing you to capture expansive landscapes, cramped interiors or big group-shots at one moment, before zooming-in to grab distant detail in the next. It’s a powerful and compelling range to have at your disposal in a pocketable camera.
 | |
Another unnecessary boost in resolution aside, the built-in GPS, manual controls and improved stabilisation are all worthy enhancements to one of the best-selling cameras of 2009, but the questions are how well they work and whether the image and video quality measure-up in practice.
The market has also moved-on, and recognising the popularity of pocketable super-zooms, Panasonic now finds itself with a number of key rivals, most notably Canon’s PowerShot SX210 IS, Sony’s Cyber-shot DSC-HX5 and Nikon’s COOLPIX S8000 – all are new 2010 models and all are targeting the same buyers. Find out in our review whether Panasonic still has a winner on its hands.
Note: like previous generations, the TZ10 / ZS7 was launched alongside a cheaper sister model, the TZ8 / ZS5. Both models share the same body, 12x optical zoom and 12.1 Megapixel effective resolution, but the TZ8 / ZS5 has a smaller and less detailed 2.7in / 230k screen and lacks the GPS capabilities and HDMI port of its pricier sibling.
The TZ8 / ZS5 will record HD movies, but only in the Motion JPEG format, which means it misses out on the longer recording times of the AVCHD option on the TZ10 / ZS7.
Panasonic Lumix DMC-TZ10 / ZS7 overview
If the video plays smoothly, but stops from time to time, simply pause the player and wait a few moments for it to buffer; you may also want to try changing the video option to 480p. If you’re accessing the video from an older computer or slower internet connection, please check out our Low Bandwidth version.
Panasonic Lumix DMC-TZ10 / ZS7 design and build quality
At first glance, the new Lumix TZ10 / ZS7 looks very similar to its predecessor and shares the same 103x60x33mm dimensions, although interestingly comes in fractionally lighter at 218g when fitted with a battery and card. Viewed from above though you’ll notice two major changes over the older model: the mode dial has been relocated to the other side of the shutter release, while a small bulge towards the left side reveals the new GPS capability; we’ll detail both later in the review.
In your hands, it remains a relatively chunky compact that’s better suited to trouser and coat pockets rather than the one on the front of a shirt. It’s important to put this in perspective though, as there’s plenty of compacts which share similar dimensions yet have zoom ranges three to four times lower; indeed passers-by will still give the camera a double-take when you tell them it has a 12x optical zoom.
 |
|
The build quality, like previous Lumix compacts, is excellent. The metal body feels confidently solid with no creaks or poor joins. As before, the camera bulges on the right side to provide a grip. This has been subtly reshaped on the TZ10 / ZS7, but still forces the tips of your right fingers to press up against a relatively slippery surface, although the bulge of the grip itself and the raised dots on the rear for your thumb still allow you to hold the camera pretty securely. The TZ10 / ZS7 is available in black, silver, blue or red, and the optional DMW-MCTZ10 underwater casing can protect the camera to depths of up to 40m.
With essentially the same body, it’s not surprising to find the Lumix TZ10 / ZS7 also powered by the same battery as its predecessor: the DMW-BCG10E. Panasonic also quotes the same 300 shot lifespan for the TZ10 / ZS7 as its predecessor under CIPA conditions, but these don’t take GPS into account. We’ll discuss the impact of GPS operation on battery life later in the review. Note Panasonic warns of using third-party batteries from non-certified companies, but doesn’t explicity say whether the TZ10 / ZS7 will automatically block them or not. We didn’t have access to any third-party batteries so can’t comment on their compatibility.
The battery compartment also houses an SD memory card slot, and alongside the door, just off-centre, is a metal tripod thread. The TZ10 / ZS7 is now compatible with the SDXC format to support cards bigger than 32GB. You’ll need a card rated at Class 4 or higher to successfully record video in the AVCHD mode, or at Class 6 or higher to support video in the Motion JPEG mode. We used a Lexar Professional 8GB SDHC 133x model in our tests which is rated as Class 6 and worked fine with all the movie modes. SanDisk’s Ultra III and Extreme cards are also rated as Class 6, so should be a great match for the TZ10 / ZS7; note the cheaper Ultra II cards are only Class 4, so while fine for still photography and AVCHD movies on this camera, will be too slow to support the Motion JPEG mode. See the movie section below for further details.
Behind a small flap on the right side of the body are a combined AV / USB socket and a mini HDMI port; the former works with the supplied TV and USB cables. The HDMI port can be configured to output 576p, 720p or 1080i signals (although AVCHD Lite movies are always output at 720p), and enabling the Viera Link option in the menus allows the camera to be operated across the cable by compatible Panasonic HDTVs and their remote controls; there’s no comment on support for CEC for other brands of TVs though. Note the HDMI port isn’t active during composition, and neither it or the composite output are active while filming a video – so it’s not possible to monitor the output on a bigger screen while actually recording video, although to be fair, this won’t be an issue for many people.
Panasonic Lumix DMC-TZ10 / ZS7 lens and stabilisation
The large optical zoom range remains the key selling point of the camera, packing super-zoom coverage into a pocketable compact. The TZ10 / ZS7 employs the same 12x optical zoom as its predecessor with a range equivalent to 25-300mm and a focal ratio of f3.3-4.9.
The TZ10 / ZS7’s broad optical zoom range gives you enormous compositional flexibility in practice, taking you from very wide angle to pretty serious telephoto. Three millimetres may not sound like much at the wide-end, but zoomed-out to an equivalent of 25mm allows the camera to capture a comfortably larger field than cameras with 28mm coverage, which is invaluable when shooting big landscapes, buildings, cramped interiors, large group shots or in situations when you literally can’t step back any further. Then a push of the zoom ring takes you to 300mm where you can grab distant details in close-up. The closest focusing distance remains 3cm. You can see an example of the coverage below, and further examples of how you can use it in our Sample Images Gallery.
Panasonic Lumix DMC-TZ10 / ZS7 coverage wide |
Panasonic Lumix DMC-TZ10 / ZS7 coverage tele | |
 |  | |
| 4.1-49.2mm at 4.1mm (25mm equivalent) | 4.1-49.2mm at 49.2mm (300mm equivalent) |
The TZ10 / ZS7’s 12x range sites inbetween the 10x range of the Sony Cyber-shot DSC-HX5 and the 14x range of the Canon PowerShot SX210 IS, but it’s important to also look at the actual focal lengths of each model. The Sony range starts with the same 25mm equivalent wide angle as the Panasonic, but ends shorter at an equivalent of 250mm. The Canon starts a little less wide at an equivalent of 28mm, but ends much longer at an equivalent of 392mm. Some will find the wider coverage of the Panasonic and Sony invaluable, while others will prefer the more powerful reach of the Canon, which works out one third longer than the TZ10 / ZS7 and over 50% longer than the HX5. Either way, all are pretty remarkable considering their compact form factors.
The lens extends upon power-up with the camera ready for action in around 2.5 seconds – not the quickest by any means, but rarely does it hold you back. A rocker around the shutter release operates the dual-speed zoom with 37 steps between wide and telephoto, and very little lurching between them. Push the rocker gently and the TZ10 / ZS7 will take about eight seconds to zoom from full wide to tele, while a full push will do it in three and a half. Note to minimise the sound of the zoom motor while filming, there’s only one speed offered once you start recording and it takes a leisurely 11 seconds or so to complete the full range; see more details in our movie mode section below.
Panasonic Lumix DMC-TZ7 / ZS3 Image Stabilisation off / on (Auto) | ||
 |  | |
100% crop, 4.1-49.2mm at 49.2mm, 1/20, 80 ISO, IS off |
100% crop, 4.1-49.2mm at 49.2mm, 1/20, 80 ISO, IS on | |
Like all Panasonic cameras, the Lumix TZ10 / ZS7 employs optical image stabilisation – that’s pretty essential on a compact with a minimal grip and a 300mm equivalent telephoto. With this new model though, Panasonic has updated the stabilisation from Mega OIS to Power OIS, claiming nearly double the compensation of the previous system.
There’s still the same stabilisation options as its predecessor though: Mode 1 which stabilises constantly for a reassuringly steady view when composing, or Mode 2 which only stabilises as you take the photo – potentially more effective, but with visible wobbling as you compose. The default Auto option switches between them depending on conditions.
Above are examples taken with and without the default Auto stabilisation using the Lumix TZ10 / ZS7 fully zoomed-into its maximum equivalent of 300mm, and at a shutter speed of 1/20. Traditional photographic advice would recommend a shutter speed of at least 1/300 to eliminate camera shake, but the stabilised TZ10 / ZS7 allowed us to capture sharp handheld shots at 1/20 or even slightly below. In contrast under the same conditions we required 1/320 without stabilisation to achieve the same degree of sharpness; this corresponds to at least four stops of compensation, confirming Panasonic’s claims that Power OIS is roughly twice as effective as Mega OIS on the earlier TZ7 / ZS3. It’s a pretty impressive capability, and makes the long telephoto reach of the camera perfectly usable, although remember like all stabilisation systems it’ll only iron-out wobbles, not freeze a subject in motion.
Panasonic Lumix DMC-TZ10 / ZS7 screen and menus
 |
The rear surface of the Lumix TZ10 / ZS7 is dominated by the same 3in / 460k pixel screen as its predecessor – 460k corresponds to a resolution of 480×320 pixels, allowing the screen to display much finer detail than the 320×240 pixel resolution of average 230k screens, including those on the Canon SX210 IS and Sony HX5. Interestingly like its predecessor, the full benefit is seen during playback, rather than composition – although we’re pleased to report the streaking sometimes seen on older Panasonic compacts with very high contrast subjects seems less common now.
The screen remains fairly visible in bright conditions, although a Power LCD Mode offers a boost if desired. There’s also an auto option which can switch between Normal and Power modes, although the high-angle option of some older models is missing here.
 |
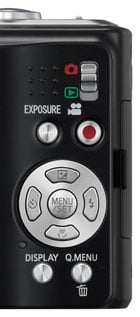
Like previous Panasonic models, the TZ10 / ZS7 offer quick access to common shooting options via a drop-down menu that’s super-imposed along the top of the screen when you press the Q.Menu button. Pressing the left and right buttons highlight particular headings, after which you use the up and down buttons to select the desired option from a drop-down list. This allows you to quickly and easily adjust aspects like the GPS, burst and AF modes, White Balance, Sensitivity, Quality and LCD mode. With no separate movie mode on the mode dial, you can also set the video quality here.
The direction buttons double-up outside of the Q.Menu to offer direct adjustments over the exposure compensation (and bracketing), flash, self-timer and macro modes.
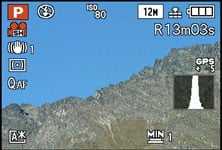
While shooting, the Display button switches between three modes: a clean view of the image, one with alignment guides (switchable between a grid and a cross), and shooting information with either the remaining shots and GPS location details or the remaining video recording time. A live histogram can also be enabled in the Setup menus if desired.
 |
 |
 |
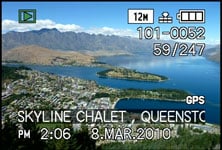 | 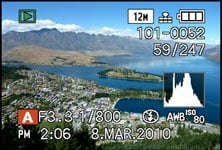 |
During playback, the DISP button cycles between a clean view and ones with GPS landmark details (but not actual co-ordinates) or shooting information, the latter including a brightness histogram if it’s been enabled in the menus. Sadly unlike Canon’s compacts, the TZ10 / ZS7 still doesn’t employ its orientation sensors to automatically rotate portrait images to fill the screen when the camera’s turned to the side during playback. You can however make slideshows based on content or location (thanks to the GPS-tagging), or perform tweaks in playback including fine rotation.
Panasonic Lumix DMC-TZ10 / ZS7 exposure modes
Up until now, exposures on the TZ series were fully automatic, and this would probably have remained the case had Canon not launched its SX200 IS in 2009 with manual controls. While manual exposure control on a compact lacks the impact of a DSLR (at least when it comes to depth-of-field anyway), this was a key specification the new Canon compact super-zoom had over the Panasonic. Not any longer though as the TZ10 / ZS7 now becomes the first model in the TZ series to offer full manual control.
 |
 |
 |
 |
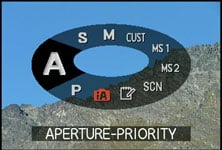
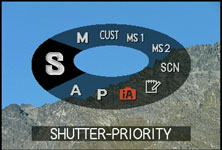
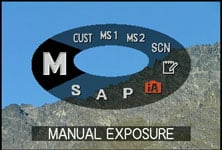
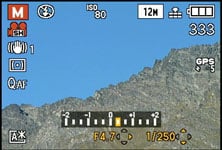
The mode dial, which also finds itself relocated to the left side of the shutter release, now offers Program, Aperture Priority, Shutter Priority and full Manual options; Program is essentially the same as the ‘Normal’ mode on earlier models, but the other new additions really do give you much more control than before.
Like its predecessor, the TZ10 / ZS7 has seven aperture settings (when zoomed-out), but now lets you adjust them yourself in Aperture Priority or Manual modes. Switch to Shutter Priority and you can choose from exposures between 1/2000 and 8 seconds, with Manual further extending the maximum to an impressive 60 seconds. To make changes to the aperture or shutter, just press the new Exposure button on the back of the camera, and then use the cross-keys to adjust the setting highlighted in yellow at the bottom of the screen.
 |
 |
 |
Like most compacts, there are some restrictions. The quickest shutter speed of 1/2000 is only available with an aperture range of f4-6.3. Drop to 1/1600 and you can open the aperture to f3.6, but for the full aperture range, the maximum shutter speed is limited to 1/1000.
Again like most compacts there are also caveats involving the usefulness of manual exposure control. Most notably, the inherently large depth-of-field in most compacts, including this one, means it’s hard to achieve a blurred background on portraits even with the aperture wide open. Your best bet is to zoom all the way-in, position the subject close and the background as far away as possible, and you can see an example under these conditions in our Gallery. Macro shots allow a shallower depth-of-field, but neither these nor portraits will come close to the blurred background effect you can enjoy with a DSLR.
On a more positive note though, Aperture Priority does allow you to select the optimum f-number to avoid diffraction. Shutter Priority also lets you choose deliberately slower-than-normal exposures to blur moving action, such as waterfalls or racing vehicles. You can find out how to achieve these effects in our Blurring Action and Photographing Water tutorials. Meanwhile, full Manual lets you choose combinations of aperture and shutter which go way beyond normal metering or compensation ranges, allowing you to achieve massive under or over-exposures. You can also choose very long exposures with ease. So while the presence of Aperture Priority doesn’t guarantee portraits with blurred backgrounds, the addition of manual exposure controls remains a valuable enhancement to the TZ series.
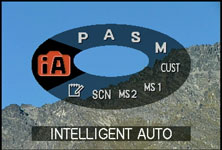
The PASM modes are joined by Intelligent Auto, a pair of MyScene modes, SCN, Clipboard and Custom options on the dial, more of which in a moment. You’ll note there’s no Movie mode on the dial, because like its predecessor you can start recording in any mode at any time by simply pressing the dedicated record button on the rear.
Making a little less sense though is the continued use of a switch which sets the camera between play and capture. Unfortunately it’s easy to leave the switch set to play, then miss a spontaneous photo opportunity as a result – we found ourselves regularly powering-up the camera only to wonder for a few seconds why the screen showed a previous photo rather than a live image even with a press of the shutter. If this were your primary camera, you’d of course learn to switch it back to capture after playback, but surely a play button which could be deactivated with a half-press of the shutter release would be quicker and more intuitive.
 |  |
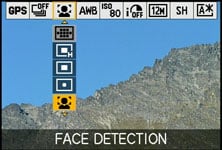
Intelligent Auto on the Lumix TZ10 / ZS7 combines Panasonic’s latest technologies to deliver a pretty foolproof experience. Like earlier models, these include Intelligent ISO and Scene Detection which both do a good job of figuring out what you’re trying to take and whether the subject’s in motion. In practice this works very well, with the camera setting itself to its Landscape preset when we pointed it at a mountain, into Macro when directed towards a close subject, then onto its Portrait preset with Face Detection when turned to people. The camera’s also good at detecting motion and increasing the sensitivity if necessary to maintain a quick shutter to avoid blurring – great when photographing unpredictable children, although obviously the quality reduces quickly at higher ISOs.
 |  |
These tricks may now be several years old for Panasonic, but remain some of the most effective on the market. Rather than rest on its laurels though the Lumix TZ10 / ZS7 enhances the Face Recognition technology first-seen on the TZ7 / ZS3, while also introducing Intelligent Resolution.
As before, Face Recognition can memorise up to six people along with their names and birthdays if desired, but in a feature inherited from the FZ35 / FZ38, the TZ10 / ZS7 can now store up to three poses for each person in order to better recognise them under different situations. Once registered, these faces can have focusing priority over ‘strangers’, and it’s also fun to see their name popup under the tracking frame. If the subject’s age is less than three years old, the camera will also automatically switch to its Baby scene preset. In practice it really works too, and is fairly tolerant of accessories like hats, although sunglasses can fool the system.
 |
 |
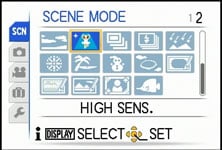
Turning the dial to SCN lets you choose from 29 Scene Presets which now include the High Dynamic option first seen on the FZ35 / FZ38. The High Dynamic scene preset simulates the effect of HDR photography with a single frame, digitally boosting shadow areas while attempting to retain bright highlights; it in fact employs the same technique as Intelligent Exposure but with two or three times the effect. This approach is however far from ideal, as significant brightness adjustments to a single exposure normally incurs loss of quality, such as increased noise in those shadow regions. This is further accentuated by the preset operating at a fixed sensitivity of 400 ISO. In use the High Dynamic preset can noticeably boost the shadow areas, albeit with increased noise artefacts when viewed at 100%. As such it’s best-reserved for small prints or emailed photos.
Finally, the two MyScene positions can be used to store and quickly access your favourite pair of presets, while Clipboard is used to record documents or memos. In PASM, MyScene or SCN modes, you can also record a five second audio memo.
New to the TZ10 / ZS7 is Intelligent Resolution, which applies greater sharpening to images, and if i.ZOOM is also enabled, allows the camera to digitally extend its zoom from 12x to 16x. To put this to the test, we photographed the same scene fully zoomed-in first with the normal settings, followed by Intelligent Resolution, then with i.ZOOM extending the range – you can see 100% crops from the same area of each photo below. Technically speaking the i.ZOOM extension inevitably doesn’t record any greater detail, but does a fair job of scaling in-camera and providing a little extra reach when ultimate image quality isn’t paramount.
TZ10 / ZS7 normal shooting |
TZ10 / ZS7 with Intelligent Resolution (IR) |
TZ10 / ZS7 with IR and i.ZOOM | ||
 |
 |
 | ||
100% crop, 4.1-49.2mm at 49.2mm, 80 ISO |
100% crop, 4.1-49.2mm at 49.2mm, 80 ISO |
100% crop, 4.1-49.2mm at 49.2mm, 80 ISO |
Pushing the upper cross-key lets you adjust exposure compensation in a +/-2EV range, while pushing up a second time in certain shooting modes presents the bracketing options. The Auto Bracket option lets you take three images up to 1EV apart, while pressing Display allows you to choose the Multi Aspect feature which takes images in 4:3, 3:2 and 16:9 aspect ratios in succession – see the sensor section towards the bottom of the page for more details.
Like earlier Lumix compacts, there’s a wide choice of AF modes. In addition to the face detection with recognition mentioned above, the TZ10 / ZS7 also sports a focus tracking option. This can effectively lock-onto and follow any object you position the cross-hairs on – like face detection for non-faces.
|

Panasonic Lumix DMC-TZ10 / ZS7 GPS features
 |
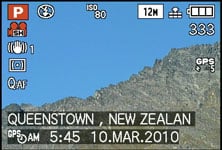
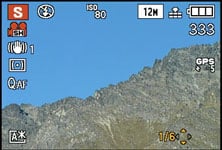
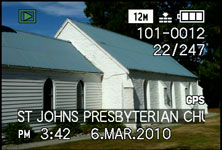
The headline new feature of the Lumix TZ10 / ZS7 is of course its built-in GPS receiver. GPS looks set to be the hot new feature of 2010, with the TZ10 / ZS7 being the second major super-zoom after Sony’s Cyber-shot HX5 to offer the facility built right into the camera. Like the Sony, GPS allows the TZ10 / ZS7 to record location and local time details for each image and store them in the standard EXIF header. This information can subsequently be read by mapping software on your computer to show exactly where and when your photos were taken – and the clock is also automatically updated by GPS to the local time, regardless of where you travel to.
The recorded GPS information isn’t just for when you get back to your computer though. Unlike the Sony HX5, the Lumix TZ10 / ZS7 can look-up its location from an internal database then display the name of the Country, State and City on-screen. The camera’s database also features over half a million landmarks spread across 73 countries, including museums, churches, stations, airports, temples, sports grounds and tourist locations, which are also displayed if desired. You can choose how much or little area information is displayed from the database, although purists may be disappointed they’ll have to delve into the GPS menus to actually view raw co-ordinates and satellite details; they’re not viewable in playback at all. For that you’ll need to read the image header either manually or with mapping software later.
While the Sony HX5 doesn’t offer placenames, it will show the GPS co-ordinates and compass direction during playback if desired, and if you browse the EXIF header, you’ll also find altitude and direction details which are sadly missing from the Panasonic. Interestingly though the Panasonic does record the number of satellites it had locked-onto at the time of taking the photo whereas the Sony does not.
 |
 |
 |
 |
 |
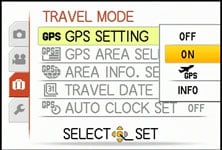
Clearly there’s more than one way to implement GPS on a camera, but if you’ve used a receiver before, you’ll probably still have two major concerns at this point: first is the time taken to acquire a location after powering-up (after all, are you likely to wait for a couple of minutes before taking a shot just for the co-ordinates to appear), and second is the impact the receiver will have on battery life. Panasonic has given this a great deal of thought and offers three GPS modes as a solution.
The default GPS mode addresses potentially slow acquisition times by actually running most of the time, even when the camera is switched off. When the camera is switched on, positioning is performed every five minutes, and when it’s switched off, positioning is performed every 15 minutes; you know when this is happening because a small light on the back briefly flashes. This approach means the camera stands a good chance of knowing where it is when you switch it on to take a photo, and in practice we found it generally took between 10 and 20 seconds to confirm its new position. In the meantime, the previous confirmed position is displayed.
Of course this ‘always-on’ approach raises concerns over battery consumption, but the TZ10 / ZS7 is intelligent enough to stop the search under a number of conditions. If positioning has not been successful for two hours after power-off, it’ll give up. Likewise if the camera’s not been switched on for three hours, it’ll stop the search. And if the battery indicator falls to one bar, it’ll automatically stop searching to prevent itself from running down.
Alternatively if you’d like greater control over the GPS, there’s two other modes to choose from. Flight mode, indicated by a plane, only starts positioning when the camera’s switched on, and stops the process when powered-off. The plus-side is knowing exactly when the GPS is operating, but the downside is taking anything up to a few minutes to re-acquire your position. Finally, there’s an OFF option which deactivates the GPS altogether.
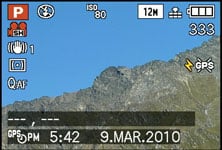 | |
Despite initial concerns over the default GPS option, it quickly became our preferred choice when using the TZ10 / ZS7. If you’re regularly taking photos throughout the day, the TZ10 / ZS7 will typically find and display its location in no more than ten seconds (or 20 at a push), even if the camera’s been in a pocket or car. When you switch the camera on, you’ll see a GPS icon on the right of the screen with a yellow lightening symbol indicating the search is in progress. Below the icon you’ll see the number 5, 60 or 120, indicating the number of minutes since the last confirmed location. Then when the symbol turns white, you’re locked-on. During the re-acquisition process the camera displays the last known location, which can look a little odd if you’ve significantly moved-on since then, so unless you’re going to miss a spontaneous opportunity, it’s worth waiting for the symbol to turn white. In side-by-side tests with the Sony Cyber-shot HX5, we found both cameras took roughly the same time to acquire a brand new location from scratch (roughly a minute or two), but the Panasonic was often much quicker to update its location when regularly powering on and off in the default mode.
In addition, while the Sony only displays co-ordinates from the GPS, the Panasonic cross-references them with its internal database to display a place name. This region and landmark information on the TZ10 / ZS7 may sound like a novelty, but it’s great fun to see places named on-screen, not to mention being useful. Even in familiar places the camera can teach you a thing or two about local landmarks, such as the official names of churches or a sports club you weren’t aware of. Of course a system which displays landmark names by location can be tripped-up by overlap or simply covering a large area. As such, you may need to move around a park, zoo or golf course before its name is revealed, while anything close to a known landmark will often display its name instead.
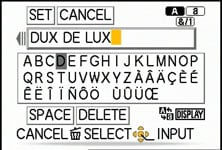
For example, before revealing the name of a local golf course we had to drive through the greens to the actual clubhouse, while photos taken in a bar near to a church displayed the church’s name. In the latter case, the TZ10 / ZS7 allows you to edit the name associated with a photo (see screengrabs below), or again simply switch off the landmark details. But it’s important not to worry too much about the displayed place names as they’re not actually recorded in the image files. The TZ10 / ZS7, along with Panasonic’s supplied PHOTOfunSTUDIO are simply matching the GPS co-ordinates recorded in the image with a database of names, and while the latter may not always match-up or show what you were expecting, you still have the raw GPS time and location details.
 |
 |
 |
Note, the database is not upgradable, so any landmarks built after February 2010 won’t be named on your screen. Again though (aside from geographic border changes) you will always have the correct country, state and city details automatically displayed, and you can manually enter your own landmark name on the photo if desired for internal cataloguing. And remember you’ll always have the raw GPS co-ordinates in the image data. So consider the place names as a fun bonus.
As for battery life, GPS has an inevitable impact, although perhaps not as much as you fear. In our tests a full charge was good for a couple of days of regular stills and movie shooting with positioning enabled, although once the battery indicator reached one bar, it wasn’t long before it expired altogether. The moral is to recharge every night or two if you’re regularly taking photos, or switch off the GPS if you’re away from mains electricity and don’t have a spare. And like all GPS receivers, coverage may be limited or unavailable in densely wooded areas or when surrounded by tall buildings; Panasonic also warns it may not be available in and around China.
Ultimately if all you want are co-ordinates embedded in your images, you could achieve the same results by using a separate handheld GPS with geo-tagging software later (see our forum tutorial), but the TZ10 / ZS7 has the benefit of doing it all in-camera, with the bonus of displaying place-names. It’s convenient and great fun.
Panasonic Lumix DMC-TZ10 / ZS7 Movie mode
The Lumix TZ10 / ZS7 inherits the exact same movie modes as its predecessor, which means Panasonic’s resisted the temptation to offer 1080p Full HD or manual exposure control on the new model. As such the best quality video remains 720p HD, although like the TZ7 / ZS3, you get the choice of encoding it in AVCHD Lite or Motion JPEG formats, along with a dedicated record button, stereo microphones and the chance to adjust the optical zoom while filming, although you still can’t take a photo without stopping the recording. Note to support AVCHD Lite, you’ll need to use a memory card rated as Class 4 or quicker, while to support Motion JPEG, you’ll need Class 6 or faster.
 |  |
 |  |
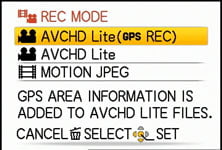
For the record, AVCHD Lite is the same as AVCHD, but only operating at 720p. There’s also now an ‘AVCHD Lite GPS’ option on the TZ10 / ZS7 which as the name suggests, tags the file with location data. Use this mode with caution though as it may render the file incompatible with devices which can play ‘normal’ AVCHD files, but aren’t expecting location data.
Like its predecessor, the choice of encoding formats for HD video seems a little odd at first, but there’s compelling reasons for having both.
As before, Motion JPEG has the advantage of easier editing, while AVCHD Lite allows smaller files, longer recording times, stereo sound and the possibility of playback on compatible Panasonic TV sets, although again beware of the GPS option reducing compatibility.
|

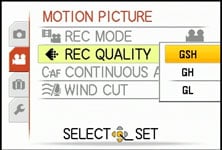
With the camera set to AVCHD Lite (with or without the GPS tagging), the resolution is fixed at 720p (1280×720 / 16:9), but with the choice of three compression settings: SH (17Mbit/s), H (13Mbit/s) or L (9Mbit/s), each prefaced by the letter G if the GPS option is enabled. If you have a ‘PAL’ model (Europe / Aus / NZ), the sensor outputs 25fps and the AVCHD files are recorded at 50p. If you have an ‘NTSC’ model (North America), the sensor outputs 30fps and the AVCHD files are recorded at 60p.
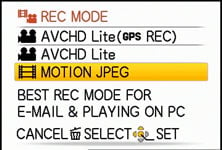
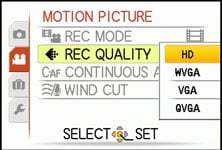
Switch the camera to Motion JPEG, you have the choice of four resolutions: HD (1280×720 / 16:9), WVGA (848×480 / 16:9), VGA (640×480 / 4:3) and QVGA (320×240 / 4:3), all recorded at a fixed quality setting and at a frame rate of 30fps regardless of geographic region.
To put them in perspective, we filmed the same 59 second sequence moments apart with both formats, with the 17Mbit AVCHD Lite and Motion JPEG versions measuring around 99MB and 219MB respectively, despite delivering roughly the same image quality. We then imported both clips into Adobe Premiere Pro CS4, and confirmed the Motion JPEG version was much more responsive when scrubbing or editing than the one using AVCHD.
Smaller file sizes are always handy, but the major benefit of choosing AVCHD Lite is the potentially longer recording times. Motion JPEG files on the TZ10 / ZS7 are restricted to 2GB in size, which limits the HD mode to clips lasting about 8 minutes and 20 seconds each. In contrast, switching to the AVCHD Lite mode allows you to keep recording uninterrupted until you run out of memory or battery life. Fit an 8GB card and you could record for an hour in the best quality setting. We confirmed this on our model, by recording uninterrupted for almost 40 minutes before the half-full battery gave up the ghost.
There is however one important caveat for the European Lumix TZ10 version, which has a maximum recording time of 29 minutes and 59 seconds per file to comply with tax regulations. But that’s still much longer than the 8 minute maximum of Motion JPEG.
Another difference worth noting between the two formats is their location on the card itself. Motion JPEG ‘MOV’ files may be found alongside your still photos in the DCIM folder, but the AVCHD ‘MTS’ files are buried away in various nested folders which start with one unhelpfully labelled PRIVATE on your card. This is to ensure compatibility with Panasonic’s TVs, and to play them on your computer, simply point your software at this folder and it’ll work out the rest; we had no issues playing back in Cyberlink’s PowerDVD 8 which ‘saw’ them as a Blu-Ray disc, or opening them directly into VLC Player. Either way, just remember to copy the MTS files out of this folder before reformatting your card.
In use the TZ10 / ZS7 delivers a very good video recording experience, and one which actually improved upon its predecessor during our tests in one important respect. The video quality itself was essentially the same as before, and as such you can expect smooth and detailed results albeit arguably a little over-cooked in terms of contrast and sharpness – but at least there’ll be no complaints about lack of vibrancy. The clip here was filmed using the Motion JPEG mode and registered members of Vimeo can download the original for evaluation on their own computers here.
Where the TZ10 / ZS7 improves over its predecessor though, at least in our tests, is when it comes to continuous autofocus. The focus on the earlier TZ7 / ZS3 often hunted or drifted while filming, especially when zooming the lens. This could be quite distracting and you can see an example here. In contrast, the newer TZ10 / ZS7 managed to minimise its focus hunting in our tests under similar conditions, as you can see in the clip here and those in our video tour. Sure there’s still a little hunting from time to time, but it’s much less of an issue than its predecessor. We’re confirming with Panasonic as to whether the system has actually been improved, or if we were just lucky with our test footage, but the bottom line is our results were much preferable in this respect.
Staying on the subject of zooming while filming, the TZ10 / ZS7 slows its motor right down to minimise operational noise, taking a leisurely 11 seconds to go from one end of the range to the other. If you’re filming in absolute silent conditions, you’ll still hear the motor whirring very faintly, but in our outdoor footage it was generally masked by ambient noise levels, with a much bigger issue being the sharp sound if you quickly let go of the spring-loaded zoom rocker. Comparing footage shot with the TZ7 / ZS3, the new model made a similar amount of operational noise. In addition to our clip here, we have two further clips which include an optical zoom throughout the entire range – once again registered members of Vimeo can download the original Motion JPEG clip and AVCHD clip for evaluation on their own computers.
 |
So far so good, but the movie mode on the TZ10 / ZS7 isn’t without a few issues. First of all, the dedicated record button may allow you to quickly start filming without turning a dial, but it also means the screen may not be set up to show the 16:9 frame (for the wide recording options), forcing you to quickly readjust the composition once recording begins. You can choose to superimpose 16:9 guidelines in advance, but these are distracting for normal 4:3 composition. To be fair though this is a compromise which faces all cameras which record stills and video of different shapes. Secondly the video can occasionally suffer from vertical streaks in areas of very high contrast, such as a bright sunlight reflecting on rippling water, although it rarely affected our test footage.
As mentioned earlier, choosing the GPS tagging for AVCHD Lite files can render them less compatible with other devices, and the updated Power OIS stabilisation could occasionally jerk the image when fully zoomed-in, depending on the degree of shake – you can see an example of this in our clip above. But overall the video experience with the TZ10 / ZS7 remains very satisfying, despite resisting the move to 1080p or offering manual exposure controls.
Panasonic Lumix DMC-TZ10 / ZS7 drive modes
The Lumix TZ10 / ZS7 offers a variety of continuous shooting options. First up is the burst mode available from the Q.Menu which can capture up to three Fine or five Standard quality JPEGs at a rate of 2.3 fps; we confirmed this rate in tests. The Unlimited Burst mode of its predecessor, which shoots until you run out of memory albeit at a slower rate, is no longer available.
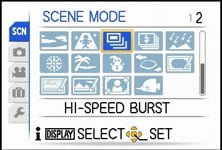 |
Like other recent Lumix compacts, the TZ10 / ZS7 is also equipped with a High Speed Burst Scene preset which reduces the resolution to 3, 2.5 or 2 Megapixels (at 4:3, 3:2 and 16:9 aspect ratios respectively) and the compression to Standard, but allows you to shoot up to 100 images at around 6fps in Image Priority, or up to 10fps in Speed Priority. Note both modes employ high sensitivities with 800 ISO not uncommon even under bright conditions.
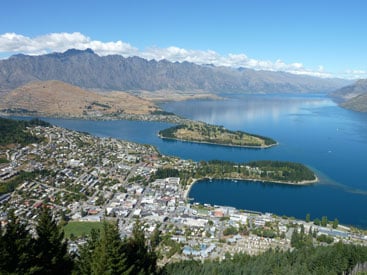
The Normal Burst and High Speed Burst Preset modes both involve compromises, either in total frames or resolution respectively, but are arguably more useful alternatives to the infinite, but very slow continuous rate of most rival models. We successfully used the High Speed Burst preset to capture Queenstown’s famous Shotover Jet boats in action and you can see examples at the bottom of our Sample Images Gallery.
Finally in terms of self-timer, the TZ10 / ZS7 offers the usual 2 or 10 second modes, although if set to Burst or Flash Burst modes, it’ll record three or five frames after the countdown respectively. Canon’s recent compacts equipped with DIGIC 4 processors out-gadget these facilities though with customisable self-timer and face timer modes, the latter cleverly exploiting face detection to wait for a new person to enter the frame before starting the countdown.
Panasonic Lumix DMC-TZ10 / ZS7 sensor
 |
The Lumix TZ10 / ZS7 is equipped with a 14.5 Megapixel CCD sensor measuring 1 /2.33in, although captures images with a maximum effective resolution of 12.1 Megapixels. Like the TZ7 / ZS3 before it, the extra pixels around the edges of the frame are used to maintain the angle of view and avoid cropping at different aspect ratios.
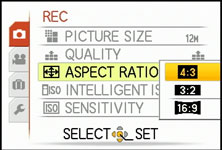
So with the camera zoomed-out, you’ll enjoy 25mm coverage whether you’re shooting in 4:3, 3:2 or 16:9 aspect ratios. Shoot the same scene with each aspect ratio and you’ll see the wider modes may capture less vertically, but more horizontally – the relative area captured by each aspect ratio is illustrated in the Multi Aspect bracketing mode, pictured here. This innovative approach is unique to Panasonic and in contrast to most compacts which simply crop strips from the top and bottom at wider aspect ratios, thereby losing resolution and coverage.
 |
 |
 |
That said, the TZ10 / ZS7’s maximum quality is when shooting in 4:3 mode, where the 12.1 effective Megapixels deliver images with 4000×3000 pixels. That’s two Megapixels more than the TZ7 / ZS3 which delivered images with 3648×2736 pixels, allowing ‘photo-quality’ 300dpi prints to be made about an inch and a half bigger, although since the pixels are packed into the same surface area, there’s obviously concerns over increased noise levels. Four lower resolutions are also available on the TZ10 / ZS7 when shooting in 4:3, and there’s the choice of Fine or Standard JPEG compression, but still no RAW mode. If you want RAW in a pocketable compact, you’ll need something like Canon’s PowerShot S90.
Set to 12M Fine mode, images typically measure around 5MB each, and as before Panasonic includes around 40MB of built-in memory to get you started. However this time round much of the memory has already been consumed by the internal database for the GPS system, leaving around 15MB for you to play with. You can delete as much of this database as you like to free-up memory, but considering this is a non-reversible choice which only frees up a few Megabytes, we’d recommend leaving the camera as it stands and simply fit a decent card sooner rather than later. Once again the camera is compatible with SD, SDHC and the latest SDXC cards, although for a smooth HD movie recording experience go for at least Class 4 (for AVCHD files) or at least Class 6 (for Motion JPEG files).
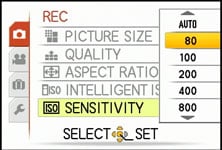 |
Like its predecessor, the sensitivity ranges from 80 to 1600 ISO at full resolution, with a High Sensitivity Scene Preset automatically choosing between 1600 and 6400 ISO depending on conditions – albeit operating at a greatly reduced resolution of 3 Megapixels (in 4:3 mode).
To see how the quality of the Lumix TZ10 / ZS7 measures-up in practice, take a look at our real-life resolution and high ISO noise results pages, browse the sample images gallery, or skip to the chase and head straight for our verdict.


