 The Panasonic Lumix GH3 is a worthy successor to the GH2. The redesigned sensor and updated processor provide a raft of enhancements to its video capabilities which will delight existing GH series owners, some of whom have been relying on firmware hacks to provide the high bit rates and extended encoding options now available. These improvements will unquestionably cement the GH3's position as the darling of the professional video community.
Panasonic Lumix GH3 review
-
-
Written by Ken McMahon
Intro
The Lumix GH3 is Panasonic’s flagship Micro Four Thirds compact system camera. Launched in September 2012 it replaces the Lumix GH2 and Panasonic hopes to build on the earlier model’s reputation for combining DSLR-like handling with professional video features. Indeed, such is the Lumix GH2’s reputation among professional videographers that it’s known equally if not more so as a movie camera than a stills one.
For the GH3 Panasonic has updated the sensor, but maintained the 16 Megapixel resolution of its predecessor. But where the GH2’s sensor had an actual resolution of 18.3 Megapixels, allowing changing of the aspect ratio without cropping, the GH3’s sensor operates more conventionally, resulting in reduced resolution for aspect ratios other than the Four Thirds native 4:3. The processor is also updated, providing a new AVCHD full HD 1080p 50/60 movie mode with MPEG-4 ALL-I MOV encoding at up to 72Mbps; other video enhancements include extended variable frame rate shooting and improved bit rate options. Videographers will also be pleased to discover that Panasonic has replaced the GH2’s 2.5mm external mic socket with a 3.5mm one and a headphones socket has also been added.

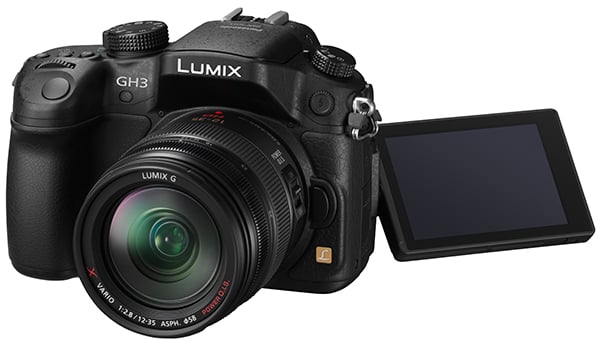
The GH3 also gets a new 3 inch 3:2 aspect ratio OLED touch-screen with the resolution bumped to 614 thousand dots as well as a bigger, brighter OLED viewfinder with a 16:9 aspect ratio and 1.7 million dot resolution. And the hardware refinements don’t end there. The Lumix GH3’s Magnesium alloy body is weather sealed, a move widely anticipated in the wake of the earlier announcement of two weather-sealed lenses one of which, the 12-35mm f2.8 constant aperture lens, is available as a kit option. Despite the presence of a touch-screen the GH3 is all about physical controls and this is affirmed by the increase in programmable function buttons from three to five and the introduction of a second control dial. There’s also a PC sync socket for studio flash and an optional battery grip.
Continuous shooting also gets a boost with a 6fps top speed compared with 5fps on the GH2. A new HDR mode along with interval shooting for time-lapse sequences round out a comprehensive list of updates and improvements, but the GH3 adds one further major new feature in the form of Wi-Fi connectivity, allowing remote operation of the camera using a smartphone as well as image sharing.
It’s been a couple of years since Panasonic upgraded its Micro Four Thirds flagship, but this raft of additions and enhancements brings the GH3 bang up to date. It’s not the only weather-sealed compact system camera though, nor the only one with Wi-Fi connectivity. Since it was launched in February 2012, the Olympus OM-D E-M5 has rapidly gained in popularity and like the Lumix GH3 boasts Magnesium alloy weather-sealed construction and DSLR styling and handling, but with the distinctive OM-series retro styling. The NEX-6 is a slightly different proposition, offering similar handling characteristics in a much smaller package. While the NEX-6 isn’t weatherproof though, it is the first compact system camera to offer in-built Wi-Fi connectivity with the option to extend its feature set with downloadable apps. In my review I’ve compared the Lumix GH3 with both these models.
Panasonic Lumix GH3 design and controls
The Lumix GH3 is a substantially larger and chunkier camera than the GH2 it replaces, a model that was itself frequently likened to consumer DSLRs in terms of its proportions. The dimensions are 133 x 93 x 82mm compared with 124 x 90 x 76mm, so the GH3 is a little bigger in all dimensions, but primarily it’s wider and thicker and, at 550g with battery, a little over a 100g, or four ounces heavier. To give those dimensions some perspective, the Canon EOS T4i / 650D body measures 133 x 100 x 79mm and weighs 575g with card and battery.
I don’t have particularly large hands, but I found the GH3 to be a very comfortable fit with the larger handgrip providing a deeper recess for your fingers. The grip and the other parts of the body that your hands come into contact with are finished in soft textured plastic which provides a very tactile secure grip and looks to be pretty hard wearing. Generally, the materials and construction of the GH3 are of high quality and it has the feel of a semi-pro model.
Though the larger body retains the same shape as the earlier GH2, it’s more rounded and has a more modern muscular appearance. Despite the fact that it sports a touch-sensitive screen the Lumix GH3 is one of the more button-heavy compact system cameras, the number and layout of the physical controls has altered quite a but, but at the same time will be familiar to GH2 owners. From the front, other than cosmetically, there’s little to distinguish the two. The GH3’s shutter release is more visible on the sloping front panel of the grip and the AF illuminator LED has moved from the left side of the body to the right. The silver round lens release button has changed to a black D-shaped one and the silver strip that ran vertically down the front of the grip is gone. Lastly the new PC sync socket for an external flash is visible on the top right of the front panel. Overall the effect of these changes is that the GH3 looks much more like a professional tool than its predecessor.
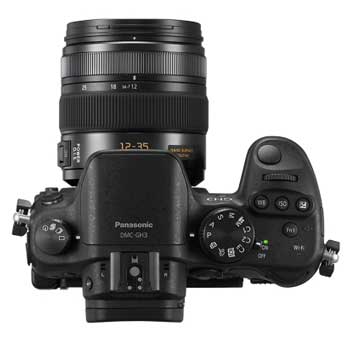 |
On the top panel the combined focus mode lever and AF mode dial are replaced with a new drive mode dial. The built-in stereo mics have been relocated from the front of the pop-up flash to either side of the hotshoe at rear of the top panel. On the right side of the top panel the control layout has again been radically revised. The drive mode lever is of course no longer required on the Mode dial which itself has been slightly redesigned with a simpler layout with the previously available portrait, scenery and close-up mode positions dropped to provide a less cluttered layout.
The Mode dial mounted On/Off lever is unchanged as is the approximate location of the first of the programmable function buttons, Fn1. Behind it, on the left rear corner of the top panel is a tiny LED that indicates Wi-Fi activity. Forward of the Fn1 button on a raised panel is a row of three buttons for direct selection of white balance, ISO and exposure compensation and in front of those a new front dial which, it appears, mimics the functions of the rear dial in all but manual exposure mode. Finally, at the end of an extended hand grip with a gently sloping front section is the large black shutter release button. Despite the presence of two additional buttons and a dial, the larger top right panel of the GH3 looks less crowded than the GH2 and the new control layout seems far more sensible.
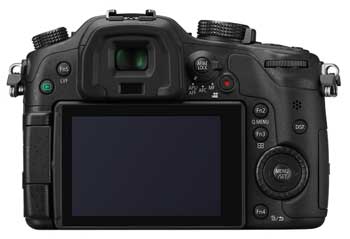
As before, the rear is largely dominated by the articulated 3 inch screen, an OLED touch-screen replacing the LCD one on the GH2. Above it on the left of the viewfinder the button to toggle between the screen and viewfinder is relabelled LVF and also functions as the fifth programmable function button, Fn5. Next to it is the playback button, relocated from the other side of the viewfinder on the GH2.
On the right of the viewfinder the earlier AF/AE lock button is replaced by a new AF/AE lock button with a three-position collar switch for selecting the focus mode. Just below and to the right of it is the dedicated movie record button which was behind the shutter release on the GH2. Moving to the right of the screen, the Q Menu button and AF mode button double up as Fn2 and Fn3 and the image delete/back button at the bottom is also Fn4. A large control wheel replaces the earlier model’s four way control pad; this wheel doesn’t have functions set to its cardinal points, those of the earlier model have all been assigned to dedicated buttons, instead it’s used purely for menu and control navigation. The moulded grip material that wraps around the camera back forms a raised area into which the right half of the wheel is inset. This makes rotating it a bit tricky as you can only get a proper grip on the left side – from the 12 to 6 o’clock position the moulding gets in the way of your thumb. This is pretty irritating, but it’s one of few handling gripes overall.
 |
On the left side of the camera body three soft rubber flaps protect the Lumix GH3’s various ports. The topmost of these is the mic socket which now takes a 3.5mm jack. Below that is the new headphones socket and below that a third flap opens to reveal the mini HDMI and combined USB and A/V port. Like its predecessor the Lumix GH3 has a card compartment separate from the battery on the right side of the camera body. The GH3 is compatible with SD, SDHC and SDXC cards including high speed UHS-1 cards.
Underneath the Lumix GH3 there’s a metal tripod bush located on the lens axis which allows you to open the battery compartment with a quick release plate attached. Between the tripod thread and the battery compartment you’ll find the connectors for the new battery grip, protected when not in use with a soft plastic cover.
The Lumix GH3 is powered by a new lithium Ion battery, the DMW-BLF 19E is rated at 1860 mAh providing sufficient power for 540 shots with the Lumix G X Vario 12-35mm f2.8 lens fitted. That’s a big hike over the 330 images of the GH2 and one of the compensations for the GH3’s larger, heavier body. It also compares very favourably with the 330 shots of the Olympus OM-D E-M5 and 360 shots (using the screen, rather than the EVF) for the Sony NEX-6.
Like the OM-D E-M5, the Lumix GH3 has an optional battery pack available. The DMW-BGGH3E attaches to the base of the camera via the tripod bush and, like the GH3 body, is splash and dust-proof. It takes a second battery providing a total capacity sufficient for more than 1,000 shots. The battery grip also provides additional controls with a second shutter release for portrait format shooting, and duplicates the three buttons on the GH3 grip for white balance, ISO and exposure compensation as well as the front and rear dials. It’s worth pointing out that the OM-D E-M5’s grip is a little more versatile than the Lumix GH3’s with two component parts, so you can just use the battery holder on its own or add the grip extension for the additional controls.
The Lumix GH3 has a built-in flash which is operated by pressing a small button on the left of the viewfinder hood. The flash doesn’t pop-up automatically, but operates a mechanical linkage which pops up the flash, when you’re finished with it you simply push it back down again. The range is quoted as 17.1 metres, presumably at 1600 ISO which is the upper limit in Auto mode with the flash activated. The Sony NEX-6 also has a built-in flash and Olympus OM-D E-M5 is supplied with a flash accessory which slides into the hotshoe and is powered via the accessory port. In the absence of Guide numbers it’s difficult to make comparisons, but at 200 ISO the GH3’s built-in unit provides reasonably bright and even illumination in small spaces and for subjects within a few metres of the camera. If you need more power you can attach an accessory flash; the GH3 is compatible with the FL220, FL360 and FL500 with TTL auto metering, it also works with the wirelessly controlled FL360LE. The GH3 also now has a PC sync socket for a wired connection to an external flash that isn’t fitted to the hotshoe.
Panasonic Lumix GH3 viewfinder and screen
The Lumix GH3 upgrades both the electronic viewfinder and the rear monitor of its predecessor. The viewfinder is a new OLED unit with 1,744k dots and an aspect ratio of 16:9. This is an interesting move which further reinforces the GH3’s reputation as just as much of a movie camera as a stills one. In stills modes at the native 4:3 aspect ratio the image has thick black bars down either side. But with 100 percent coverage and 0.67x (35mm equivalent) magnification, even though you’re not using the full area, it doesn’t feel like a huge compromise.
The Olympus OM-D E-M5’s 1.4 million dot EVF looks bigger by comparison even though its 35mm equivalent magnification is only 0.58. That can only be due to the different aspect ratios – the EM-5 uses the full area of its 4:3 aspect ratio EVF for stills shooting. But the GH3’s viewfinder provides a more detailed view that looks less ‘electronic’. In terms of brightness, though, there’s not a lot to choose between them.
 |
The Sony NEX-6, like both the GH3 and E-M5 has an OLED viewfinder with the highest resolution of all three models at 2.3 million dots and with a (35mm equivalent) magnification of 0.73x, so theoretically it should provide the biggest, most detailed view. In a side-by-side comparison this is indeed the case, the NEX-6’s EVF is significantly bigger in both dimensions to the Lumix GH3’s and, with its 3:2 aspect ratio it’s also wider than the E-M5’s, though about the same height. Despite its much higher resolution, of the three I found the NEX-6’s EVF looked the least stable, especially when panning, but this can be quite a subjective thing and if you’re considering one of these models I’d strongly suggest you make your own comparisons. The other surprising outcome was that of the three the NEX provided the least bright view.
Switch the mode dial to the movie position, though, and the Lumix GH3’s 16:9 aspect ratio viewfinder really comes into its own. Now the tables are turned and the view through the GH3 is much bigger than the Olympus OM-D E-M5. The NEX-6 mode dial doesn’t have a dedicated movie position, but press the record button and the view switches to 16:9, fractionally smaller than the GH3’s.
All told, the Lumix GH3’s viewfinder provides a good view for both stills and movie shooting, but it’s clearly weighted in favour of the latter. For stills shooting only the central portion of the screen is used with black bars down either side and as a result the GH3 provides a view that’s smaller than both the Olympus OM-D E-M5 and the Sony NEX-6. But in movie mode the situation is reversed with the GH3 providing the best shooting experience of all three – a bigger view than the E-M5 and the same size, but brighter than the NEX-6
Of course you’re not restricted to using the viewfinder as the Lumix GH3 also provides a new 3 inch OLED articulated touch-screen. As before, the screen is side-hinged which means it can face in any direction including forwards for self-shooting and folded inwards for protection.
The size and shape of the GH3’s screen are the same as its predecessor at 3in and 3:2, but the resolution has increased from 460k to 614k dots. The Olympus OM-D E-M5’s 610k dot screen has a lot in common with the GH3’s; it uses OLED technology, measures 3 inches on the diagonal, is 3:2 proportioned and touch-sensitive. The EM-5’s screen is also articulated but is limited to up and down positions. One of the GH3’s big selling points is that the touch-screen can be used to focus during movie recording; in contrast while you can tap the EM-5’s screen to focus and shoot stills it becomes inactive for movie recording.
The Sony NEX-6 also has a 3in screen, but it’s an LCD as opposed to OLED, has a wider 16:9 aspect ratio and sports a higher resolution of 920k dots. When shooting 16:9 content, the GH3 shows thin black bars above and below the image, resulting in a 2.8in diagonal; this is obviously a little smaller than 16:9 content on the NEX-6 which fills its 3in screen. Like the OM-D-EM-5, the NEX-6 screen can be adjusted to face up or down, but it it isn’t touch-sensitive which means not only does it lack the tap to focus feature of the GH3, but it’s trickier to enter password and other information required for online sharing.
Panasonic Lumix GH3 lens and stabilisation
The Lumix GH3 is sold as a body only, with the Lumix G X Vario 12-35mm f2.8 or the Lumix G Vario 14-140mm f4-5.8 zoom. I tested it with the former, one of the high performance X range which features Nano Surface coating technology, Power O.I.S stabilisation, and fast silent AF motors optimised for movie shooting. But possibly the most useful of this lens’s features is the f2.8 aperture which remains constant throughout the zoom range.
All lenses mounted on the GH3 (or any other Micro Four Thirds body) have their effective field of view reduced by two times, so the 12-35mm lens delivers coverage equivalent to 24-70mm. Like other Micro Four Thirds models, the Lumix GH3 has a wide range of lenses to choose including not only Panasonic lenses, but those from Olympus and other third party manufacturers. You need to be careful though as not every lens provides the full range of AF and AE modes. Panasonic maintains a GH3 lens compatibility guide.
Panasonic Lumix GH3 Lumix G X Vario 12-35mm F2.8coverage wide | Panasonic Lumix GH3 Lumix G X Vario 12-35mm F2.8coverage tele | |
 |  | |
| 12-35mm at 12mm (24mm equiv) | 12-35mm at 35mm (70mm equiv) |
The 12-35mm is a well-constructed, nicely balanced lens that is a good complement in terms of size and weight to the GH3 body. Like the GH3 body, it’s quite large, closer in size to a DSLR lens than most compact system camera lenses. At 74mm in length and with a diameter of 68mm it’s about the same length as the Olympus M. Zuiko 12-50mm, but considerably wider. The Sony PZ 16-50mm kit lens is the baby of the bunch, almost as wide as the other two, but only 30mm long when retracted, although you could of course fit Panasonic’s 14-42mm Power Zoom pancake lens to either the GH3 or E-M5 if you want a smaller and lighter combination.
But back to the 12-35mm. While it doesn’t provide the super-zoom range of the 14-140mm it covers everything from super-wide angle shots to portraiture and at the telephoto focal length you can minimise the depth of field shooting wide open at f2.8, although be aware that the effective depth of field on Micro Four Thirds lenses is also increased by two times, so the 12-35mm f2.8 acts like a 24-70mm f5.6 on a full-frame body. It’s not one of the most affordable kit lenses either. The lens on its own costs over a thousand dollars, or a little under a thousand pounds in the UK, add that to the GH3 body, which already costs more on its own than the Sony NEX-6 or the Olympus OM-D E-M5 with their respective kit lenses and you’re looking at a substantial investment.
Expensive it may be, but with its metal housing and rubberised zoom and focus rings you do feel as though you’re getting your money’s worth. The extending section of the lens is non-rotating, so there’s no problem with circular polarisers, and has a 58mm filter thread. The zoom ring is marked with zoom positions on the top of the zoom ring. In addition to weather sealing, described as dust and splash proof, the lens comes with a plastic lens hood.
Note that unlike the 12-50mm f3.5-6.3 kit zoom on the Olympus and Sony’s new E PZ 16-50mm f3.5-5.6, the Lumix G X Vario 12-35mm isn’t a powered zoom; it uses a more conventional manual zoom ring with a mechanical linkage. This provides faster and more direct zoom control for stills shooting, but isn’t as good for zooming while recording video. And if you prefer a manual zoom remember that the Olympus 12-50mm gives you best of both worlds with a zoom ring that can be used in manual or powered modes, although it doesn’t feel as good as the Lumix 12-35mm.
Where Olympus Micro Four Thirds bodies have stabilisation built-in, the Lumix GH3, like the NEX-6 only provides image stabilisation with suitably equipped lenses. The Lumix G Vario 12-35mm f2.8 provides optical stabilisation which is activated via a switch on the lens barrel. There are two modes which are selected from the camera’s Rec menu. Normal mode provides two axis stabilisation for both vertical and horizontal motion and panning mode restricts stabilisation to the vertical plane.
I tested the stabilisation by zooming the lens to its maximum 35mm (70mm equivalent) telephoto range and taking a sequence of shots at progressively slower shutter speeds with the stabilisation disabled, then repeating the sequence with it turned on in Normal mode. As you can see from the crops below the GH3 fitted with the 12-35mm f2.8 is capable of around three stops of stabilisation. Note that the OM-D E-M5 has a sophisticated five-axis in-body stabilisation system that works with any lens you attach. In my tests with the M. Zuiko 12-50mm it managed four stops of stabilisation.
Panasonic Lumix GH3 Lumix G X Vario 12-35mm F2.8Power O.I.S. Off/On | ||||
 |  | |||
100% crop, 12-35mm at 35mm 200 ISO 1/8th O.I.S. Off. | 100% crop, 12-35mm at 35mm 200 ISO 1/8th O.I.S. On. | |||
The 24-100mm equivalent range of the Olympus kit lens has a little more reach, as does the Sony 16-50mm, and you might think that provides better opportunities for portraiture with nicely blurred backgrounds. But you’d be forgetting that the Lumix lens has a wider f2.8 maximum aperture, compared with f3.5 for the other two lenses and, crucially, that it’s constant throughout the zoom range. So at the maximum 70mm focal length on the Lumix you’ll be shooting at f2.8 compared with f5.6 on the Olympus and f5 on the Sony. That’s a two stop advantage over the Olympus lens and almost as much on the Sony, though the latter’s bigger sensor compensates to a degree.
Below I’ve included samples from each of the three lenses showing the degree of background blurring for a typical head and shoulders portrait with the lens at its maximum aperture and zoomed to 70mm equivalent (75mm on the Sony). The fourth image shows the Olympus lens fully zoomed in to 100mm equivalent shot from further back to maintain a similar field of view. Below that you’ll see comparison macro shots showing each lens at its closest focussing distance when fully zoomed in.
Portrait Depth of Field comparison | ||||
 |  | |||
Lumix G X Vario 12-35mm at 35mm f2.8 | Sony E PZ 16-50mm at 50mm f5.6 | |||
 |  | |||
M.Zuiko 12-50mm at 35mm f5.6 | M.Zuiko 12-50mm at 50mm f6.3 | |||
As you can see above, there’s not actually much between the depth of field of the three lenses when the image is reduced down to this size. Blow them up and the Lumix 12-35mm enjoys blurrier backgrounds, but if you’re really into achieving a shallower depth of field for portraits, you should really be using the Olympus 45mm f1.8 or 75mm f1.8 prime lenses. Below is a macro comparison taken at their respective closest focusing distances.
| Macro Depth of Field comparison | ||
 |  |  |
| Lumix 12-35mm at 35mm f2.8 | M.Zuiko 12-50mm at 50mm f6.3 | Sony E PZ 16-50mm at 50mm f5.6 |
More important for some than the potentially shallow depth of field advantages will be the low-light performance of the Lumix 12-35mm lens. Again, at the 35mm focal length, it’ll allow you to shoot using the same exposure settings as the OM-D E-M5 fitted with the 12-50mm at, say, 200 ISO, where you need 800 ISO with the Olympus lens.
Panasonic Lumix GH3 shooting modes
Rather than go into detailed explanation of the GH3’s shooting modes, which are essentially the same as its predecessor, I’ll refer you to the earlier GH2 review and focus here on two additions. The first is the GH3’s new interval timer which is accessed from the Time Lapse Shot option on the Rec menu. This is a fairly comprehensive interval timer which provides the option to shoot up to 9999 images at intervals from one second to a second shy of 100 minutes. You can also delay the start of shooting by up to 24 hours. It doesn’t provide any of the preset options of the NEX-6 interval timer, and it won’t combine the images into a movie for you, so it’s less well suited to time-lapse novices, but it nonetheless provides the basic functionality necessary to shoot successful time-lapse sequences if you’re prepared to do the working out and necessary post-processing.
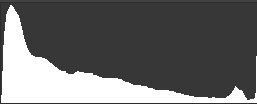
The GH3 also has a new HDR mode which takes a fast burst of shots and produces a composite with extended dynamic range. HDR has three settings, Auto, +/-1EV, +/-2EV and +/-3EV. To demonstrate it below I’ve shown an example taken in the church I use for high ISO noise testing. On the left is the single shot version taken in Aperture priority mode at 200 ISO and on the right the HDR shot also taken in Aperture priority mode with the same settings although HDR mode selected a marginally slower shutter speed.
You can see straight away that the HDR version has captured more detail in the highlights and shadows, the cropped section below provides a better idea of just how much highlight detail is retained in stained glass which is blown in the single shot. Finally the histogram provides graphic confirmation of the fact.
Panasonic Lumix GH3 Aperture priority mode HDR Off / Auto | ||||
 |  | |||
 |  | |||
 |  | |||
Aperture priority 200 ISO f4 0.4s | HDR Aperture priority, 200 ISO f4 0.3s | |||
Finally, like the G5, the GH3 has a new Electronic Shutter option. This doesn’t enable faster continuous shooting or provide any other performance enhancements, but merely disables the mechanical shutter to enable silent shooting for those situations where the shutter noise would be distracting such as in museums, concerts and so on.
Panasonic Lumix GH3 Wi-Fi
The Lumix GH3’s built-in Wi-Fi antenna makes it possible to wirelessly connect to the internet and to other devices including a smartphone. Connect to an iOS or Android device and you can operate the camera remotely. Connect to a Wi-Fi access point and you can wirelessly download photos over a network to your PC or upload them to photo sharing and social networking Web sites.
 |
Let’s look at the remote shooting to begin with. To operate the camera with an iPad, iPhone or Android phone or tablet you first need to download the free Lumix Link app from the App store or Android marketplace. Then you turn on the Wi-Fi by selecting the Remote Shooting option from the Wi-Fi menu; the quick way to do this is to press the Fn1 button which turns on Wi-Fi in the default configuration. This essentially sets the camera up as an access point which you then connect to with your smartphone, tablet or other device.
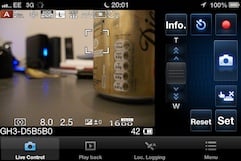
Next you launch the app – and this is where it gets interesting. I tested remote shooting on the Lumix GH3 using my iPhone 4S. In Live Control mode the display shows you almost exactly what you see on the screen or viewfinder which also remains live. With the detailed info overlay you can see all the same icons displaying shooting mode, Photo style, image size and quality focus mode and so on as well as the exposure settings.
 |
Not only can you see these settings, you can change most of them as well. The set button displays a menu which gives to access to exposure compensation, sensitivity and white balance as well as mode-sensitive exposure control – program shift in Program mode, Aperture and shutter speed respectively in Aperture and shutter speed priority and both in Manual. Having selected the appropriate exposure control you’re returned to the live view screen where you make the adjustment via a slider. In A and S modes both aperture and shutter speed are displayed and in when you alter one the other updates, it’s nicely designed and makes it really easy to see what’s going on.
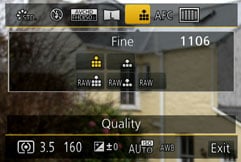
The fun doesn’t end there though. Tap the menu icon and you have access to a raft of other settings including the AF mode, Photo Style, Flash mode, Aspect ratio, Picture size, Picture quality, Metering mode, video quality and the option to set a video recording time limit. This last one is necessary because, while it’s possible to start video recording remotely, presumably for technical reasons, you can only stop it by pressing the record button on the camera.
 |
Back in the live control view, a button panel provides direct control over camera functions for firing the shutter and starting video recording. Exactly as on the GH3’s screen you can remotely set the focus by tapping your phone screen and pinching to set the size of the AF area. I was a little disappointed to discover that once you start recording a video, not only can you not stop it remotely as I’ve already mentioned, but all other remote operations are off the menu including focussing.
But the app provides so many other options this is an easy omission to forgive. There’s an info tab that allows you to toggle the information overlay independently of the camera display and a self-timer button that provides 10 second, 10 second 3-shot and 2 second self-timer settings irrespective of the position of the drive mode dial. Finally, if you have a powered zoom attached to the Lumix GH3 you can remotely control it via a virtual zoom rocker switch. With the Olympus M. Zuiko 12-50mm lens attached to the GH3 I was able to to zoom in and out at each of the two available speeds.
 |
As well as an impressive level of control the Lumix Link app will record a GPS log file and transfer the location data to images on the camera. You can set the recording interval between one second and 60 seconds to strike a compromise between accuracy and preserving your phone’s battery as well as automatically synchronising the time on both devices.
Reviewing images can also be done using the Lumix link app, and you can even send images while recording either using an ad hoc connection or via a Wi-Fi access point.
If you want to transfer photos from the card to your phone or upload them to photo sharing and social networking sites you can do this over Wi-Fi too. Unlike the Sony NEX-6, the GH3 has no mini-browser, so you can’t connect to a public Wi-fi hotspot that requires a log in or the acceptance of terms and conditions. So I tested this over my home Wi-Fi, with mixed results. You can transfer images to your smartphone or computer via a direct Wi-Fi connection between the two devices or via your network which can also be used to upload to the Web. Just to note that when I discovered connection to a public hotspot wasn’t possible I attempted to connect via my iPhone set up as a personal hotspot. The iPhone showed the GH3 had connected, but for whatever reason the GH3 wasn’t happy and wouldn’t continue the process, saying the connection had failed.
I had more success uploading to the Web via my home Wi-Fi. The GH3 allows you to connect to Facebook, Twitter, YouTube, Picasa, Flickr and Ustream, a wider selection than on the NEX-6. Like Sony and Canon you first need an account with the camera manufacturer’s online presence in order to authorise linking to these websites and uploading images, in this case Panasonic’s Lumix Club. Crucially though, Panasonic doesn’t use its own site as an intermediary, your photos are uploaded direct to the sites you choose, not via a link to the Lumix Club site. If you want to though, the Lumix Club site does provide a Cloud folder where you can temporarily store up to 1000 images of any size.
 |
Speaking of size, the upload allows you to chose from a number of reduced resolution options, or you can upload full-sized images. Don’t expect to be able to quickly upload an entire card of full-sized images though. It took me several minutes to upload a single 16 Megapixel image to Flickr on an 80Mbps broadband link, so even on a fast wireless connection the GH3 isn’t exactly swift. In fact, in contrast to the remote function, the GH3’s wireless transfer feature is slow and a little clunky. Wi-Fi signal reception on the GH3 was quite poor, it would only work reliably within a few metres of my access point, and connecting was slow and difficult, requiring entering the encryption key via a phone-style screen keypad, each and every time a connection was made. And if you decide to cancel upload to, say Flickr, in favour of another site, you have to start right back at the beginning, requiring re-entry of the key, which is pretty frustrating.
On the whole though the Lumix GH3’s wireless capabilities are the best I’ve used. It’s a little slow and the interface needs work, but it offers a lot more and is better designed than the equivalent feature on the Sony NEX-6 even if it doesn’t have the benefit of Sony’s downloadable apps to extend other aspects of the camera.
Panasonic Lumix GH3 movie modes
The Lumix GH3’s upgraded video features have been awaited with eager anticipation. The GH series has developed a reputation for high quality video that has led to its adoption by professionals, not to mention adaptation in order to squeeze even better performance from the hardware. The headline features are an improvement in the best quality video mode from 1080i50/60 to 1080p50/60 and the addition of a headphone jack alongside a more useful 3.5mm external microphone input, but also the official implementation of high bit-rates, long recording times and intra-frame encoding previously offered on the GH2 via hacks by enthusiasts.
Like the GH2 before it, the GH3 can capture Full HD video with continuous autofocus and full manual control over exposures. And, like the GH2, the GH3 sensor outputs 1080p progressive video at 50fps for PAL regions and 60fps for NTSC regions. The difference is that where the GH2 encoded this as interlaced video at 50 or 60fps, the GH3 now offers progressive video encoding at those frame rates – 1080p60 in NTSC regions and 1080p50 elsewhere.
Perhaps more significantly, at this setting the GH3 encodes HD video at 50Mbps, compared with 24Mbps on the earlier GH2, with rates up to 72Mbps in 1080p30 mode with All-I compression. You can also shoot at 24 frames per second at the 72Mbps bit rate. The introduction of Progressive full HD shooting along with these higher bit rates amount to a significant improvement in the GH3’s video quality.
The GH3 now provides the choice of three file formats, AVCHD, MP4 and MOV with the older less efficient Motion JPEG option discontinued. The best quality AVCHD mode is 1080p50/60 at 28Mbps. There’s also a 1080i50/60 setting with a choice of bit rates, 1080p24 and 720p50/60. Switch to MP4 and the options are 1080p25/30 at 20Mbps, 720p25/30 at 10Mbps and VGA at 25 or 30fps at 10Mbps. Finally, the MOV format is where it gets really interesting. Starting from the bottom up with a 24fps VGA mode with a 10Mbps bit rate. This is followed by three modes, 720p50/60, 1080p24 and 1080p25/30, each of which offers two encoding options; 50Mbps IBP or 72Mbps All-I. The difference between these two is that All-I is higher quality as each frame is encoded in its entirety without reference to the preceding or following ones (hence the higher bit rate). Finally, there’s the 1080p50/60 mode which also offers the 50Mbps IBP and 72Mbps All-I encoding options.
Turn the GH3’s mode dial to Creative Movie, and you can choose whether to record in Program, Aperture Priority, Shutter Priority or full Manual. You can choose shutter speeds from 1/25 to 1/4000 (or as slow as 1/2 in Manual), and any aperture offered by the lens. You can set the sensitivity to auto, or manually set it to any value within the non-extended range. Basically you have complete control over the exposure, sensitivity and depth of field. And in another nod to the professional market, the GH3 now also offers timecode in the MOV and AVCHD modes.
The GH3 retains the ability to output a clean 1080i output over HDMI while recording video; this is very useful when connecting and composing with an external monitor or feeding an external recorder. Most DSLRs and hybrid cameras may output 1080i over HDMI in Live View, but scatter it with icons and downgrade the feed to standard definition as soon as you start recording. Not so with the GH3 which can drive external monitors with a nice, clean image, while recording, and even maintain a duplicate image on the camera’s own screen if desired; you could even have icons and level meters on the latter while keeping the HDMI output clean.
The GH3 also retains the neat option that allows you to use the touch-screen to tap on the subject you’d like the camera to refocus on, while you’re filming. This is great for pulling-focus between subjects without recomposing the shot. As seen in the sample video below, there can still be a little visible searching, but it remains a useful and enjoyable feature for those who don’t want to manually pull-focus.
The GH3’s variable frame rate feature, which allows you to slow down and speed up the action, by increasing or decreasing the shooting frame rate has been extended with the addition of 48 and 40 percent slow motion options to the existing 80, 160, 200 and 300 percent modes. While few will make use of the high speed options, being able to produce high quality slow motion footage at less than half speed in the camera is a welcome addition.
| |
|---|---|
| |
| |
| |
|---|---|
| |
| |
| |
|---|---|
| |
| |
| |
|---|---|
| |
| |
| |
|---|---|
| |
| |
| |
|---|---|
| |
| |
| |
|---|---|
| |
| |
Panasonic Lumix GH3
handling
Those moving from the GH2 will find the control layout on the Lumix GH3 familiar, up to a point. The biggest difference is that there are more buttons providing direct access to controls that previously would have been accessed from the control pad, Q. menu or elsewhere. Selection of drive modes is much less fiddly with the new drive mode dial and the buttons make selection of white balance, ISO and exposure compensation no longer something you have to think about.
Those dedicated buttons along with no fewer than five programmable function buttons mean fewer trips to the Q. menu, but that doesn’t mean you won’t be needing it and, as on the G5, Panasonic has finally taken the step of making it customisable, something that I’ve been hoping they would do for a long time. In practice this not only means you can put your favourite controls on the Q.menu where you can get at them quickly and easily, but you can take off the ones you don’t use, saving yourself the effort of having to scroll through them to get to what you do want.
The presence of a proximity sensor below the viewfinder means you can use the LVF/Fn5 button for something more useful than toggling between the screen and viewfinder and the disp button allows you to toggle display overlays, including a 2-axis level, and to set the monitor to display information only while you use the viewfinder to compose.
 |  |  |
 |  |  |
Panasonic Lumix GH3
autofocus
Focus on the GH3 is fast and accessible both from a handling and performance perspective. The five AF modes, Face detection, AF Tracking, 23-Area, 1-Area and Pinpoint, are selectable via the Fn3 button and the three focus modes, AFS/AFF, AFC and Manual, from the focus mode lever.
The GH3 relies on a purely contrast-detect AF system and its predecessor gained a reputation for having one of the fastest AF systems around, including the phase-detect systems of DSLRs. But since then the Olympus OM-D E-M5 has arrived with, according to Olympus, the “World’s fastest …autofocussing system” with the 12-50mm f3.5-5.6. We’ve also seen the emergence of models like the NEX-6 which use a hybrid system with both contrast-detect and phase-detect elements on the sensor.
There’s no doubt the GH3’s AF is so swift you hardly notice a gap between half-pressing the shutter release and hearing the confirmation beep. With the 12-35mm f2.8 lens attached it’s also very quiet, if you listen for it you can hear the AF motor in operation, but it is practically silent.
In single AF mode I couldn’t detect a diference between the AF speed of the Lumix GH3 fitted with the Lumix 12-35mm f2.8 and the Olympus OM-D E-M5 fitted with the M. Zuiko 12-50mm f3.5-6.3. With sophisticated measuring equipment you might be able to detect a fractional lag in one or the other, but ask yourself what difference would this make in practice on the street or in the sports stadium? Interestingly, swapping the lenses on the two bodies makes little if any difference to the speed of S-AF operation.
The NEX-6 on the other hand is a little slower, it takes just a fraction of a second longer to lock focus on a stationary subject than the GH3. The NEX-6 shutter release presents no resistance to pressure until it reaches the half-press point, which is also an issue. With both the GH3 and the OM-D E-M5 there’s a slight resistance which gives the half-press a much more positive feel.
Switch to continuous AF and the OM-D E-M5 gains an advantage though, with faster more positive focussing. The M. Zuiko 12-50mm lens is also quieter in C-AF mode than the Lumix 12-35mm f2.8 which makes an audible buzz each time it refocusses. Then again the continuous whirring from the E-M5 body is louder than any AF motor.
But the king of C-AF in this threesome is the Sony NEX-6. Its hybrid AF system, which combines both contrast and phase-detect systems performs flawlessly, not to mention silently in C-AF mode switching focus confidently and almost instantaneously from near to far subjects. This is a big advantage the NEX-6 has over contrast-detect models like the OM-D E-M5 and GH3, particularly when it comes to movie shooting. If you compare my ‘coffee cup’ video clips for all three models you’ll see how the NEX-6 provides far and away the best continuous focussing performance. It’s also worth noting, though that of all three models only the GH3 will allow you to pull focus using the touch screen during movie recording.
Panasonic Lumix GH3 Continuous shooting
The Lumix GH3’s continuous shooting performance has been improved with a new 6fps full resolution mode compared with 5fps on its predecessor. There are also 4 and 2fps modes with Live view in addition to a 20fps Super High Speed mode which reduces the resolution to 4 Megapixels.
If the AF mode is set to Continuous and Focus/Release Priority set to Focus, the GH2 will attempt to predict and track a moving subject, although sometimes at the cost of a slower burst speed. If maintaining a high frame rate is more important though, you can set the Focus/Release Priority to Release, albeit with the risk of some images not being perfectly in focus.
To test the Lumix GH3’s continuous shooting I fitted it with a freshly formatted Sandisk Extreme Pro UHS-1 card, set the quality to Large Fine JPEGs and fired a burst of images. The GH3 shot at a steady rate for almost 40 frames then became slower and more erratic, but continued shooting. The rate for the first 35 frames was 4.44fps – significantly short of the claimed 6fps rate. Reducing the image quality to Large Standard jpegs produced exactly the same result as did reducing the image size to 8 Megapixels. So the GH3’s continuous shooting performance in practice is only a marginal improvement on its predecessor, however it is possible to shoot a much longer burst of around 35 frames.
Panasonic Lumix GH3
Sensor
The Lumix GH3 has a redesigned 16 Megapixel CMOS sensor. Unlike its predecessor it doesn’t have sufficient spare resolution to maintain the angle of view when shooting at different aspect ratios which are now cropped. So if you switch to 3:2 the resolution is reduced to 14 Megapixels and 16:9 images are 12 Megapixels.
The sensitivity range is increased from the 160 – 12800 ISO of it’s predecessor with a standard range of 200 – 12800 ISO extendable to 125 ISO at the lower end and 25600 at the upper limit.
The GH3 offers shutter speeds from 1/4000 to 60 seconds, and the GH3’s Bulb mode has been extended from the paltry 120 seconds on the GH2 to a more practical 60 minutes. Exposure compensation is available in a broad range of +/-5EV, and the exposure bracketing can be set to three, five or a generous seven frames at up to 1EV apart.
To see how the quality of the Panasonic Lumix GH3 measures-up in practice, take a look at my Panasonic Lumix GH3 quality and Panasonic Lumix GH3 noise results pages, browse my Panasonic Lumix GH3 sample images, or skip to the chase and head straight for my verdict.


