 Any downsides? Well I'd have preferred the screen to be fully-articulated like the Lumix G3 and also to support its rival's touch-screen pull-focusing capabilities while filming video (please can you address this in a firmware update Olympus?). A built-in mic input would also have been nice, as would interval timer facilities, and some may find the supplied flash unit not being built-in a bit inconvenient. It's also worth noting that while the single AF speed is very fast indeed, the continuous AF tracking is still not as confident nor consistent as the phase-detect systems on traditional DSLRs, Sony's SLTs and the Nikon 1 models. But overall the pros far outweigh the cons with Olympus delivering one of the most compelling higher-end compact system cameras to date - and if you haven't already, I'd urge you to check out all of the results pages if you assume the Sony NEX-7 has an advantage in quality due to its bigger sensor.
Olympus OM-D E-M5 review
-
-
Written by Ken McMahon
Intro
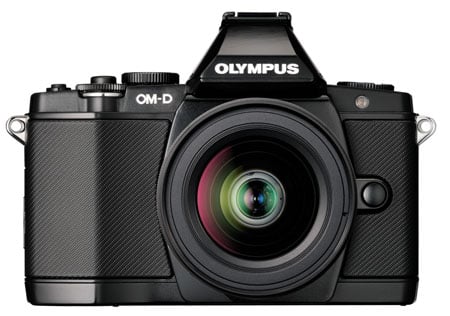
The Olympus OM-D E-M5 is the latest Micro Four Thirds compact system camera from Olympus and its first with a built-in viewfinder. Announced in May 2012, the E-M5 design is based on the popular and, for it’s time, diminutive Olympus OM series of SLRs, from the late 1970s. Those lucky enough to have lived through the period will remember its advertising featuring another popular icon of the photography world – David Bailey. By choosing the OM range as its design inspiration Olympus is making a statement – that its Micro Four Thirds compact system cameras can be everything a DSLR can be, only smaller. The OM-D E-M5 sits alongside the existing PEN range and Olympus says there will be other OM-D models to come in future.
The E-M5 is based around a 16.1 Megapixel Four Thirds sized MOS sensor. The body styling makes it look like it has a pentaprism but in fact there’s no optical viewfinder, instead it has an electronic viewfinder with 1.4 million pixel resolution and a 3 inch flip-up OLED touch screen with a resolution of 610k pixels. The Body has built-in stabilisation which works with any lens you attach and has a new design which compensates for camera movement on five axes – three more than the conventional up/down and side-to-side correction of most conventional stabilisation systems.
The EM-5 can shoot continuously at speeds up to 9fps (4.2fps with continuous AF) and has all the usual Olympus Art filters in addition to PASM exposure modes and iAuto mode with face detect AF. It can shoot Full HD 1080p30 video with manual exposure control and can record stereo audio with adjustable level control. The E-M5 also becomes the first Micro Four Thirds body to be weather sealed along with its 12-50mm kit lens and add-on flash. Find out if this is the compact system camera you’ve been waiting for in my Olympus E-M5 review!
 |
Olympus OM-D E-M5 Design and controls
Out of the box, the most striking thing about the Olympus OM-D E-M5 is its size. Possibly because of its SLR styling you expect something SLR-sized, but it’s most definitely a compact system camera and surprisingly small in person. The physical dimensions are 121x90x41.9mm and the body with battery and card weighs 425g, so it’s small, but with a reassuring heft. Attach the 12-50mm kit lens and the total weight increases to 636g.
Compared to the Sony NEX-7, which measures 120x67x42.6mm and weighs 350g including the battery and card, you can see that as well as being significantly lighter, the NEX-7 is not as tall as the E-M5 and that difference in height is pretty much all down to the E-M5’s ‘pentaprism’ hump.
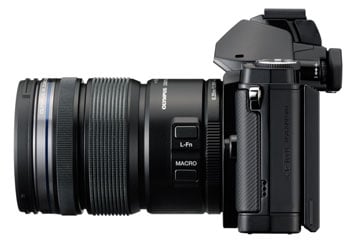 |
In a sense, comparing these two cameras for size is a bit of a red herring as they’re polar opposites in design terms. In the same way as the Fujifilm X-Pro1 adopts a rangefinder aesthetic not just to appeal to people’s fondness for retro styling, the E-M5’s SLR styling is as much about handling as looks. While the NEX designers started with a blank sheet, Olympus has returned to a tried and trusted form factor in the belief that it will work in a modern digital context. A more logical comparison in many ways is with Panasonic’s Lumix G3 which measures 115x84x47mm and weighs 382g with battery.
The camera’s top plate is home to three dials. To the left of the hump is the control dial with positions for the PASM modes plus iAuto, Art, SCN (scene modes) and Movie mode. Then on the right side of the hump are two unlabelled dials. The main dial slightly overlays the sub-dial which surrounds the shutter release, and protrudes at the front so you can operate it with your index finger. The main dial likewise protrudes at the back and can be thumb-operated. In the default setup, depending on the mode, the main dial changes the aperture or shutter speed and the sub-dial sets exposure compensation but, as with most things on the OM-D E-M5, they are customisable. I’ll go into more detail about that in the handling section later.
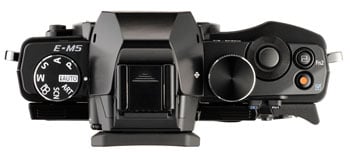 |
To the right of the shutter release is one of two programmable function buttons, Fn2, and behind that a dedicated movie record button which can also be programmed for alternative functions.
On top of the hump, there’s a standard hotshoe and at the back of it is a plastic cover which pulls off to reveal the proprietary Olympus AP2 accessory port. This is something of a surprise as its main function is to accommodate the accessory EVF. And it will actually work with the Olympus EVF accessories, though, aside from being able to flip up the accessory EVF in a 90 degree vertical position, there’s not much advantage to this. More usefully the add-on flash is controlled via the port and you can plug in other accessories including an external mic, macro arm light and the PENPAL PP-1 Bluetooth transmitter.
Just to confirm, the hump does not contain a popup flash. The E-M5 is instead supplied with a small flash unit which slots on top and can be used in Auto, manual, Red-eye, Slow sync, 2nd curtain and fill in modes. It has a guide number of 10 at 200 ISO, which makes it just a little more powerful than the NEX-7’s built in flash, and has a fastest sync speed of 1/250th. While it’s a handy accessory for basic fills, I can see many people opting to mount an external flash unit or to use the accessory flash to wirelessly trigger a compatible external unit.
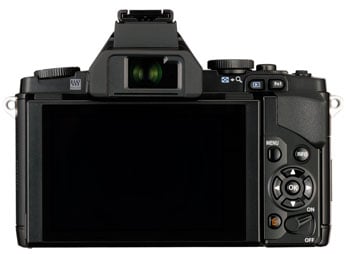
The rear panel controls spit into two sections. On the back edge of the top plate, conveniently positioned for thumb operation, are the other function button – Fn1 and a playback button. Then to the right of the screen there’s a four-way controller with a central OK button, menu, info and delete buttons. Finally at the bottom is the on/off two-position lever. One other feature on the back panel that’s worth noting is the thumb-rest, a pronounced L-shaped protrusion that looks a bit odd, but does exactly what it’s supposed to.
A flush-fitting soft plastic cover runs the length of the left side of the body and beneath are a USB / A/V port and a mini HDMI port. On the other side is the door to the card compartment – separate from the battery compartment in the base. To open the port cover you must first flip out the screen, while the card compartment door first slides back a little then opens. The battery compartment door is likewise very secure, this time with a recessed locking lever and the reason for all this security is that the OM-D E-M5 body is fully weather and dust-sealed as is the kit lens and the flash attachment. Indeed this makes it the first Micro Four Thirds body to sport any kind of environmental sealing and represents a very welcome advance into the semi-pro marketplace. During my initial tests I didn’t push the sealing capabilities so can’t say exactly what it will or won’t cope with, but as my tests are ongoing I plan to report back with my experiences and those of others in this regard.
 | |
The battery compartment is far enough away from the tripod bush to be able to open it with the camera on a tripod or with a quick-release plate fitted. The OM-D E-M5’s BLN-1 Lithium-Ion battery is good for around 330 images on a full charge and the camera is compatible with SD, SDHC, SDXC and UHS-1 cards.
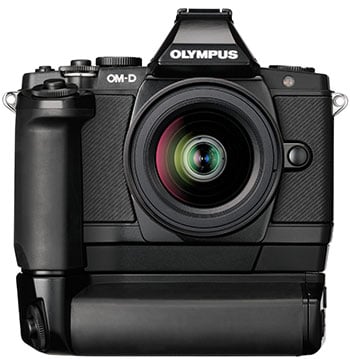
For many, the diminutive proportions of the OM-D E-M5 will be one of it’s biggest attractions, but if you find the controls a bit fiddly the HLD-6 Power Battery Holder could provide the answer as well as doubling the operating life of the camera. It comes in two parts, an extended deeper front grip with its own shutter release and sub-dial, and the battery holder which has duplicate main and sub-dials. The battery holder also has a shutter release located for easy operation when the camera is in portrait orientation and two additional programmable function buttons, B-Fn1 and B-Fn2.
Both units screw into the camera base after first removing a soft cover that protects the contacts. Adding the front grip offsets the tripod bush so that it’s directly under the lens, and to me made the camera immediately feel much more secure in my hands while only slightly increasing its overall size. Adding the main battery holder obviously makes the entire package much laregr, while also shifting the tripod thread even further to the right, but it’s still fairly central and I didn’t encounter any stability or other problems with both attachments fitted and the camera mounted on a tripod. Overall I appreciated the ability to either go for the full portrait battery grip or a smaller simpler enhancement to the main grip alone. This two-part solution works well.
You don’t need to remove the camera from a tripod to replace the battery in the portrait grip as the door is in the side of the holder, but to replace the battery in the camera body, you need to remove both add-ons (you can do this together as one unit). The order in which the batteries are used can be set from the menu so you can effectively use the ‘body’ battery as a backup.
Olympus OM-D E-M5 Viewfinder and Screen
 |
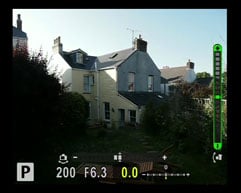
The OM-D E-M5’s electronic viewfinder (EVF) provides a 100 percent 4:3 view with a resolution of 1.44 million pixels (800 x 600 pixels) and a quoted magnification of 1.15, these are the same specifications as the VF2 accessory viewfinder for the PEN (and the E-M5 if you’re so inclined) models. The OM-D E-M5’s viewfinder isn’t quite as large as the Lumix G3’s which it matches in terms of resolution, but the image looks more stable even in the default mode which refreshes at 60Hz. You can also set a higher frame rate which doubles that to 120Hz. The NEX-7’s EVF remains the one against which all others are judged, though, and its viewfinder boasts a higher 2.4 million pixel resolution as well as being bigger.
Compared with an optical viewfinder on a cropped frame budget DSLR like the Nikon D3200, the E-M5’s viewfinder looks larger, but one thing none of these EVF’s can match is the brightness and direct response of an optical viewfinder which provides a more ‘real’ view of the scene in front of you, mediated only by glass and mirrors. Comparisons aside, in use the OM-D E-M5’s viewfinder feels quick and responsive and, while there will always be those for whom an EVF, no matter how good, is second best, in most situations I found it more than adequate. And there are some things an Electronic viewfinder can do better than an optical one, like information overlays and effect previews – I’ll talk about those in more detail in the handling section.
 |
When the eyepiece proximity sensor detects your eye the EVF activates and the OLED screen switches off. In default mode the screen displays information but it can of course be used for composing by pressing the button next to the viewfinder. For the OM-D E-M5 Olympus has stuck with the excellent 3 inch 610k pixel touch OLED screen used on the EP-3 and it has the same 3:2 proportions which means there are narrow black bars down either side when in live view mode.
The screen flips out on a cantilevered hinge and can be tilted up into an almost vertical position and downwards to 50 degrees. Olympus has managed to integrate the touch screen on the PEN E-P3 so that it complements the physical controls and provides genuinely useful extra functionality and that’s also true of the OM-D E-M5. With Super Control Panel display you can just tap the setting you want to change and in ‘Live view’ mode touch to focus is swift and sure. It is however worth noting the screen on the rival Lumix G3 is fully-articulated and can both flip-out and twist to face any direction rather than just tilting vertically.
Olympus OM-D E-M5 lens and stabilisation
The OM-D E-M5 is available as a body only, in silver or black, or as a kit with the M.Zuiko Digital ED 12-50mm f3.5-6.3 kit lens. Like the body, this lens is available in two colours and also sports weather-sealing. The construction feels sturdy and professional despite the plastic body, with all the moving components internal. The Four Thirds sensor results in a 2x reduction in the field of view so the 35mm full-frame equivalent range of this lens is 24-100mm
The linkages between the camera body and the lens are all electronic and focusing is ‘fly by wire’, but the zoom ring is physically actuated. Zooming this lens is anything but conventional, though, and Olympus has incorporated some very ingenious features into the zoom ring. The first clue that this lens is different is that as well as rotating in the conventional manner, the zoom ring shifts back and forth into one of three positions. In the rear-most position the zoom operates like a conventional manual zoom, you rotate the ring and the lens zooms in and out depending on the degree of rotation.
Snap the zoom ring forward a notch, though, and you now have a two-speed motorised zoom perfect for movie shooting. At the slower speed the zoom motor is virtually inaudible and at the faster speed it emits a quiet whirring noise.
In order to push the zoom ring into the final position you must also press the macro button on the side of the barrel, which tells you all you need to know about this function. It’s little awkward to press the button and shift the ring at the same time and requires both hands, but at least it’s not going to happen by accident. An indicator window on the top right of the barrel displays the current mode. In macro mode the zoom is locked in a fixed position at 43mm and produces an image with 0.36 (0.72 35mm equivalent) magnification. When you’ve finished with macro mode there’s no need to press the button again, you can just snap the ring back to one of the other two positions.
The kits lens has one other button; above the Macro button and labelled L-fn. Like every other button on the OM-D E-M5, this can be programmed and, for me, using it as an AF/MF toggle seemed the most logical option.
The 24-100mm equivalent range makes this a good general purpose kit lens with a slightly wider range than the 14-42mm kit lenses supplied with the Olympus PEN and Panasonic Lumix G ranges, although it is rather long. But of course there’s plenty of other lenses in the Micro Four Thirds range to choose from if the kit lens doesn’t inspire you – over 30 at the time of writing, making it by far the most established compact system.
Olympus OM-D E-M5 coverage wide | Olympus OM-D E-M5 coverage tele | |
 |  | |
| 12-50mm at 12mm (24mm equivalent) | 12-50mm at 50mm (100mm equivalent) |
The OM-D E-M5’s built-in stabilisation works with any lens you attach, which further expands your choice, because you don’t have to restrict your search to optically stabilised lenses. Not only that, the OM-D E-M5’s stabilisation goes beyond the conventional two-axis stabilisation found in most cameras and lenses. In-body stabilisation works by shifting the camera sensor to counteract movement, usually in the horizontal and vertical plane. Some cameras allow you to restrict stabilisation to a single plane so that you can pan to follow moving subjects without the camera attempting to correct the movement in either the horizontal or vertical plane. The stabilisation system in the OM-D E-M5 adds three more planes to the equation; as well as horizontal and vertical movement it corrects for roll, pitch and yaw rotational movements.
The stabiliser has three modes. Mode 1 is the full works, 5-axis stabilisation, Modes 2 and 3 are confined to a single axis for horizontal and vertical panning respectively and you can turn the stabilisation off for when the camera is mounted on a tripod. While stabilisation is active you can hear it whirring quietly in the background.
Olympus OM-D E-M5 with M. Zuiko Digital 12-50mm handheld | ||||
 |  | |||
100% crop, M. Zuiko Digital 12-50mm, 200 ISO 1/8th IS off. | 100% crop, M. Zuiko Digital 12-50mm, 200 ISO 1/8th IS mode 1. | |||
So how effective is it in practice? To test the OM-D EM-5’s stabilisation I zoomed the lens to it’s furthest 50mm (100mm equivalent) position and took a series of shots in Shutter priority mode first with the stabilisation turned off and then with it set to the 5-axis Mode 1 setting. As you can see from the crops above the stabilised OM-D E-M5 can be hand held at shutter speeds down to 1/8th at 100mm which is nearly four stops below what the photographer’s ‘one over the focal length’ rule of thumb suggests is possible, though without stabilisation I did manage to get steady shots at 1/50th.
This is a good result, but given the hype Olympus has created around it’s new stabilisation system I was hoping for something better. Possibly the 5-axis stabilisation has more to offer in movie modes.
Olympus OM-D E-M5 shooting modes
In addition to PASM shooting modes the OM-D E-M5’s mode dial has positions for iAuto, Art (filters), Scene modes (SCN) and Movie mode. Its tonal enhancement features aren’t as extensive as the DRO options on the Sony NEX-7, but Gradation, as Olympus calls it, is pretty effective at improving shadow and highlight detail. The default Gradation setting is Normal, an Auto position assesses the scene and applies the appropriate tonal adjustments to different regions, a little like the Lumix G3’s Intelligent Dynamic Range control, or you can set High Key or Low key for bright or dark subjects respectively.
Another way to adjust the tonal curve is by using the highlight/shadow adjustment feature. This is the first item on the ‘multi-function’ button assigned by default to the Fn2 button, the others being white balance, focus magnification, and aspect ratio. A single press of the Fn2 button activates the last-used option and holding it down whilst rotating either of the dials cycles through the options. Highlight/Shadow provides a curves-style adjustment with two control points at the quarter-tone and three-quarter tone positions each of which can be adjusted up or down using the two dials. In this way you can quickly create an S-curve for example to increase contrast without highlights blowing and shadows filling.
The OM-D E-M5 provides comprehensive auto bracketing features with bracketing available for exposure, white balance, flash exposure, ISO sensitivity and even Art filters. The exposure bracketing shoots up to 7 exposures – three either side of the correct exposure. The 7 frame option can be set to step in .3 or .7EV increments. The two, three and five frame options add a 1EV step, so in 5 or 7 frame bracketing you can capture a range of 5EV which will delight HDR fanatics.
Once you’ve selected the frame number/increment the bracketing mode is dependent on the continuous shooting mode. Set to single frame shooting a bracketed shot is taken with each press of the shutter, in sequential shooting modes the full bracketed sequence is shot in a continuous burst while the shutter release is held down. Auto bracketing is one of the few features you can’t access from the Super Control Panel or assign to a button which is a bit of a shame, though there’s nothing to stop you setting it up as a shooting preset and assigning that to one of the programmable buttons.
Intelligent Auto mode incorporates the Live guide assisted settings mode for techniques such as colour saturation, white balance, background blur, motion blur, and exposure compensation. The touch screen makes this a lot more manageable, you just tap the docked handle and the menu slides out, tap an option and the controls appear, then adjust the sliders on screen. Even so, I’m not sure that the addition of highlight and shadow sliders to the darken/brighten controls is really something that will benefit novices. Interestingly though, Olympus hasn’t taken the approach of some manufacturers and turned everything off bar the shutter release in iAuto mode. As well as the touch screen you can use the E-M5’s dials and buttons to control Live Guide settings and access the menu to, for example, set manual focus in iAuto mode. So, while novice-friendly features aren’t likely to be a big selling point for the E-M5, the iAuto mode in combination with Live Guide turn it into an effective point and shoot that competent photographers will also find useful in certain situations.
 |  |  |
| Pale & Light Colour with frame | Light Tone with frame | Cross Process with white edge effect |
 |  |  |
| Gentle Sepia | Dramatic Tone II | Key Line |
Olympus pioneered the use of Art filters its PEN range and it’s good to see that they’ve not only been included in the OM-D E-M5, but the range has been expanded. In addition to Pop Art, Soft Focus, Grainy Film, Pin Hole Diorama and Dramatic Tone, there’s now Pale & Light Colour, Light Tone, Cross Process, Gentle Sepia and Key Line. Most of the filters have several variants and you can also embellish them by adding pin-hole, white edge and frame effects. Examples of some of the Art filters, including the new additions are pictured above.
In manual exposure mode the OM-D E-M5 has Bulb and Time settings for long exposures up to 30 minutes and has an innovative new feature that you could almost overlook, but which will be a very big deal for night shooters and long exposure practitioners. Called Live Time and Live Bulb, these are display settings which update the screen at regular intervals to show the current state of the image during a long exposure.
The display interval can be set anywhere between 0.5 and 60 seconds with a maximum display count (the total number of preview peeks) being 24 at 200 ISO (the display count drops as the ISO sensitivity increases). So for a 24 second 200 ISO exposure you could, for example get a preview update every second. You can also update the display by touching the screen or half-pressing the shutter release though this might be inadvisable due to the risk of moving the camera.
Apart from being a huge help in getting long exposures right and and having great creative potential, for light painting shots for example, watching the image develop on-screen is every bit as magical as the experience of watching prints develop in the darkroom. Though I don’t do a lot of long exposure photography myself, I’m already a big fan of this feature and had a lot of fun trying it out.
Note there are no built-in intervalometer facilities on the E-M5 for capturing timelapse sequences, although third party intervalometers are available which may work with it; for example, the TriggerTrap iPhone app with the CL-UC1 cable.
Olympus OM-D E-M5 movie modes
The OM-D E-M5 can shoot movies in Full HD 1920x1080p30 resolution; 24 and 25p frame rates are not available. The Full HD format is offered at two quality settings with average bit rates of 20 and 17Mbits/s. In a move away from the ACVCHD format of the PEN series, the OM-D E-M5 encodes video using the H.264 codec and saves files in a QuickTime .mov wrapper. Not the least of the advantages of this is that the movie files are in the same folder as still images and not tucked away in a subfolder. There are also two 720p30 modes at 13 and 10Mbits/s and then two further options which are encoded using the ageing Motion JPEG codec – 1280×720 and 640×480 both at 30fps.
Movie recording can be started in any of the PASM shooting modes by pressing the dedicated movie record button on the top panel, but you can designate any of the OM-D E-M5’s programmable buttons to do this except for the L-Fn button on the lens. When recording is started in this way the exposure and ISO sensitivity are set automatically.
Switch to the Movie position on the mode dial and you have access to PASM exposure modes for movie shooting, but whilst you can set the aperture and shutter speed before pressing the record button, during recording the exposure is fixed. For all of these modes the ISO sensitivity is selectable, but like the other exposure settings is fixed once recording has started.
All of the E-M5’s art filters are available from the Live view menu in Movie mode, but the effect processing can slow down the frame rate considerably. In some cases the slow, jerky playback that results can actually add to the effect, but in the faux tilt-shift Diorama mode the sound is turned off and playback maintained at 30fps to speed up the action. You can’t control the playback in the way that some Canon compacts allow, and neither can you select the in-focus area or adapt it for portrait orientated shooting, but the E-M5 does use the the AF area to select the in-focus image area around which blurring is applied.
The are two other movie effects which unlike the Art filters can only be applied to movie footage and not stills. Multi shot echo and One shot echo are really two variations on the same effect which freezes a single frame and holds it at reduced opacity while the action continues. Think of all those movies you’ve seen where someone has a drug slipped into their drink and you see their point of view as they stumble into the furniture and lose consciousness and you’ll get the idea. It has limited applications (unless you make a lot of those kinds of movies) but, like virtually everything else on the E-M5 it can be disabled if you don’t want to be bothered with it.
For movie shooting, the E-M5’s stabilisation has only two modes, on and off, regardless of the mode setting. The digital movie stabilisation used on PEN models which suffered from noticeable wobbling and shimmering artifacts has been dropped and the E-M5 uses the same sensor-shift system as for stills. This system works very well with none of the distracting wobbling which can spoil stabilised footage shot with the PENs. Combined with the motorised zoom option on the 12-50mm kit zoom it makes the OM-D E-M5 once of the most capable compact system video cameras.
The E-M5’s touch-screen is however de-activated during movie recording which means you can’t use it to pull focus in the same way that you can with other touch-screen compact system cameras like the Sony NEX-5N and Panasonic Lumix G3 / GX1. In a way, this is no surprise as it’s not a feature on the PEN EP-3, but it puts the EM-5 at a disadvantage compared with other touch-screen models. This is one of the few advantages that the cheaper Lumix G3 / GX1 has over the EM5. The NEX-7 on the other hand outdoes the EM-5 with a best quality 1080p50/60 best quality mode and the ability to adjust exposure and, though it’s a bit fiddly, the AF area during shoting. Touch focusing would have been an opportunity for the EM-5 to redress the balance, which makes it’s absence all the more disapointing. Any chance of a firmware update to enable the feature Olympus? You’ll make a lot of movie shooters very happy and draw potential buyers from Panasonic.
You can take photos while recording video, though images are limited to the 16:9 aspect ratio and the video clip is split before and after the shot. The OM-D E-M5 has built-in stereo mics and although there’s sadly no external mic socket you can attach an Olympus or other external mic with the optional SEMA-1 microphone adapter connected to the accessory port. You can also adjust recording levels to one of three positions and there’s a 3-position wind-cut filter. There’s very little to criticise about the menu system on the OM-D E-M5, but the fact that neither of these options appears on the Live view menu in movie mode (though you can turn audio recording on and off from here) is a bit of an oversight.
The maximum recording time in any mode is 29 minutes and Olympus recommends an SD card of speed class 6 or higher for recording video.
| |
|---|---|
|
The most impressive thing about this handheld panning shot is the stabilisation which keeps the image nice and steady in the frame. When panning you have to watch out for a little bit of overrun – the frame keeps panning for a fraction of a second after you’ve stopped moving. The Continuous AF is a little flighty, but generally does a good job.
| |
|---|---|
|
The biggest problem with this tripod-mounted panning shot is my technique. At the beginning of the shot, into the light, the exposure is on the dark side, but brightens up as we come around. As on the handheld panning shot, the C-AF is a bit jittery during the zoom, but eventually sorts itself out fairly unobrusively.
| |
|---|---|
|
On the whole the OM-D E-M5’s continuous AF behaves very well in this low light panning shot, apart from a little wobble at the bar. The low-light image quality is good, with little visible noise. The exposure reacts swiftly to the changing light level and maybe a bit too enthusiastically, but the change is smooth with no stepping.You can use the AE lock to prevent this happening as long as you have it assigned to one of the Fn buttons.
| |
|---|---|
|
This final clip shows the OM-D EM-5’s continuous AF in action in low light. With contrast-detect AF systems, focus hunting – where the AF adjusts back and forth in order to determine whether the focus point is in front of or behind its current position – is inevitable. But it’s not as intrusive on the E-M5 as on some cameras. Generally the camera finds the subject without too much fuss and when it does go on the hunt, the back and forth isn’t too obvious.
Olympus OM-D E-M5
handling
The OM-D E-M5 takes a little over a second to be ready to shoot once the on/off switch is flicked. The position of the on/off switch, on the bottom right corner of the rear panel is a little awkward, but at least it won’t be activated accidentally and it’s out of the way of the shooting controls.
In terms of overall handling, I’ve already talked a little about the compact size of the E-M5 but, unless you’ve got particularly large hands, this is unlikely to be an insurmountable issue as most of the controls can be adjusted using the dials and/or the touch-screen. Even so, the playback and Fn1 buttons, positioned at the rear of the top plate are particularly fiddly. I also found some of the buttons quite spongey in use and less positive than other models. That said, the E-M5’s size works much more in its favour than against and, as far it’s possible to produce a very compact body with accessible physical controls, Olympus has provided us with cake and given us the opportunity to scoff it.
The one thing that I immediately found counter-intuitive was the main dial / sub dial setup, in PASM modes used to control aperture/shutter and exposure compensation respectively. In Aperture priority mode, for example, this puts the aperture on the main dial and exposure compensation on the sub dial. Possibly because I use my left eye for the viewfinder, I found the front-facing sub-dial much more comfortable than the rear-protruding main dial, but it’s a simple matter to switch the two – almost boundless customisation options are something for which Olympus established a reputation with the PEN series and the OM-D E-M5 continues in the same tradition.
There are two programmable Fn buttons on the body, a third on the lens and two more on the optional Power Battery Holder and, though they don’t all offer the same options, between them they provide the opportunity to have most of the important shooting functions at your fingertips. Among the available options are Multi-function (Highlight & Shadow, white balance, magnify, aspect ratio), ISO sensitivity, white balance, exposure compensation, AE/AF lock, movie record, AF target selection, sequential shooting and manual focus – and that’s not even most of them.
You can also effectively create two additional functions buttons by assigning the four-way controller to direct functions. In the default settings all four are used to position the AF area, but you can customise the right and bottom buttons to a variety of functions like ISO or drive mode. Even with these two customised though, pressing the left button still shows the AF area selection display, at which point all four buttons are temporarily dedicated to adjusting its position.
While button functions are applied globally in all modes, dial function is mode specific, so if you want to you can, for example, assign exposure compensation to the main dial in Program auto, but to the sub-dial in all other exposure modes. All in all there’s a huge array of control and customisation available.
 |  |  |
 | 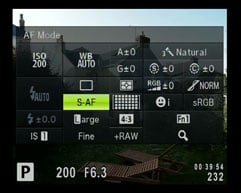 |  |
Menu navigation on the E-M5 is transformed from average to outstanding by the widely copied Super Control Panel (SCP). This is activated by pressing the OK button at the centre of the four-way controller and is toggled with the more conventional Live view menu using the Info button. Like everything on the OM-D E-M5 it’s customisable and most people will find it more convenient just to turn off the Live view option. The SCP displays all the main control settings in a grid and you can navigate through them using the main dial (or just tap the screen) and alter the selected option with the sub dial.
Once again, Olympus claims to have pushed the speed boundaries of contrast detect AF announcing the OM-D E-M5 as having the world’s fastest AF system. It’s certainly very fast, at least in single AF mode where there’s very little if any perceptible delay between half pressing the shutter and the AF locking on, even when the lighting conditions are less than optimal.
The default AF area mode has 35 areas in a 7×5 grid covering all but the edges of the frame. You can quickly select an individual area either by using the four-way controller or by tapping the screen. The screen can also be used to meter, focus and shoot in a single tap – process that happens virtually instantaneously even when the camera has to refocus from close to distant objects.
With face detection enabled the camera will lock onto multiple faces in the frame and you can also set one of three eye priority AF modes – left, right and auto which selects the eye closest to the camera. All very useful and it works, though for the eye priority mode to work effectively the subject does need to be reasonably close and well lit.
Set to continuous AF mode, the E-M5 will adjust its focus as the subject approaches or moves further away. Like other cameras with contrast-based AF systems this can prove a bigger challenge than those with phase-detect AF systems. A contrast-based system can’t help but search back and forth a little when confirming focus, which means it may struggle to keep up with a subject in constant motion. In its favour, the E-M5 can certainly perform the confirmation process very quickly, and as a consequence can generally do a fair job at tracking. To put it to the test I photographed kids running towards and away from me using the Olympus 45mm f1.8 lens opened up to f1.8, where the E-M5 enjoyed a success rate of at least 70%. As such it’s one of the better contrast-based cameras in this regard, but it’s still not as confident or consistent as a phase-detect AF system when it comes to tracking.
As well As S-AF and C-AF modes there’s a C-AF TR tracking mode which locks onto a subject and follows it around the frame. I din’t have the opportunity to test this thoroughly but in good light it manages to keep a hold of moving object pretty well. There’s also S-AF MF which allows you manually fine tune once the AF has locked and finally Manual focus. With MF assist activated, or by assigning the magnify function to one of the Fn buttons, manual focusing is surprisingly easy, at least with the 12-50mm kit lens. Though in low light it isn’t so straightforward and you’re left wishing for something akin to the focus peaking of Sony’s NEX models.
Olympus OM-D E-M5 continuous shooting
The OM-D E-M5 offers two sequential shooting modes, H and L at 9fps and 4.2 fps respectively. At the faster of the two speeds focus and exposure are locked on the first frame and the slower speed offers continuous AF The specifications say the buffer is capable of storing 20 RAW frames or 70 Large Normal JPEGs.
To test the OM-D E-M5’s sequential shooting I fitted it with a newly formatted Sandisk Extreme Pro UHS-1 Card. For these tests the release setting which turns image stabilisation off during sequential shooting in the default position was left unchanged, in other word the IS was disabled.
First I set the image quality to Large Normal and fired a burst of images by holding down the shutter release. The OM-D E-M5 managed a burst of 19 shots before it stalled and the frame rate dropped to about 3fps. The frame rate for the first 19 shots was marginally under 9fps. Switching to Large Fine JPEGs the burst reduced to 16 shots, again a tad below 9fps. Changing again to RAW+ Large Fine JPEGs the burst again reduced to 14 shots at exactly 9fps.
With the Sandisk UHS-1 card and RAW + LF JPEGs, the buffer takes 21 seconds to empty, but you can continue to shoot shorter burst during that time – after waiting 10 seconds I was able to fire off a burst of seven RAW + LF shots before the buffer filled again. Switch to Large Fine JPEG mode and the wait shortens considerably to nine seconds. Note that switching to a SandiskExtreme speed class 10 card didn’t reduce the buffer write times, so although the OM-D E-M5 is compatible with UHS-1 cards they didn’t result in a performance boost in my tests. At some point though, slower cards will begin to affect the write times, with a speed class 4 card the buffer write time for RAW + LF JPEGs increases to 31 seconds.
Olympus OM-D E-M5 sensor
The OM-D E-M5’s 16.1 Megapixel sensor is the same size as used in other Micro Four Thirds compact system cameras and Four Thirds system SLRs. It’s smaller than the APS-C sensors common in DSLRs and results in a 2x reduction in the field of view compared with a full frame 35mm sensor. There’s been speculation that this sensor is the same as that used in the Panasonic Lumix DMC-G3 and GX1, but Olympus claims this is a new sensor and Gordon’s Raw noise tests comparing the EM-5 with the Lumix GX1 (which has the same sensor as the G3) would seem to back this up.
The OM-D E-M5’s files are saved as JPEG’s at one of two compression settings, Fine and Normal. At the best quality fine setting image files are around 7 to 8MB in size. The OM-D E-M5’s shutter speed range is 1/4000 to 60s plus Bulb to 30 minutes. The ISO sensitivity range is 200 to 25600 ISO.


