 The Nikon D5300 is what's often referred to in the technology world as an 'evolutionary' upgrade. Nikon has abandoned the D5200's optical low pass filter, which might have been considered revolutionary a year ago, but now looks, to borrow a fashion industry term, 'on trend'. That's not to say it's frivolous or unwarranted, given that it improves the D5300's image quality with no apparent drawbacks (Moire wasn't an issue in any of my test shots) it's absolutely the right move.
Nikon D5300 review
-
-
Written by Ken McMahon
Intro
The Nikon D5300 is an upper entry-level DSLR aimed at photographers looking for a step-up from a budget model without the expense, size and complexity of a higher-end model. Announced in October 2013, it comes just less than a year after the D5200, but makes some important upgrades including becoming the first Nikon DSLR with built-in wireless.
The headline feature is a 24 Megapixel DX format sensor, the same resolution as the D5200, but now with the optical low pass filter removed. This matches the specification of the D7100 sensor, proving Nikon firmly believes this approach is now in the mainstream.
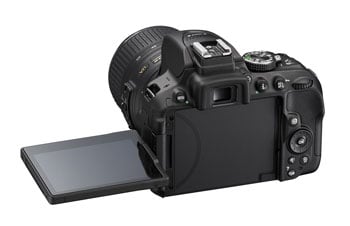
The screen remains fully-articulated, making it unique in the Nikon DSLR range, but the panel is now bigger and 3:2 proportioned to match the native shape of images without cropping, rather than the 4:3 screen of the D5200 and indeed most other Nikon DSLRs. Continuous shooting remains at 5fps, the AF system is unchanged with 39 points / 9 cross-type sensors, there’s still no AF motor to drive non AF-S lenses, but the viewfinder magnification has been boosted a little. Movies can now be recorded at 1080p60/50, and as mentioned earlier, the D5300 becomes the first Nikon DSLR to feature built-in Wifi and GPS – a very welcome but long overdue inclusion.
While there’s nothing like embedded phase detect AF or even a touch-screen, the D5300 still compares well against its natural rival from Canon, the EOS T5i / 700D, with higher resolution OLPF-free sensor and built-in Wifi, albeit again lacking the Canon’s touch-capabilities. In my review I’ve compared both models, to discover which is the best buy for those looking for a step up from a basic entry-level DSLR.
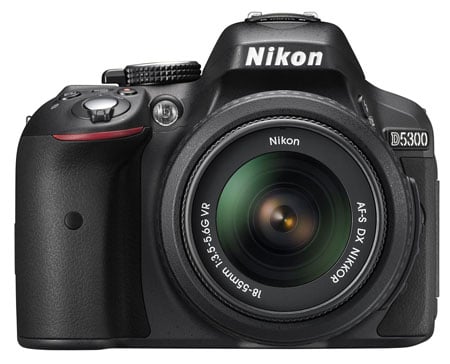
Nikon D5300 design and controls
While I wouldn’t go so far as to call it a major design update, the D5300 does feature a number of significant changes which taken together amount to an evolution in its appearance and handling. The body shape has changed a little and is more square-shouldered, giving it a less curvy more conservative look which doesn’t in itself change the way the camera feels in your hand, though.
As before, the AF illuminator is positioned high on the right side of the front panel between the lens mount and the grip in a gap that’s significantly narrower than on the D5200 but still just big enough to accommodate my skinny fingers – it might be uncomfortable for those with bigger hands though. On the other side above the lens mount lock there’s the same button arrangement as before – the top one activates the pop-up flash with a programmable Fn button underneath. Below the lock button there’s a new addition, the drive mode button has been moved here, evicted from the top panel to make room for the GPS and wi-fi antennas. This is actually a much better spot for it, as there’s no mistaking it for co-located buttons and it’s conveniently positioned for your left thumb.
On top, the proportions also look squared-up and slimmed down. In all, the redesigned body shape trims 5mm of the width and is 2mm shorter than the D5200, measuring 125 x 98 x 76mm; it’s also lost a little weight at 530g compared with 555g. Side-by-side with the Canon EOS T5i 700D with the kit lens fitted, it’s difficult to separate them just by looking and lifting, you have to resort to cold hard measurements to discover that at 133 x 100 x 79 and weighing 580g including card and battery, the Canon is a little bigger all round and a tad heavier.
Though you have to resort to measuring to differentiate them on size, one thing you can tell at a glance is that Canon and Nikon have quite different ideas about finishes. Nikon is sticking with its shiny body lacquered plastic for the D5300 which is available in black, silver and red, the latter the colour of our review model and not a choice for those who like to remain unobtrusive. This is obviously down to personal taste and I don’t dislike the shiny Nikon finish, but you have to wonder how well it’ll stand up to knocks and scratches. Apart from the buttons, the only surfaces that aren’t glossy are the grip and thumb pad, which are covered with a very comfortable rubber-like material which is reassuringly grippy, for want of a better word. By contrast the Canon T5i 700D is about fifty percent matt black plastic with the other half covered in a textured, slightly softer grip material. It looks more professional and has to be more durable than the D5300’s gloss finish.
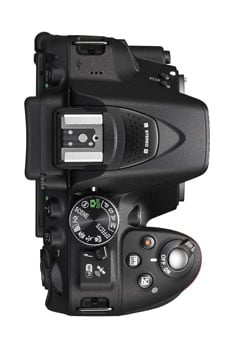
To get back to the control layout, aside from the absence of the drive mode button the top panel has much the same control layout as before. The large mode dial extends from the front and rear of the top panel with the spring-loaded live view lever extending from the right. To the right of that is the vacant space previously occupied by the drive mode button and though it’s now buttonless, there’s a square-shaped extrusion with satellite and wi-fi icons indicating the location of the respective aerials. It makes it look like they’ve been shoe-horned in, it certainly isn’t very elegant and makes the D5300’s top panel look even busier than it was before. There’s certainly a lot more going on here than on the top of the T5i 700D which looks cleaner and simpler.
Round the back, the D5300’s control layout also bears quite a close resemblance to its predecessor. One of two infra-red sensors is located on the top left corner (the other is on the front of the grip) next to the menu button just to the left of the viewfinder. The controls on the right side are as before – info and AE-L/AF-L buttons at the top, multi-selector controller surrounded by playback, magnify and delete buttons to the right of the screen. If fact, the most significant change is that all the buttons are closer together with less shiny plastic to separate them. It’s not just the reduced dimensions that are responsible, the D5300 has a slightly larger screen, at 3.2 inches measured diagonally, compared with the 3 inch screen of its predecessor. When you think about it, fitting a larger screen into a smaller body is quite a feat and the fact that the controls don’t feel at all cramped is testament to the skill and ingenuity of Nikon’s designers. They’ve even managed to make room for a bigger and more sculpted thumb rest.
On the right side of the body you’ll find an SD memory card slot that’s compatible with SDXC standard in addition to SD and SDHC. Cards rated as Class 6 or faster are recommended for movie recording.
On the left side of the body are four ports behind a large flap. Like its predecessor you’ll find a combined USB and analogue AV output, a Mini HDMI port, a 3.5mm jack to connect an external microphone and the proprietary accessory terminal compatible with, according to the manual, the W1-R and less expensive WR-R10 radio frequency wireless remote transceivers, the MC-DC2 remote cord and the GP1 and GP1a GPS units. The last of these is of course redundant on the D5300 which has built-in wi-fi and GPS capabilities.
In a compartment underneath the body you’ll find the rechargeable EN-EL14a Lithium Ion battery pack. This is a more powerful version of the EN-EL14 battery used in earlier models and is rated at 1230mAh. It’s good for around 600 shots under CIPA conditions, that’s well up on the 500 shot capacity of the D5200, but still not approaching the 660 shots that owners of the even earlier D5100. It’s also well ahead of the Canon EOS T5i 700D which manages 440 shots on a full charge from its battery. You can of course fit the 700D with the BG-E8 battery grip, which takes two batteries, effectively doubling the capacity to 880 shots; there’s no battery grip accessory currently available for the D5300 so if you want to carry extra power with you the options are limited to popping a spare in your camera bag. Battery life is shown on-screen using a three segment indicator, but unlike higher-end models in the range, there’s no menu showing a precise percentage of remaining charge.
Like its predecessor, the Nikon D5300 is equipped with both a popup flash with a Guide number of 12 and a hot shoe for external flashguns; the maximum sync speed is 1/200. Flash compensation and power level is adjustable, and you can also choose from red-eye, slow-sync and rear-curtain options. The built-in flash Guide number increases to 13 with manual control, which matches that of the Canon EOS T5i 700D. The D5300’s built-in flash can either popup automatically or by pressing a button on the side of the head, and once you’re finished with it, you can just push it back into place. If you mount a compatible flashgun like the SB-400, SB-600, SB-700, SB-800 or SB-900, the D5100 can support the Nikon Creative Lighting System (CLS) which offers iTTL and wireless control.
Nikon D5300 screen and viewfinder
The D5300 has a new LCD screen which is physically larger, wider and boasts a higher resolution than its predecessor. The D5200 was fitted with a 921k dot, 640×480 pixel screen with 4:3 proportions which meant that for stills shooting the 3:2 image was displayed with a black bar at the bottom (showing exposure information). Nikon has followed Canon’s lead, opting for a 3:2 proportioned screen with the same 1040k dot resolution and 720×480 pixel grid that Canon introduced on the T2i 550D and continues to use on the T5i 700D.
At 3.2 inches, the new screen is slightly larger than the the 3 inch screen of the Canon T5i 700D. Just under a quarter of an inch may not sound a lot, but it makes quite a difference. At first glance the D5300’s screen looks huge compared with the T5i 700D’s. Look closer, though, (or just turn the camera on) and it becomes apparent that the active 3:2 screen area is surrounded by quite a lot of black, particularly at the top where there’s a black band nearly a centimetre deep. To be clear, the active screen area does measure 3.2 inches diagonally, but sits in a panel that’s 4 inches diagonally. That said, the D5300’s active screen area is visibly larger than the T5i 700D’s and that does make a difference when reviewing images and composing them in Live view.
Despite the fact that they share the same resolution I thought the D5300’s image looked slightly more detailed and it was less prone to moiré patterns when faced with fine repeating patterns. The Live view image is stable and pleasantly warm, though this obviously has no bearing on the recorded image. As before, the D5300’s screen is hinged on the left side so can be flipped out to face in any direction, a trick the Canon T5i 700D can equal. But where the T5i 700D really scores over the D5300 is with its touch screen which provides a much more direct way of accessing settings and controls than the i-button and control pad on the D5300.
When not being used for Live view the screen displays shooting information, something I’ll go into detail about in the handling section a little later. For now I’ll just say that while Nikon has previously made big improvements to the design of the information screens, it’s a shame to still have to look at pixellated lettering when the display is obviously capable of much better.
The D5300 has a pentamirror optical viewfinder which provides 95 percent coverage of the image area in both horizontal and vertical planes with a magnification of 0.82x, an increase on the 0.78x of the earlier D5200. The numbers for the T5i 700D are 95 percent coverage and 0.85x magnification, but remember Canon’s APS-C sensors are fractionally smaller, so even with a slightly greater viewfinder magnification the actual viewfinder image size on the T5i 700D and D5300 are in fact very similar. Indeed there’s little if anything to tell the two apart in terms of viewfinder size and brightness. The screens and AF markers vary, with the D5300 the outline of the AF area is etched on the screen and the active AF points flash black (red in low light). On the T5i 700D the nine AF points are etched squares on the screen with a central dot that flashes when active.
I didn’t have a D5200 to compare, but I did have a D3200 and was surprised to discover that its 0.8x viewfinder looked significantly smaller than the D5300’s. That suggests that D5200 owners considering an upgrade will benefit from a substantially bigger viewfinder image. Though, if the view through the viewfinder is important to you, then the pentaprism-equipped D7100, though heavier, and of course more expensive, will provide a far bigger brighter view.
Nikon D5300 lens and stabilisation
The Nikon D5300’s F-mount can accommodate most Nikkor lenses, with the DX-format sensor resulting in their field of view being reduced by 1.5 times; so the DX 18-55mm VR kit lens delivers an effective focal range of 27-83mm.
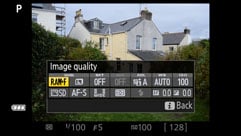
As with all Nikon DSLRs, you’ll need recent lenses to support the full focusing and metering modes. Nikon doesn’t provide a PDF manual with the D5300 and the paper manual that accompanies it is even more basic than the one that shipped with its predecessor, but does include a lens compatibility chart which you can also find on the Nikon website. Just briefly you’ll need a Type G or D AF (including AF-S and AF-I) Nikkor to support all functions including the most sophisticated 3D Colour Matrix Metering II system.
Nikon D5300coverage wide | Nikon D5300coverage tele |
 |  |
| 18-55mm at 18mm (27mm equiv) | 18-55mm at 55mm (83mm equiv) |
Like the D3000, D3100, D3200, D5000, D5100 and D5200 before it, the D5300 does not feature a built-in motor required to auto-focus older non-AF-S lenses. These lenses will still work on the D5300, but they become manual-focus only. The D5300 will only auto-focus with AF-S or AF-I CPU lenses from the Nikkor range. If you want autofocus from third party lenses, look for models with built-in focusing motors like Sigma’s HSM series.
Nikon omitted the AF motor to save size, weight and cost, and while its absence will frustrate enthusiasts who want to use older lenses, it’s less of an issue for the D5300’s target audience which will mostly buy newer AF-S models. One final word on lenses; if you own Sigma F-mount lenses with an AF motor built-in, you’ll need a firmware update to ensure they work properly with the D5300. The main issue appears to be that AF doesn’t work in Live view. Sigma says all new products dispatched from its factory will have the latest firmware, but you’d be advised to check, just to make sure. Sigma is advising owners to contact their local Sigma distributor for details of the update, which is free and can be installed for compatible lenses using the Sigma USB Dock and Optimization Pro software. You can find more details on the Sigma website.
Nikon D5300 18-55mm f3.5-5.6 G VR Off/ Continuous | ||||
 |  | |||
100% crop, 18-55mm at 55mm, 100 ISO, 1/10th VR off. | 100% crop, 18-55mm at 55mm, 100 ISO, 1/10th VR on. | |||
The VR suffix on the 18-55mm kit lens stands for Vibration Reduction and provides the lens with anti-shake capabilities which you can see through the viewfinder, although with a longest equivalent focal length of 83mm, any wobbling isn’t that obvious. VR is enabled by sliding a small switch on the lens barrel. To test the effectiveness of the 18-55mm kit lens’s VR stabilisation on the D5300 I zoomed it to its maximum 83mm equivalent telephoto focal length and took a sequence of shots in Shutter priority mode at progressively slower shutter speeds first with stabilisation off and then turned on.
As you can see from the 100 percent crops above, the Vibration Reduction system is capable of eliminating camera shake down to 1/10th – about three stops slower than conventional wisdom suggests. I found it was possible to hold the D5300 steady at speeds down to 1/25 without VR enabled, so effectively it really only provided me with just over a stop of stabilisation, all the same it’s a useful feature to have on this lens.
Nikon D5300 shooting modes
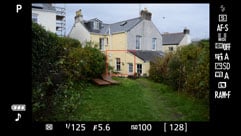
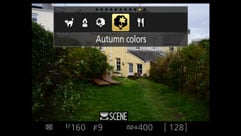
The Nikon D5300 shares the same exposure modes as its predecessor; the main dial offers the traditional PASM modes, along with direct access to five scene presets, flash off, full Auto (with scene detection in Live View, see screenshot right), a SCENE position which presents access to 11 further presets, and an EFFECTS mode, first introduced on the D5100. There’s no movie mode position on the dial as you can start shooting in any mode by simply entering Live View then pressing the red button by the shutter release.
The D5300 offers shutter speeds between 1/4000 to 30 seconds with a Bulb option in Manual; Program Shift is also available. Exposure compensation is available in a broader than average range of +/-5EV, and basic bracketing is offered with three frames in steps between 0.3 and 2EV, but at least it is available as the D3200 had none. White Balance and Active D-Lighting bracketing is also available.
The Nikon D5300 shares the same three metering modes as the D3200, D5100 and D5200 before it: Spot, Centre-weighted and 3D Colour Matrix II, the latter employing the same 2016 pixel RGB sensor used in the D7100.
Like most settings on the D5300, these are adjusted through the main information screen system. Note you’ll need a type G or D lens to deliver distance information for the 3D system, otherwise the D5300 falls back on Colour Matrix Metering II. I found 3D Matrix metering on the D5300 delivered consistently accurate exposures, and refreshingly unlike many Nikon DSLRs I’ve tested, wasn’t fooled by extremely bright scenes like my outdoor resolution test.
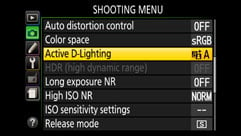
Active D-lighting, has six positions, Off, Auto, Low, Normal, high and Extra high, compared with just two positions on the D3200, It enhances the tonal range to retain detail in the shadow and highlight regions. D-Lighting can also be applied by post processing images in-camera via the Retouch menu in which case you have the choice of three settings. As you can see from the sample images below, with ADL off on the left and set to Extra high on the right, Active D-lighting enhances shadow detail in scenes with a wide tonal range and reduces blown highlights, but the effect is quite subtle, even on the Extra high setting. Because it’s difficult to see the difference from the full frame comparison, I’ve also shown a cropped area in which you can clearly see better retention of the highlight detail. As such I can’t see any reason you wouldn’t leave it in the default Auto position, unless noise was a factor.
Nikon D5300 Active D-lighting off / Extra high | ||||
 |  | |||
Aperture priority 100 ISO f5.6 0.6s ADL off. | Aperture priority 100 ISO f5.6 1/3s ADL Extra high. | |||
 |  | |||
Aperture priority 100 ISO f5.6 0.6s ADL off. | Aperture priority 100 ISO f5.6 1/3s ADL Extra high. | |||
 |  | |||
Regardless of your shooting mode, the D5300 is a very friendly camera, the context-sensitive help system which displays handy hints on the current setting or menu whenever you press the Question mark button. Sometimes you’ll see the question mark blinking in the corner of the screen, in which case the D5300 believes something’s wrong and wants to make a suggestion, such as to use the flash. If only all cameras were this friendly.
As on earlier models, the D5300 is equipped with an interval timer for shooting time-lapse sequences. The Interval Timer triggers the camera at pre-set intervals; you can choose the number of shots, the interval between them, and also delay the starting time if desired. I wish all cameras had this built-in. If you want Intervalometer facilities on the Canon EOS T5i 700D, you’ll need to connect it to a laptop and use the supplied EOS Utility, whereas it’s all built-into the D5300 without any accessories required.
The D5300 has an HDR mode, introduced on its predecessor which combines two exposures to produce a single image with a wide range of tones for high contrast subjects. As with Active D-lighting there’s a choice of Low, Normal, High, Extra High and Auto settings. Above you can see my church test scene shot at 100 ISO first with a single exposure then in HDR mode at the Normal, High and Extra high settings. HDR manages to retrieve some highlight detail but at the higher settings it’s the shadows that benefit the most.
Nikon D5300 HDR mode | ||||
 |  | |||
Off | Normal | |||
 |  | |||
High | Extra High | |||
Turn the D5300’s mode dial to the Effects position and you have the choice of nine special effects filters – Night vision, Colour sketch, Toy camera effect, Miniature effect, Selective colour, Silhouette, High Key, Low key and HDR painting. Of these, Colour Sketch, Toy camera, Miniature, and Selective colour are available in Live view and can be previewed on the screen. These effects can also be used for movie recording and you can see an example of the D5300’s miniature mode in the Movies section below. Below I’ve shown examples of the Toy camera, Miniature, and HDR painting effects.
 |  |  |
When in Live view mode the available effects can be adjusted and previewed, for example Colour sketch offers vividness and outline options, Toy camera vividness and vignette settings and in Miniature mode you can orientate and position the in-focus area. Though the Effects filters aren’t likely to be one of the D5300’s biggest draws, they’re nonetheless a worthwhile addition that many will use, if only occasionally, and compare pretty favourably with the Creative effects filters available on the T5i 700D.
Nikon D5300 movie modes
The D5300 improves on it’s predecessor’s movie modes with a new 1080p50/60 mode. The D5200 offered 1080i50/60, but the new progressive mode will not only provide better quality, but allow shooting high quality slow motion clips by replaying the footage at 30fps. As before, frame rates are dependent on whether PAL or NTSC video mode is selected in the Setup menu with the former providing 25 and 50fps modes and the latter 30 and 60fps.
From the top down, the full range of PAL video modes is 1080p50, 1080p25, 1080p24 720p50 and 640×424 at 25fps. As I’ve mentioned For NTSC the 50 and 30fps rates switch to 60 and 30 with the exception of the 1080p24 mode which remains at a film-like 24fps. There are two quality settings, Normal and High; Nikon doesn’t publish details of the compression settings but I measured the 1080p60 High quality footage at an average bit rate of 35 Mbps and on the Normal setting it was 20 Mbps. This is an improvement in quality terms over the D5200, which also offered High and Normal quality settings at 24 Mbps and 12 Mbps respectively.
So depending on the footage, at the best quality High 1080p60 setting a 10 Minute clip will take up around 2GB and that’s the longest you can shoot with the D5300 in its 1080p60 High quality mode, though if you reduce the quality to Normal that extends to 20 minutes. As before clips are saved in QuickTime format using the H.264 codec as on the T5i 700D.
The D5300 doesn’t have a movie shooting position on the mode dial, you must first put the camera into Live view mode before pressing the movie record button. The Live view switch is on the mode dial and superficially this looks like a similar arrangement to that on the T5i 700D’s where the on/off switch has a third position for movie shooting which puts the camera into Live view mode and displays a 16:9 view on the screen. On the D5300 though, the display remains in 3:2 mode until you press the record button, though pressing the info button switches to the ‘Show movie indicators’ overlay which places dark bands top and bottom to indicate the 16:9 movie area as well as displaying the movie mode, time remaining and audio level indicators.
The D5300 sets the shutter speed, aperture and ISO sensitivity automatically for movie shooting, but setting manual movie settings to On in the Shooting menu allows setting of the shutter speed and ISO when the mode dial is set to the M position. You can even adjust the shutter speed and ISO during filming so long as you’re happy to put up with the clicking of the command dial which is easily picked up by the built-in mics. What you still can’t do though is change the aperture for the movie mode – as before, the movie mode inherits the aperture value from Live View, so the best you can do is preset the aperture before entering Live View, then start the movie mode. While this falls short of the complete Manual exposure control available on the T5i 700D, it remains a big improvement on the D5200 which had no dedicated manual exposure mode but simply inherited the currently selected aperture when switched to Live view.
The D5300 features built-in stereo mics and it also has a 3.5mm jack for an external mic such as Nikon’s ME-1 microphone which mounts on the hot shoe. And like its predecessor the D5300 outputs video at all resolutions including 1080i and 1080p over its HDMI port without any graphics overlays, so you can drive an external monitor or capture the HDMI feed using an external device.
Now let’s have a look at a selection of clips that demonstrate its capabilities.
| |
|---|---|
| |
|
| |
|---|---|
| |
|
| |
|---|---|
| |
|
| |
|---|---|
| |
|
| |
|---|---|
| |
|
| |
|---|---|
| |
|
Nikon D5300 handling
As the D5300’s controls and menu system are broadly the same as its predecessor, in this section I’ll confine myself to talking about the impact on handling of those changes before going on to talk about the headline new features, the built-in GPS and wi-fi.
For anyone upgrading to the D5300 the larger screen will make a bigger difference than you might expect, don’t forget that it’s now 3:2 proportioned so still images fit it exactly and there’s no black band along the bottom as there is on the 4:3 screen of the D5200 and D3200. The viewfinder is also bigger, a improvement that’s easy to overlook, as the only clue is in the specifications with the newer model’s boasting 0.82x magnification compared with 0.78x on the D5200 and 0.8x on the D3200.
As I mentioned earlier, the drive mode button has been moved from the top panel to the front of the camera on the left side of the lens, making it easy to operate with your left thumb and de-cluttering the top panel which is nonetheless pretty busy without it.
The display graphics underwent an overhaul on the D5200 and remain the same here. As before there are Classic and Graphic display options, each available in one of three colour schemes. with the graphic display providing three big animated dials displaying shutter speed, aperture and ISO setting.
 |  |  |
 |  |  |
 |  |  |
Shooting mode, drive mode and battery life are displayed above the graphics with the AF area indicator and number of shots remaining below it. At the very bottom of the screen is a two-row grid with other settings. On the top row, quality, bracketing, HDR, Active D-Lighting, White balance and ISO, with Picture control, Focus mode, AF-Area mode, Metering mode, Flash mode, Flash compensation and Exposure compensation on the bottom. As before, you can change any of these by pressing the I button then using the control pad to navigate to the required setting and selecting your chosen option from a secondary screen. It’s pretty slick, but it can’t compare with the touch-screen operation of the Canon EOS T5i 700D for speed and simplicity.
Nikon D5300 Wi-fi and GPS
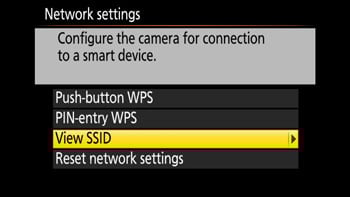
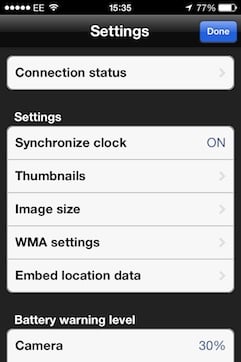
When it was introduced, one of the headline features of the D5200 was its compatibility with the WU-1a wireless mobile adapter, a small wi-fi dongle that plugged into the USB / A/V port. The WU-1a allows you to transfer images to a smartphone as well as providing remote operation. The D5300 goes a step further, providing built-in wi-fi and GPS, so I was keen to see what features it offers over and above the WU-1a other than the convenience of not having to plug-in an accessory.
Let’s start by looking at the wi-fi functions. The printed manual provides a few scant details about the functioning of the D5300’s wi-fi, confining itself to the details of connecting it to your smartphone. For Android devices there’s the option of WPS, pin or SSID connection, but iOS users have only the latter option. I tested the D5300’s wi-fi with my iPhone 4S and had no problem connecting, first enabling w-fi on the D5300, then selecting the displayed SSID on my iPhone.
Next up, you launch the Nikon Wireless Mobile Utility which allows you to transfer images from the camera and remotely operate it. This is the same app that’s used with the WU-1a and I was hoping that Nikon would have updated and enhanced it for use with the D5300’s built-in wi-fi, alas, that appears not to be the case.
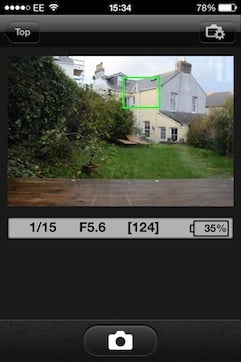
The iOS app is functional, though quite limited. The top menu consists of two options – Take Photos and View photos. Select the former and camera is immediately switched to Live view with the display showing what you’d normally see on the LCD screen, but with a more limited info display. The camera’s screen is blank and remains so while you’re in ‘Take photo’ mode, that means you can’t switch to Live view on the camera, or playback images, but you can change settings and access the menus.
Once you’ve entered the shooting mode in the iOS app control of pretty much everything passes to your phone, but here I’m using everything in its more limited context of focussing and releasing the shutter. The wireless remote app provides Live view touch focussing – you can tap anywhere on your phone screen and the D5300 responds immediately, adjusting the focus for the selected area. This is great, and it’s just a shame that this is the only way in which the app extends the camera’s functionality, in virtually every other respect what you get is a very restricted mode of operation.
With your iPhone in portrait orientation basic exposure settings are displayed below the Live view and if the camera was set to Program mode before you entered shooting mode you’ll see the aperture and shutter speed change as you move the camera and the metering responds to the changing light. But it’s not possible to use program shift or exposure compensation to change the exposure.
Once you’re in shooting mode with the app, none of the camera controls are functional. This is a pretty serious limitation given that the app itself doesn’t provide any exposure or other controls beyond touch focus and shutter release. This applies to all the shooting modes so, bizarrely, in manual mode the exposure settings are fixed to whatever was set before you entered remote shooting mode. To change them, you have to select camera from the app settings menu, which turns off live view, change the settings on the camera, then select ‘WMU’ to turn Live view back on. In Aperture and Shutter priority modes, the auto element will adjust but again, to change the manual element (i.e. the shutter speed in Shutter priority mode) you have to hand control back to the camera via the app’s setting menu, make the change then re-enter remote shooting mode from the app.
And while the app has a two-second self-timer feature, you can’t use the D5300’s ten second self timer, the interval timer, or either of the continuous shooting modes. As there’s no way of holding down the shooting button on the app you get a burst of about three frames and that’s it.
 |  |  |
 |  |  |
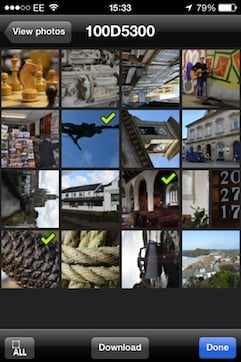
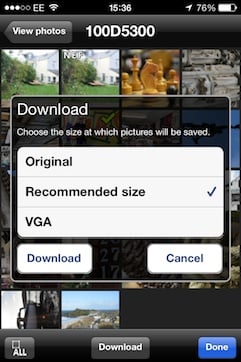
The second top menu option on the app allows you to view images on the camera card and download them to your phone. You can select individual images or download everything on the card and as well as original full-sized images you have the option of downloading 640×480 resized photos or letting the app choose an appropriate size on the basis of the device you’re transferring to. It took a little under 20 seconds to transfer a large fine JPEG to my iPhone.
So the D5300’s built in wi-fi feature is limited to the exact same functions as the WU-1a wi-fi dongle – essentially it’s just like having the WU-1a built-in. As such you can connect to it with a smartphone or tablet and remote shoot with very limited control and download photos, but not video. I have to admit I find that pretty disappointing. While it’s great to have the convenience of wi-fi built-in and it’s a commendable move by Nikon, I don’t think it’s too much to expect a little more in the way of remote control features as well as the ability to transfer a folder of photos to a laptop. And these days, direct connection to photo sharing and social networking sites is also getting to be a must have. So while this is a good start, Nikon’s still got plenty of ground to cover. It may be ahead of Canon, the T5i 700D has neither wi-fi or GPS, but it could still learn a thing or two from Sony, Panasonic and Olympus where wi-fi functionality is concerned.
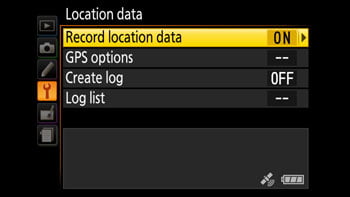
As with wi-fi, owners of earlier Nikon DSLRs have had to rely on plug-in accessories for GPS tagging; The D5300 is the first Nikon DSLR to have both built-in, and while the GPS capabilities are basic, there’s no built-in location database or mapping for example, they’re easy to set up, reliable and pretty transparent in operation. The GPS receiver is turned on by enabling it in the Setup menu. Once that’s done it will acquire the necessary satellite connections and tag images with the latitude, longitude and elevation above sea level. The D5300’s satellite acquisition was good, it managed to get an accurate fix in open spaces and even indoors relatively easily and often within a minute of switching the camera on.
A satellite screen icon tells you when the GPS is receiving location information and in payback mode one of the display overlays provides a readout of the location data, which other application can obviously make use of to plot images on a map. The D5300 will also keep a track log so that you can plot a trail of your travels with images located on it either using mapping software or one of the many websites that support trip logging. Beware when using this option though as it keeps the GPS on even when the camera is turned off and results in much reduced battery life.
Nikon D5300 Focus
The D5300 retains the 39-point AF system introduced in its predecessor. This uses the same Nikon Multi-CAM 4800DX autofocus sensor module with 39 focus points (including 9 cross-type), as the earlier higher end D7000. In AF terms, this places the D5300 right where you’d expect it, between the the D3200 with 11-point, and the D7100 and D300s with 51 point systems.
There are three main AF modes: AF-S (Single Servo AF), AF-C (Continuous Servo AF) and AF-A (an Auto mode which selects between them depending on whether the subject is in motion). These are selected from the main information display screen, where you’ll also be offered a Manual focusing option.
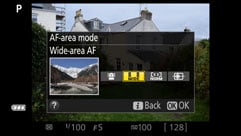
There are four AF Area modes: Single Point, Auto Area, Dynamic Area, and 3D Tracking (the latter only available in AF-A and AF-C modes). In Single and Dynamic Area, you can manually adjust the focusing point using the rocker control, with Dynamic Area also considering surrounding focus points if the subject moves. Dynamic Area AF is available in three variants – 9-point, 21-point and 39-point. 9-point dynamic Area AF is recommended for subjects like runners or race cards that move predictable, 21-point for unpredictable movement such as football players and the full 39-points for difficult to frame quick-moving subjects like birds.
The D5300 exclusively relies on contrast-based AF in Live View, with the choice of four modes: Normal Area, Wide Area, Face Priority and Subject Tracking. There’s also the choice of AF-S (Single) or AF-F (Full-time Servo) AF-Area modes, where the latter attempts to continuously autofocus, plus there’s also the option to focus manually in Live view.
It’s interesting to compare the AF system of the D5300 against the Canon T5i 700D: through their viewfinders they both employ traditional phase-detect systems, with 39-points on the Nikon versus nine on the Canon, although both share the same number of cross-type sensors, nine in all. In good light there’s little between them in performance when focusing through the viewfinder. Indoors though the margin gets a little wider and with low contrast subjects the D5300 can be a little hesitant, a problem I rarely encountered with the T5i 700D. In Live View and for movies, the Nikon AF is 100% contrast-based while the Canon sports a hybrid system which combines embedded phase-detect AF points in a central region of the sensor, outside of which it employs contrast-based AF. While the T5i 700D doesn’t boast Canon’s latest hybrid AF system, it remains quicker and more confident to focus in Live View and for movies than the D5300, without anywhere near as much hunting.
Nikon D5300 Continuous shooting
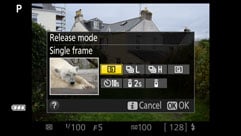
Like its predecessor, the D5300 has two continuous shooting modes, Continuous L and Continuous H which operate at a maximum speed of 3 and 5fps respectively. If you set the AF mode to continuous the D5300 will focus between shots but the rate slows by such a degree you’re better off setting AF-S, in which case the focus is fixed on the first shot.
To put it to the test I fitted the D5300 with a freshly formatted 8GB Sandisk Extreme Pro UHS-1 SD card rated at 45MB/s. With the D5300 set to 200 ISO and 1/500 and the quality set to Large Fine JPEGs I fired off a burst of exactly 100 frames before the camera stopped shooting. I timed the 100-frame burst at 22.5 seconds making a frame rate just under 4.5fps, however the 100 frame burst wasn’t consistent, it slowed after about thirty frames with occasional pauses. So I timed the first twenty five frames at a rate of just over 5fps.
Set to RAW the D5300 fired off eight frames before slowing appreciably. The first eight frames were shot at a fraction under 5fps after which the D5300 slowed to just short of a fairly steady 3fps. As with the D5200 the green LED that flashes to signify writing to the card flashes for nearly a minute following a 100-frame continuous burst, nonetheless it’s possible to shoot a second 100-frame burst only a few seconds after the first.
Nikon D5300 Sensor
The D5300 has a 24 Megapixel DX format sensor, the same resolution as the D5200, but now with the optical low pass filter removed. This matches the specification of the D7100 sensor, proving Nikon firmly believes this approach is now in the mainstream
Almost every digital camera employs a low pass filter to slightly blur the image before it’s recorded by the sensor. This is to counteract the effect of moiré where fine patterns like textiles, distant fencing or roof tiles can trigger an interference effect with undesirable shimmering; you may have seen this on TV when someone wears a striped shirt. But as resolutions and pixel densities increase, these fine patterns are being resolved successfully which begs the question why are we still blurring the incoming light?
With the COOLPIX A, D7100 and now the D5300 opting to omit the optical low-pass filter it’s looking increasingly like Nikon no longer views it as necessary. This makes sense as it allows the camera to deliver potentially sharper images than traditional 24 Megapixel models without unnecessarily boosting the resolution; you can find out how it compares in my results pages. It’ll be interesting to see if other companies follow-suit. In the meantime in the increasingly unlikely event of an image suffering from moiré, you can reduce it in software using Capture NX.
To see how the quality of the Nikon D5300 measures-up in practice, take a look at my Nikon D5300 quality and Nikon D5300 noise results pages, browse my Nikon D5300 sample images, or skip to the chase and head straight for my verdict.


