
 The COOLPX B700 offers a pretty compelling all-round package. With the combination of the 60x zoom, Raw shooting and 4K movies together with the seamless connectivity provided by Snapbridge, there's very little that compares with the B700 at this price point. Ultimately though, it mostly comes down to the 60x zoom range and SnapBridge, which will allow you to share you photos with minimal effort. 4K UHD movies and RAW shooting sound impressive, but some might question just how much extra quality they'll provide in practice given the limitations of the compact sensor. All the same, they're great features to have and are backed up with manual exposure control and loads of feature modes. There's a also the excellent viewfinder and articulated screen to factor in, though these remain unchanged from the earlier COOLPIX P610, which may be available at a lower price.
Nikon COOLPIX B700 review
-
-
Written by Ken McMahon
In depth
The Nikon COOLPIX B700 is an SLR-styled super-zoom with a 60x optical zoom lens. The lens covers a range from 24mm to 1440mm in 35mm equivalent terms and has a maximum aperture of f3.3 closing to f6.5 at the telephoto end of the zoom.
The B700’s 20 Megapixel sensor supports 4k UHD video and as well as PASM exposure modes for stills shooting it has a raft of scene and feature modes. There’s a 3 inch 921k dot vari-angle screen which can face any direction and a 0.2in 921k electronic viewfinder which is particularly useful when using the zoom at or near its maximum range.
The B700 is the latest Nikon compact to benefit from the company’s new Snapbridge technology. The camera has built-in Wifi, NFC and Bluetooth chips. The low-power Bluetooth connection can be used to automatically transfer photos to your smartphone as well as tag photos in the camera with geolocation data and watermarks. Wifi is used for more conventional manual selection and wireless transfer of photos to your phone and the NFC chip provides tap-to-connect for suitably equipped Android phones. All of this is handled by the SnapBridge iOS or Android smartphone app.
If you own a COOLPIX P610 all this is probably sounding quite familiar. The B700 is the natural successor to the P610 with which it shares the same 60x zoom, the screen and electronic viewfinder. The COOLPIX B700 was introduced in late 2016 alongside a budget sibling, the COOLPIX B500. The B500 has a shorter 40x optical zoom range, lacks a viewfinder, has no PASM exposure modes, no 4K video and is generally a simpler less sophisticated model than the B700. It costs a little over half what you’ll pay for the B700. So here’s the question: is all that control and sophistication worth the extra money, or will the less expensive COOLPIX B500 give you everything you need or want from a super-zoom. In my review I’ve tested and compared both models, so read on to find out which is the best superzoom for you.
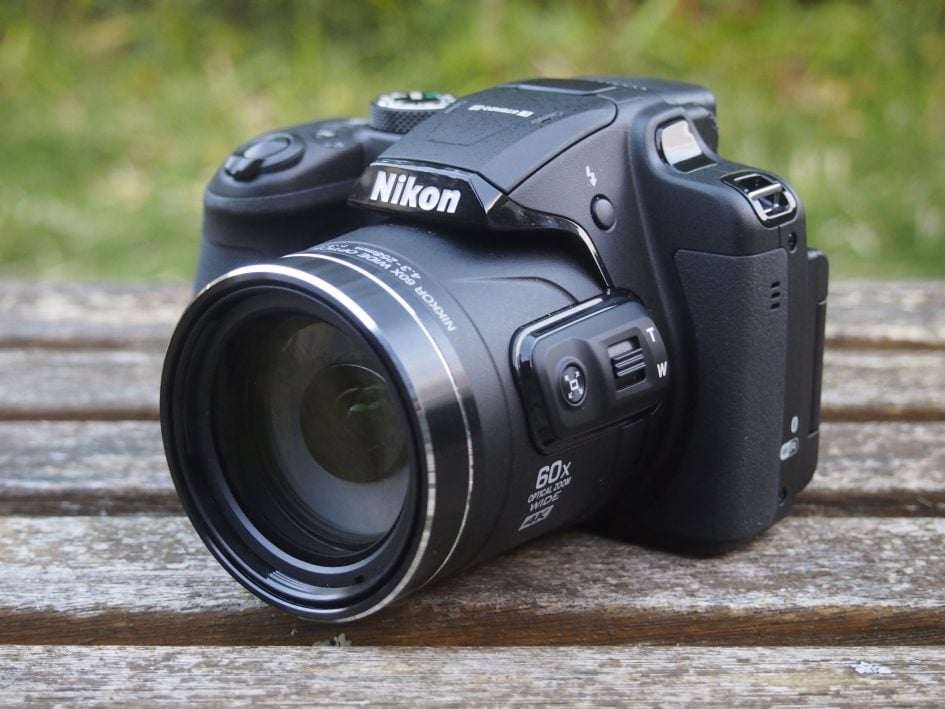
Nikon COOLPIX B700 design and controls
Externally, the COOLPIX B700 looks little different to the Earlier P610 and indeed the P600 before that, and yes, the even earlier P500. Clearly Nikon thinks it’s got a winning form factor here and I’m not going to argue. The COOLPIX B700 fits very comfortably in my hands. The grip, which is covered in soft textured rubber-like material is slightly shallower than that on the B500 (which needs to be bigger to accommodate four AA batteries) but is still generous. I’ve got quite long fingers and my middle finger just makes contact with the body when wrapped around the grip.
The dimensions are 125 x 85 x 106mm and the B700 weighs 570g with the battery and a card – that’s a little bigger all round and just under 30g, or about an ounce heavier than the B500. I could comfortably fit the B500 in my parka pocket; the B700 went in, but it was a tight squeeze and a bit of a faff to get back out.
On the top panel, the mode dial has positions for auto mode, the PASM modes, three dedicated scene mode positions (Night landscape, Night portrait and Landscape) a Scene position for the remaining scene modes (selected via the screen menu) Creative effects and finally a user defined mode. To the right of the mode dial you’ll find the on/off button and a programmable function button which used to be labelled Fn, but is now Fn1. That’s because the dedicated Wifi button on the rear panel is now a second programmable function button labelled Fn2.
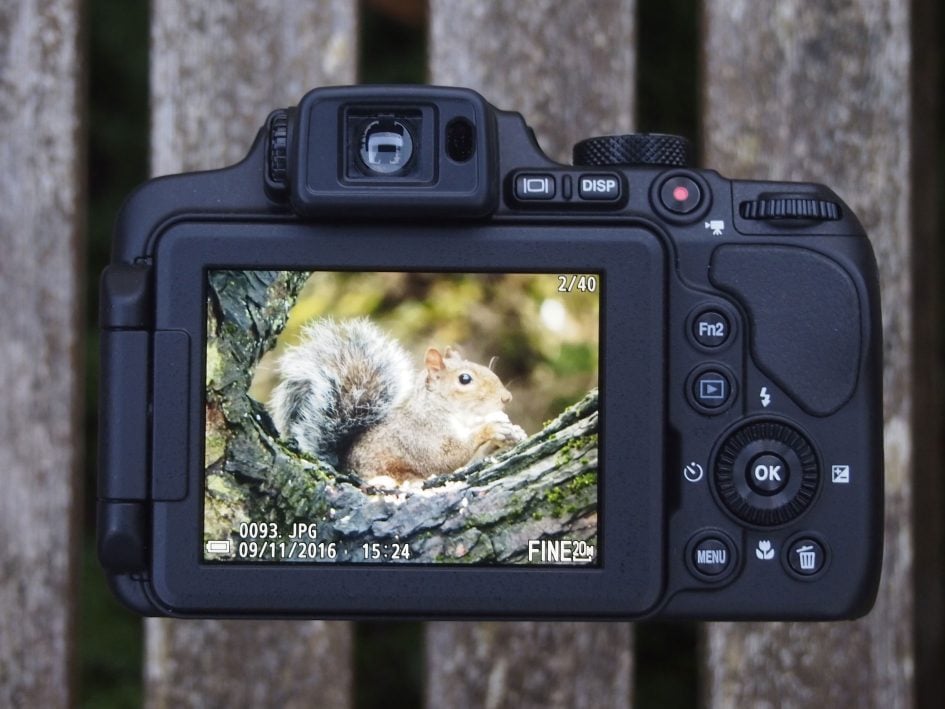
On the back the control dial is flanked by playback, menu and delete buttons with a movie record button conveniently positioned just above the thumb rest. Here, just above the screen you’ll also find a button for toggling display overlays as well as another button for toggling between the screen and the viewfinder.
The screen is a 3 inch LCD panel with resolution of 921k dots. It’s the same panel as on the B500 and they both provide a bright detailed image that’s viewable from a wide angle. The difference is the mounting. While the B500 has an articulated hinge at the bottom allowing you to flip it up and down, the COOLPIX B700’s screen has a hinge at the side with the screen mounted on a rotating pin. This allows you to turn it in any direction – facing forward for selfies, orientated for portrait format shooting, and folded in on itself for protection.
As well as the screen the COOLPIX B700 has a 0.2 inch 921k dot electronic viewfinder. In good light the viewfinder provides a stable detailed view, though in very low light there’s an ever so slight, but noticeable lag. This is a minor complaint, however, and for wildlife and sports shooting, or for that matter any situation where you need to keep track of a moving subject when zoomed in it’s indispensable.
Next to the viewfinder is a small sensor which automatically turns the viewfinder on and the screen off when you raise the camera to your eye. There’s also a button to turn off the sensor and switch views manually if you prefer. Why would you want to do that? Well sometimes, for example if the camera is mounted on a tripod and you’re shielding the screen from sunlight with your hand, or when you’re shooting from the waist with the screen flipped up, the sensor can detect your hand or body and toggle to the viewfinder when you don’t want it to.
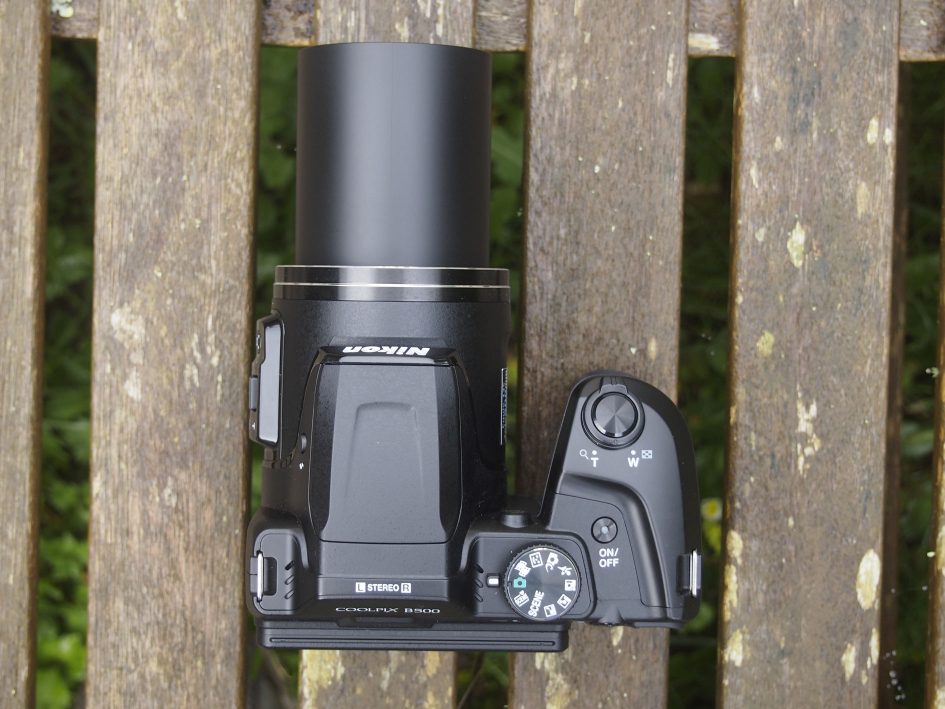
On the right side of the COOLPIX B700’s body mini HDMI and a combined USB / AV out port are located behind a soft plastic flap. Nikon provides a USB cable in the box which can be used to charge the camera from a computer as well as for transferring photos and video.
The COOLPIX B700’s combined battery and card compartment is located in the grip and accessed via a door in the base of the camera. It takes the same EN-EL23 battery as the earlier P610 and you can expect to get around 440 shots from a full charge – nearly a hundred more than previously.
The COOLPIX B500 is a very different proposition when it comes to batteries as it takes 4 AAs. If you fit it with non-rechargeable alkaline batteries you’ll get around 600 shots, a lot more if you use NiMH or Lithium rechargeables. Personally I think the ability to charge the battery in the camera from a laptop or other source via a USB cable is a big plus for the B700, but there’s no denying the flexibility and convenience that AA’s provide with the B500.
The COOLPIX B700 has a built-in flash which is raised mechanically by pressing a button on the left side of the body just below the flash head. Once in the raised position you can select the flash mode by pressing the top position on the multi selector four-way control wheel. The options are Auto, Auto with red-eye reduction, Fill flash, Slow sync and Rear-curtain sync. When you’ve finished using the flash you just push it back down into the closed position. The flash has a maximum distance at the wide angle lens setting, with the aperture set to f3.3, of seven metres, not at all bad though as it’s quoted with the ISO set to auto it’s not easy to make comparisons.
The B500’s flash has a quoted range of 6.9 metres, which might suggest they’re the same, but the B700’s flash is physically bigger and I wouldn’t mind betting that the B500’s flash specification is quoted at a higher ISO rating. Either way, the flash is useful for close subjects and fill-in illumination, but won’t be of much use to you with the lens zoomed in much beyond a portrait focal length of around 80-100mm equivalent.
Nikon COOLPIX B700 lens and stabilisation
The COOLPIX B700’s lens has a 60x optical range starting at 24mm and extending to 1440mm in 35 equivalent numbers. If you want to see what that looks like practice take a look at the two images below which show the coverage at either end of the range.
To put this in perspective, I took these test shots from the roof of a multi storey car park which according to Google maps is 190 metres (620ft) from the cathedral window which you can see close up in the shot on the right.
Nikon B700 coverage, wide and tele

Above left: at 4.3mm (24mm equivalent), above right: at 258mm (1440mm equivalent)
At the other end of the range the COOLPIX B700’s 24mm wide angle is wide enough to take in landscapes and will also be good for large group photos and interiors. It’s not quite as wide as the 22.5mm super-wide angle on the COOLPIX B500, but it goes a lot further at the other end. Here’s a comparison showing the 900mm equivalent on the COOLPIX B500 alongside the 1440mm equivalent of the B700 taken from the same spot.

Above left: Nikon B500 at 160mm (900mm equivalent). Above right: Nikon B700 at 258mm (1440mm equivalent)
Stabilisation is a key factor with long zooms and the COOLPIX B700 is equipped with optical image stabilisation or Vibration Reduction as Nikon calls it. There are two options, Normal and Off as well as an Active mode that irons out excessive wobbling, examples of the kinds of conditions it might be useful in, according to the manual, are ‘when shooting from a car or under poor foothold conditions’. Active mode was introduced on the earlier COOLPIX P520 and when I tested it, in normal handheld operation I found little difference between the Active and Normal settings.
Nikon B700 Photo VR off/on

Above left: 100% crop, 4.3-258mm at 258mm 200 ISO 1/50th VR off. Above right: 100% crop, 4.3-258mm at 258mm 200 ISO 1/50th VR on.
To test the COOLPIX B700’s stabilisation I set it to shutter priority exposure mode, zoomed the lens to its maximum telephoto setting and took a series of shots at progressively slower shutter speeds, first with Vibration reduction set to off and then with it on. As you can see from the crops above, the COOLPIX B700 can produce blur-free shots down to 1/50th at the maximum zoom range; that’s around five stops slower than would generally be considered safe and even more impressive than the four stops I managed with the B500. In all likelihood it’s the B700’s viewfinder that’s making the difference, providing extra stability with the camera pressed to your face.
Nikon COOLPIX B700 movie modes
The B700 offers a 4K UHD video mode at 25fps encoded at 60mb/s. There’s also 1080/50p, 1080/25p, 720/50p, and 720/25p. You can also have any of these modes at 30/60 frame rates, or 4k at 30p.
Additionally there’s a choice of HS options for playback at speeds other than real time. HS480/4x shoots 640×480 video at 4x normal speed (100 or 120fps depending on whether you have the 25/50 or 30/60 frame rate option selected) which plays back at quarter speed. HS720/2x records 1280×720 at double the normal frame rate for half speed playback, and finally 1080/0.5x records full HD video at half the normal frame rate for double-speed playback.
Movies are encoded as MPEG-4 files and saved in the same folder as photos. The limit on continuous movie recording is 29 minutes or when the file size reaches 4GB. If you’re using the 4K mode you’ll bump up against the 4GB file size limit in around ten minutes.
The COOLPIX B700 uses the full width of the sensor to record 4K and downsamples it from 5185 to 3840 pixels wide. The advantage of this approach is that there’s no cropping (at the sides at least, the top and bottom of the frame is cropped because of the different proportions of UHD video – 16:9 – compared with the native 4:3 proportions of the B700’s sensor). 1080p HD video uses a crop from the central portion of the sensor, so the angle of view narrows quite a bit. One advantage of this is that when shooting HD video it’s like having a little bit longer on the zoom range – though you lose out at the wide angle end.
The COOLPIX B700 doesn’t have a movie position on the mode dial, so recording is started by pressing the dedicated record button whatever mode you’re in. One of the drawbacks of this approach is that you can’t frame up your shot very easily as the screen switches from 4:3 proportions to 16:9 (assuming your shooting in one of the HD or iFrame modes). But there is a least a display mode that superimposes the 16:9 area on the 4:3 screen for you.
Download the original file (Registered members of Vimeo only)
Above: This clip was shot with the COOLPIX B700’s 4K UHD mode at 25fps. The quality is good, but not as detailed as you might expect and the noise from the zoom motor is a little intrusive. The stabilisation does a great job of keeping things steady when zoomed all the way in though.
Download the original file (Registered members of Vimeo only)
Above: For this second clip, also shot in 4K UHD, the camera was mounted on a tripod and the stabilisation was disabled. The COOLPIX B700 makes a pretty good job of challenging lighting conditions and the AF does well, though it goes out at the end of the zoom and takes a few seconds to recover.
Download the original file (Registered members of Vimeo only)
Above: The quality of this interior low light panning clip, shot in the B700’s 1080 / 25p mode, is quite noisy, though to be fair the light levels were very low. On the plus side the white balance is good and the colours are nicely saturated.
Download the original file (Registered members of Vimeo only)
Above: For this clip I tested the COOLPIX B700’s continuous AF performance in 1080 /25p mode by zooming the lens in slightly and panning from the beer glass on the table up to the bar and back again. As we saw in the earlier clips, the B700’s AF responds quite slowly, but it doesn’t hunt around too much and gets there in the end.
Nikon COOLPIX B700 shooting experience
The COOLPIX B700 offers a choice of six AF area modes, plus manual focus. Face priority works well when people are within a few metres of the camera in good light. If there are no faces in the frame it defaults to the nine-area AF system which it uses to focus on the subject closest to the camera. Alternatively you can manually select the focus area from one of 99 positions using the multi-selector to move the frame around a 9×11 grid, or set a central focus point. There are three manual modes, spot, normal and Wide, but in reality this is a single mode with options for the AF area size. All the same the ability to change both the size and position of the AF area is a useful thing to be be able to do and in certain situations can greatly increase your chances of getting sharp snaps.
The COOLPIX B700 also includes target finding AF. This identifies subjects (objects as well as people) in the frame when the camera is pointed at a scene. Potential subjects are identified and tracked with green rectangles. If you’re shooting people, face recognition is probably a better choice of AF modes, but target finding does seem to have an uncanny knack for picking the main subject in a scene which for some situations is a real improvement on the nine-area AF mode.
Finally, there’s a subject tracking mode which allows you to identify a subject with an AF point which then follows it around. this works well, provided your subject is well separated from the background, you’re not zoomed in a long way and the subject isn’t moving quickly or erratically. When you’re fully zoomed in, in any of the focus modes the COOLPIX B700 can be slow to focus, it can spend more than a second adjusting the focus through the entire range and sometimes you need to make more than one attempt. This is frustrating at the best of times, but when you’re fully zoomed in it can really reduce your chances of getting a sharp shot particularly with moving subjects like wildlife.

Above: 1/1000, f6.5, 100 ISO, 258mm (1440mm equivalent)
Selecting the PASM modes from the mode dial allows you to select aperture and shutter speed where appropriate using a combination of the multi-selector dial and the thumb-operated rear control dial. The multi-selector controls the aperture and the control dial the shutter speed. That means in Aperture and Shutter priority modes either one or the other is redundant, which is a shame. It would be good to be able to configure the redundant dial for exposure compensation, or even ISO sensitivity.
There are two Fn buttons which can be assigned to a range of menu items including drive mode, white balance, metering mode and ISO sensitivity. That makes up a little for the absence of a quick menu – something Nikon has never provided on its compacts – but why Nikon makes the default setting for both buttons the same is a little baffling. Why not make life a little easier for people? Especially as it takes some time (at least five minutes in my case) to find out how to re-assign the buttons. For anyone similarly lost, you press the Fn1 or Fn2 button, scroll to the bottom Fn menu item (which isn’t visible initially), then choose the menu function you want to assign to the button from the list.
In addition to the PASM modes, the B700 mode dial has positions for Auto , Scene modes, Night Landscape, Night portrait and Landscape modes, Creative mode and a position marked U which you can save your own setup to. With the mode dial in the Scene position you have a pretty wide choice of scene modes, many of which will be familiar to anyone who’s owned a point-and-shoot compact, for example Portrait, Landscape, Party, Beach, Snow, Food and Fireworks modes. Among the more interesting ones are Easy Panorama, Moon and Birdwatching scene modes.
The last two were introduced on the budget COOLPIX L840. Moon provides a selection of tint options which you can select on screen. More usefully, a small square in the middle of the frame indicates the area framed when fully zoomed in, so with the camera on a tripod you can frame the moon in the small square then press OK to automatically zoom the lens all the way in, theoretically at least. In practice, as anyone who has tried to shoot the moon will know, framing is a tricky business. That said, the new Moon scene mode may be enough to encourage first timers to have a crack at lunar photography.
Birdwatching mode offers single shot and continuous modes, the later shooting a 5 frame burst in a second. Like Moon mode, it provides a frame guide and zooms in automatically, this time to 800mm. The arbitrary limit on the focal length is a bit of an imposition though and I reckon most bird photographers will be happier just to use program auto mode and set the set the drive mode to one of the continuous options.
The Creative mode works in the same was as on the B500 taking a sequence of five images – a ‘normal’ one and four with a range of effects applied. Apart from some selective colour options the effect sets provide four variations on a theme – noir are black and white filters, Classic are strong coloured monochrome tints, Memory gives you variation on a slightly washed out cross-processed look. There are others, but to be honest I wasn’t blown away with them and found myself longing for the usual Nikon effects at least some of which offered a degree of customisation. One good thing about Creative mode though is that it does at least provide you with an unflitered JPEG alongside the filtered versions.
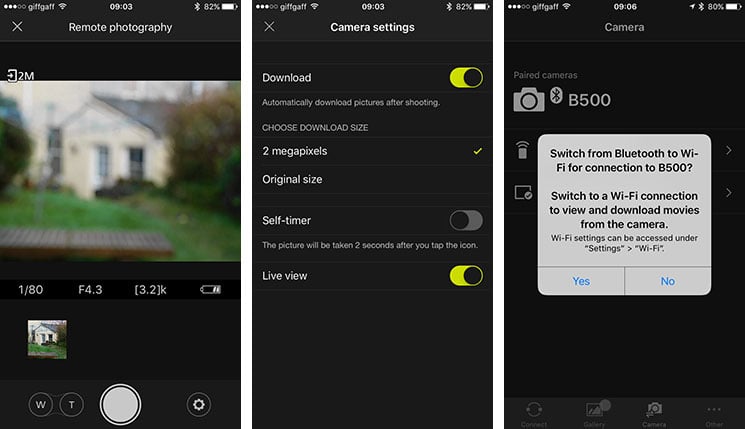
The COOLPIX B700 is one of the first Nikon super-zooms to feature its new SnapBridge technology which works with Wifi, NFC and Bluetooth to provide wireless links between the camera and your smartphone. As with earlier Wifi-equipped models you can control the camera remotely and download photos to your phone, what’s new is that you can transmit images to your phone in the background as you shoot using the low power Bluetooth connection.
Bluetooth allows the COOLPIX B700 to maintain a low-power wireless link with your smartphone at all times, allowing it to embed GPS positions or watermarks on images as you take them, while also trickling photos from the camera to phone, all without intervention – even when the camera’s switched off if desired. Bluetooth may be technically slower than Wifi, but by tagging, watermarking and or copying images without intervention, it invariably gets the job done quicker as there’s no need to pause and manually initiate the process. Of course if you prefer you can always use Wifi to transfer images manually, and the Wifi link also allows you to shoot remotely using your phone.
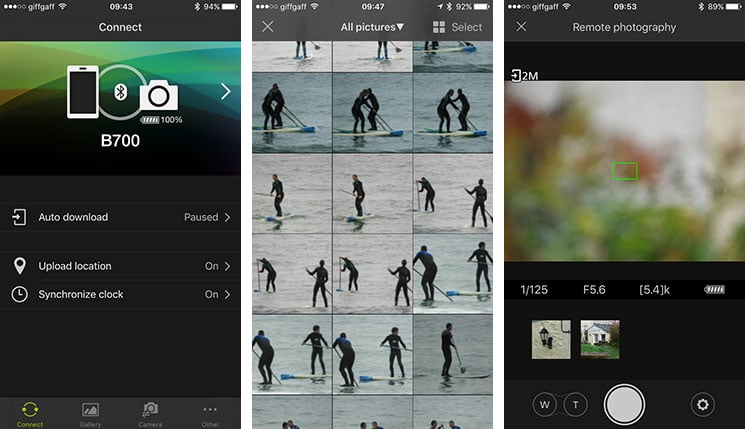
Setup is easy enough, First you install the app on your Android or Apple device, then start the pairing process with the camera. If you have an NFC-equipped Android phone you simply hold the handset against the side of the camera for a couple of seconds before both devices display passcodes for you to confirm.
I tested SnapBridge on the B700 using my iPhone 6 and the process is almost as simple – instead of making contact with the two devices the app displays the camera name, which you tap to select, it then initiates pairing with displayed passcodes for you to confirm.
Once confirmed, the phone and camera are connected by Bluetooth and you’ll never need to do it again. That is unless you have more than one Snapbridge-enabled camera. As I was testing the COOLPIX B500 and B700 together I found it necessary to unpair and forget one camera on my phone if I wanted to connect the other. This isn’t likely to be a common problem though.

Above: 1/100, f6.5, -1EV 100 ISO, 258mm (1440mm equivalent) Program Auto
I set the app to automatically download my photos as I took them, opting for the reduced 2 Megapixel size partly for speed but also to save space on my phone. If preferred you can manually select which images you’d like to copy, and there’s also the chance to transfer originals, although beware their larger file sizes will understandably take longer to copy across and also consume more storage on your phone. You can also opt to upload your photos to the Nikon Image Space service and I can see that this might be useful as a backup or if you wanted to share full-size JPEGs on from there.
Having your shots immediately accessible on your phone makes sharing to social networks about as simple as if you’d taken the shots on your phone in the first place. The only drawback is you might not want everything you shoot on your phone, but a few minutes spent culling the unwanted images easily takes care of that – and again you can choose to manually tag specific images for transfer if you don’t want all of them queued.
Time taken for 2 Megapixel images to be automatically transferred from the camera to your phone is a little variable and in my experience could be anything from a few seconds to nearly a minute, longer if there’s a queue of images to be transferred. That said, even if you’re staring at your phone screen waiting for the image to transfer, that’s not too bad and it’s more likely you’ll review a batch of photos a short while after you’ve shot them, in which case it doesn’t matter. The Bluetooth link between the camera and your phone is maintained when you switch the camera off, so any remaining downloads can complete and to save time connecting when you turn the camera back on again.
I tried using SnapBridge both ways – with the always on connection sending 2 Megapixel versions of everything I shot to my phone and manually transferring individually selected photos when I stopped for a break and got home. Personally I prefer the always on method, it’s just far simpler as it just happens without you having to think about it.
Manual transfer using the Bluetooth connection means you only get the keepers on your phone, but it involves a bit more time and effort, not least because the slow Bluetooth connection means it can take a long time to display thumbnails of all the images on the camera’s card on your phone screen, find and select the ones you want, then queue them for transfer. I’d go far as to say if you’re not using SnapBridge’s Bluetooth connection for automatic image transfer, you’re probably better off using Wifi if you want to manually transfer selected images.
In fact, when you attempt to transfer photos in this way the SnapBridge app helpfully suggests you switch to a Wifi connection for faster transfers. It then gives you a yes button which takes you to the App settings, rather than Wifi settings which isn’t particularly helpful, and switching from Bluetooth to Wifi is only one area where the Snapbridge user experience could be greatly improved without a lot of effort.
For example, to shoot remotely you also need to switch to a Wifi connection, and this isn’t made as easy as it could be. Selecting the COOLPIX B700’s SSID is easy enough, but then you’re asked for the WPA2 password. If you know where to look it’s not hard to find in the B700’s Network settings menu, but there’s no clue given and I expect this will be a stumbling block for many.
Remote shooting is basic, you can see camera’s view on your phone screen , but you can’t tap to focus and until you take a shot the blurry view isn’t much use. You can zoom the lens using touch buttons on your phone display, though it’s slow and a little clunky and you can activate a self-timer mode. It’s about as primitive as it gets, but if you simply want to set the camera up for a family portrait, or shoot some garden wildlife from the comfort of your kitchen (providing it’s in Wifi range) it’ll do the job.
Check prices on the Nikon COOLPIX B700 at Amazon, B&H, Adorama, or Wex. Alternatively get yourself a copy of my In Camera book or treat me to a coffee! Thanks!


